When you need to protect your Microsoft Word document from accidental changes or unauthorized editing, making it read-only is the perfect solution. This ensures your content stays exactly as you intended while still allowing others to view and read it.
There are several effective ways to make a Word file read-only, depending on your specific needs and the level of protection you require.
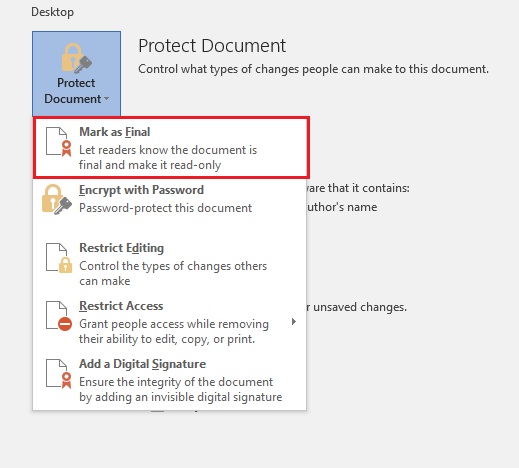
Method 1: Mark as Final
This is the quickest way to indicate that your document is complete and shouldn't be edited further.
- 1.1. Open your Word document and click File in the top-left corner
- 2.Select Info from the left sidebar
- 3.Click Protect Document
- 4.Choose Mark as Final from the dropdown menu
- 5.
 Click to expand
 - 6.A confirmation message will appear saying "This document will be marked as final and then saved"
- 7.Click OK to complete the process
- 8.
 Click to expand
When someone opens the document, they'll see a yellow bar at the top indicating it's marked as final. While this method discourages editing, users can still choose to edit anyway by clicking "Edit Anyway."
Method 2: Restrict Editing
For stronger protection, use the Restrict Editing feature to prevent changes without your permission.
- 1.1. Go to the Review tab
- 2.Click Protect and select Restrict Editing
- 3.In the right sidebar, check Allow only this type of editing in the document
- 4.Choose No changes (Read only) from the dropdown
- 5.Click Yes, Start Enforcing Protection
This method provides better security as users cannot make changes without first stopping the protection.
Method 3: Save as Read-Only Recommended
You can also set a document to open as read-only by default.
- 1.1. Click File and select Save As
- 2.Click Tools next to the Save button
- 3.Choose General Options
- 4.Check the box for Read-only recommended
- 5.Click OK and save your document
Now when someone opens the file, Word will suggest opening it as read-only, though they can still choose to edit if needed.
When to Use Each Method
- Mark as Final: Best for informal documents where you just want to indicate completion
- Restrict Editing: Ideal for important documents that need stronger protection
- Read-Only Recommended: Good for documents you share frequently where you want to encourage read-only access
Remember that read-only protection in Word is designed to prevent accidental changes rather than provide absolute security. For highly sensitive documents, consider using password protection or encryption for stronger security.