Your NETGEAR router shows power, but the Wi-Fi network disappears, rejects devices, or connects without Internet. Start with the fixes that restore the home network, then move into router settings that control radios, broadcast, device blocks, and firmware. Use the steps in this order so you do not reset the router before the faster repairs are done.
1. Restart the network from the Internet source
When every device is offline, restart the modem and router in NETGEAR's recommended order. This targets no Internet, an amber Internet LED, and failed setup before you change Wi-Fi settings.
- 1.Turn off or shut down all devices connected to the router network.
- 2.If you use a cable or DSL modem with a backup battery, remove the battery.
- 3.Wait 2 minutes.
- 4.Turn on the modem first, then wait about 5 minutes for the ISP connection.
- 5.Turn on the NETGEAR router.
- 6.Turn your wired and wireless devices back on.
For a router-only reboot, press Power On/Off, wait 30 seconds, then press Power On/Off again. If the router has no power button, unplug it, wait 10 seconds, and plug it back in.
You can also reboot from the router interface. Open www.routerlogin.net on a connected device, sign in, then select Advanced > Reboot. On Nighthawk Pro Gaming routers, select the three dots in the top right corner, then select Reboot.
2. Turn on a missing NETGEAR Wi-Fi signal
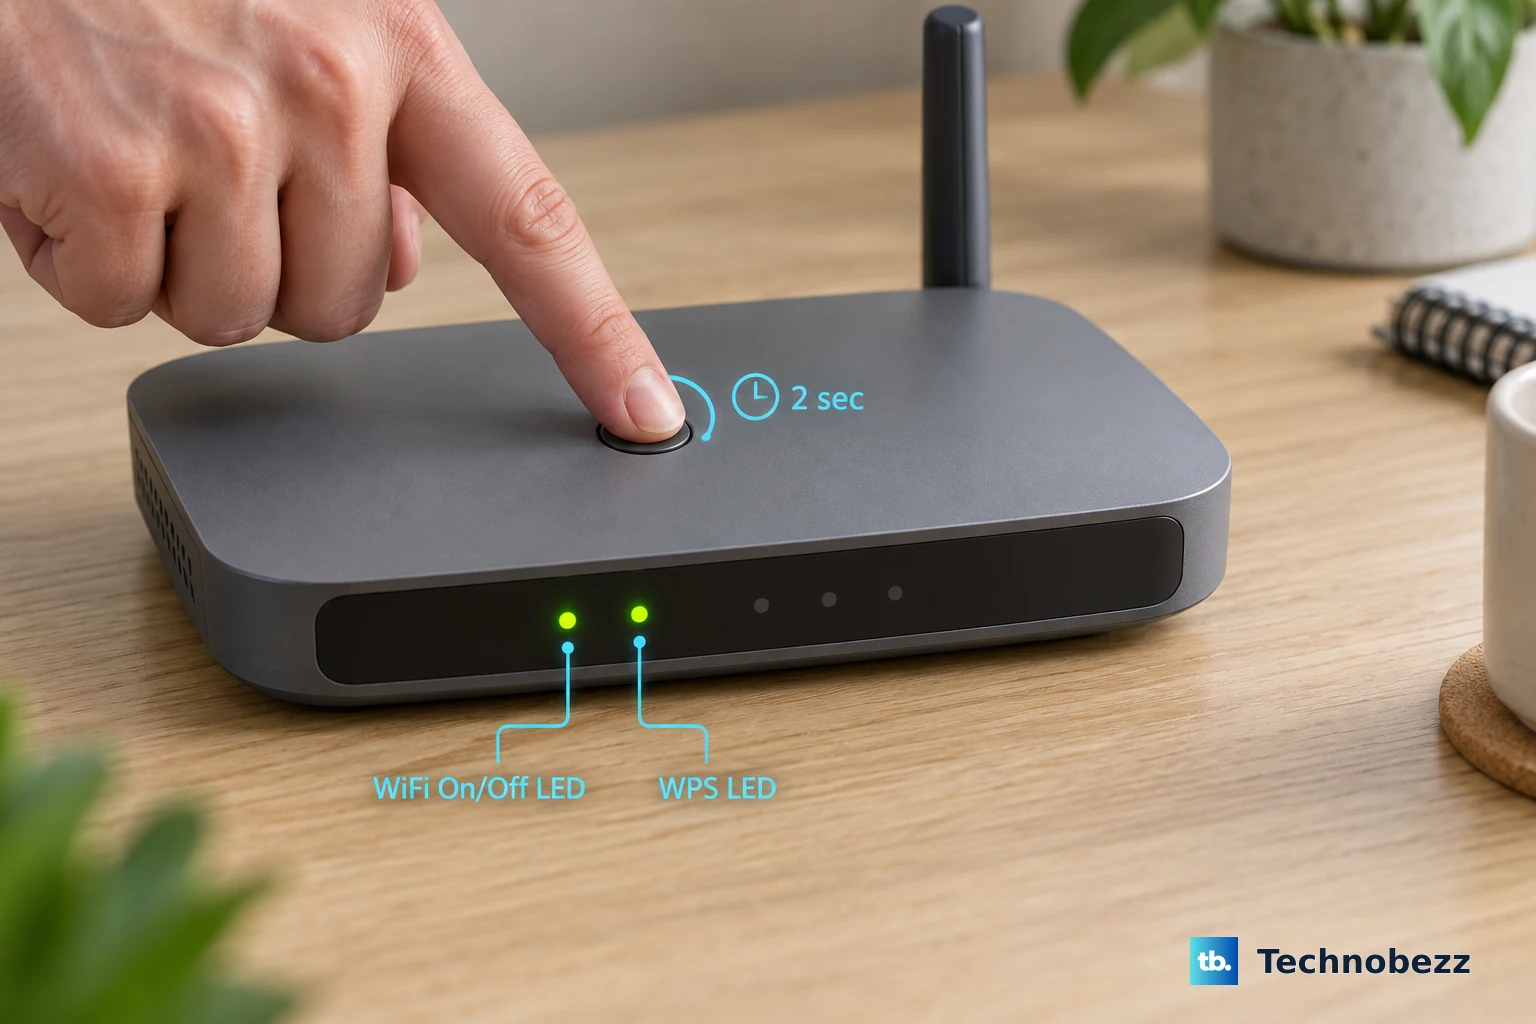
If the Wi-Fi name vanished from every phone and laptop, check the router radios first. On NETGEAR routers with a physical Wi-Fi switch, the button controls the radios directly.
Find the router WiFi On/Off button. Press WiFi On/Off for two seconds, then confirm that the WiFi On/Off LED and WPS LED turn on.
Use the hardware button first, because NETGEAR says Wi-Fi turned off with that button must be turned back on with the button. If the hardware button did not disable Wi-Fi, open http://www.routerlogin.net, sign in, then go to ADVANCED > Advanced Setup > Wireless settings. Choose the affected band, select Enable Wireless Router Radio, then select Apply.
3. Reveal the network name and reconnect
A working NETGEAR network stays invisible when SSID broadcast is off. Open www.routerlogin.net, sign in, select Wireless, select Enable SSID Broadcast, then select Apply. On Nighthawk Pro Gaming routers, use Settings > Wireless Setup.
If the Wi-Fi password or name changed, update the router record in the Nighthawk app by tapping WiFi Settings, tapping the Wi-Fi network, entering the Wi-Fi name and password, then tapping Save. On Windows 11, open Settings > Network & internet > Wi-Fi > Manage known networks, select the NETGEAR network, choose Forget, then reconnect.
On iPhone or iPad, open Settings > Wi-Fi, turn on Wi-Fi, tap the NETGEAR network, enter the password, and check for the blue checkmark. On Android, open Settings > Network & internet > Internet, tap the NETGEAR network, and enter the password when prompted.
4. Check the Internet port when Wi-Fi connects
Use this check when devices join Wi-Fi but websites do not load, because it shows the router's WAN status. Open routerlogin.net, sign in, then go to Administration > Router Status, and check the IP address shown for the Internet port.
If the Internet port shows 0.0.0.0, power-cycle the modem and router again. After that, verify the ISP-required connection settings on the router, including PPPoE login, host name, DNS, or MAC address settings.
5. Remove device blocks and pause controls
When one phone, laptop, TV, or console is offline while the rest of the home works, check NETGEAR's device controls. A device block, pause rule, or parental control profile cuts off Internet access without turning off Wi-Fi for everyone.
Access Control: open https://www.routerlogin.net or https://www.routerlogin.com, sign in, then go to ADVANCED > Security > Access Control. If the device is already blocked, open the blocked-device list, select the device, click Allow, then click Apply. Use Allow all new devices to connect only to allow future new devices by default.
Nighthawk app pause: connect your phone to the router Wi-Fi, open the Nighthawk app, enter the router admin password, tap SIGN IN, tap Device List, then use the Pause/Resume slider for the affected device.
Smart Parental Controls: open the Orbi app or Nighthawk app, tap Device Manager, swipe right on the device, then tap the pause or play icon. To resume every device, tap Parental Controls, select Home, then tap the pause or play icon at the top right.
6. Adjust schedules, channels, and Smart Connect
A wireless schedule turns the NETGEAR signal off at set times. Wireless schedule: sign in to the router web interface and open ADVANCED > Advanced Setup > Wireless Settings. Clear Turn off wireless signal by schedule, or remove or adjust the scheduled period, then select Apply.
Channel changes target dropped connections, slow transfers, or interference. Channel changes: open http://www.routerlogin.net, sign in, select Wireless, choose the affected band, select a channel number from Channel, then select Apply. For 6 GHz Wi-Fi 6E and Wi-Fi 7 routers, choose a Preferred Scanning Channel when changing the 6 GHz channel.
Smart Connect uses one Wi-Fi name across bands. Smart Connect: open www.routerlogin.net, sign in, select Wireless, select or clear Enable Smart Connect, then choose Apply. Some models use Settings > Setup > Wireless Setup.
7. Update the router firmware
Run firmware updates after the restart, radio, broadcast, and block checks. NETGEAR recommends firmware updates for performance, feature, and security fixes.
Connect your phone to the router Wi-Fi, then open the Nighthawk app. Log in to MyNETGEAR when prompted, and enter the router admin user name and password.
Tap the image of your router. Scroll down and tap CHECK FOR UPDATES. If new firmware is available, tap UPDATE.
From a browser, open routerlogin.net, sign in, choose ADVANCED > Administration or Settings > Administration, open Firmware Update or Router Update, select Check, then choose Yes or Upgrade.
8. Reset the router as the final repair
A factory reset erases custom settings. Use it when the admin password or settings are unrecoverable, or when the fixes above fail to restore Wi-Fi.
Confirm that the router Power light is on. Find Restore Factory Settings or Reset on the back of the router. Use a paper clip or similar object to press and hold Restore Factory Settings or Reset for seven seconds.
Release the button and wait for the router to reset. Then sign in with user name admin and password password, then set up Wi-Fi again.
After the reset, reconnect through the Nighthawk app setup path or the router label. Connect the router Internet port to the modem or incoming Ethernet line, attach antennas when provided, connect power, then use the default Wi-Fi name and network key printed on the router QR code label or the back or bottom label.
Use the current Nighthawk app for supported products, or use routerlogin.net from a browser. Do not use third-party Nighthawk for PC downloads. NETGEAR Genie is a legacy path for older products that are not supported by Nighthawk or Orbi.
Frequently Asked Questions
Why is my NETGEAR router Wi-Fi not showing up?
The Wi-Fi radios are off, the physical WiFi On/Off button disabled them, or SSID broadcast is off. Turn Wi-Fi back on with the router button first, then enable SSID Broadcast in the router web interface.
What does Internet port 0.0.0.0 mean on a NETGEAR router?
It means the router does not have a valid Internet-side IP address. Power-cycle the modem and router, then check the ISP-required PPPoE login, host name, DNS, or MAC address settings.
Can I use WPS to connect to NETGEAR Wi-Fi?
Yes, when the router and device support WPS. Press the router WPS button, then use the device's WPS option within two minutes. NETGEAR warns that nearby devices can connect during that window.
Should I use NETGEAR Genie to fix a Nighthawk router?
Use the Nighthawk app or routerlogin.net for current supported products. NETGEAR Genie is no longer receiving feature updates and is only for older products where Nighthawk or Orbi support is unavailable.