Mac Internet Recovery often fails before macOS loads, leaving you at a spinning globe, a warning globe, an error code, or a reinstall screen that never finishes. The quickest fix is to match the Recovery method to your Mac, then clear the network, security, disk, and installer blockers in that order. Use the steps below to get Recovery working again or move to Apple’s supported reinstall alternatives.
1. Choose the correct Recovery startup method
Match the Recovery method to the Mac first: Apple silicon and Intel Macs use different startup paths, and Apple silicon does not use the Intel Internet Recovery key combinations.
On a Mac with Apple silicon, shut down the Mac.
Press and hold the power button until Loading startup options or the Options icon appears.
Click Options, then click Continue.
If prompted, select the startup disk, click Next, select an administrator account, click Next, enter the password, then click Continue.
On an Intel-based Mac, shut down first. Press and release the power button, then immediately hold Option + Command + R to start Internet Recovery and install the latest macOS compatible with that Mac. Use Shift + Option + Command + R only when you need the macOS version that came with the Mac, or the closest version still available.
2. Make the startup keys register
Shut down the Mac completely.
Press and release the power button.
Immediately hold Command + R, Option + Command + R, or Shift + Option + Command + R.
On a Mac laptop, use the built-in keyboard.
With an external keyboard, wait a few seconds after pressing the power button, then hold the keys.
Plug in a wireless keyboard, try a wired keyboard, or switch to a Mac keyboard instead of a PC keyboard.
If an Intel Mac ignores the Recovery shortcut, keyboard timing is the first thing to fix. The same keyboard rules apply before an Intel NVRAM reset with Option + Command + P + R.
3. Connect Recovery to the internet
Recovery needs a working connection before it downloads macOS. In macOS Recovery, click the Wi-Fi menu in the upper-right corner, choose Turn Wi-Fi On, select your network, and enter the password. For a hidden network, choose Join Other Network, enter the network name, and enter the password.
If the spinning globe changes to a warning globe, or you see -2001F, -2002F, or -2003F, switch to the connection itself.
Connect a network cable instead of Wi-Fi, try another network, try the Intel Recovery key combinations again, then retry later if the network or Apple’s Recovery service is unavailable.
On a home router, restart the router, install the latest firmware from the router maker, and use WPA3 Personal or WPA2/WPA3 Transitional security.
4. Clean up networking from macOS first
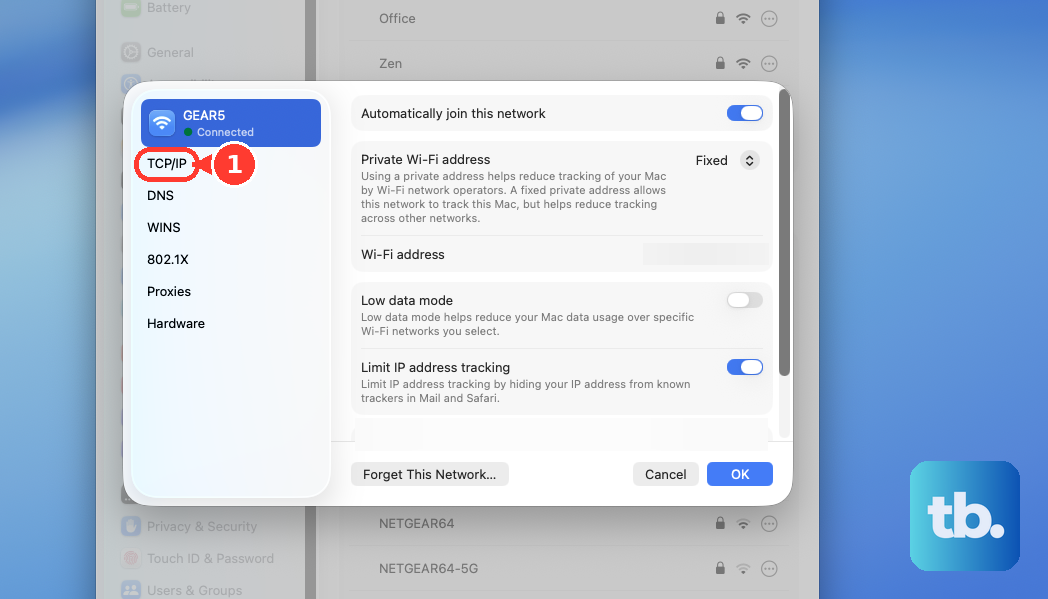
Open Apple menu > System Settings > Network.
Click the network service, then click Details.
Click TCP/IP, click Renew DHCP Lease, then click OK.
For Wi-Fi quality checks, quit open apps, join the Wi-Fi network, hold Option, click the Wi-Fi status menu, then choose Open Wireless Diagnostics.
Follow the onscreen instructions and review the Summary pane’s Info buttons.
When the Mac still boots normally, repair the network from macOS before returning to Recovery. If VPN or third-party security software monitors network connections, disconnect the VPN, disable the network-filtering component, or remove the software using the vendor’s instructions. Then test internet access and retry Recovery.
5. Clear -1008F and Activation Lock
Error -1008F has a specific Apple-supported fix on Intel Macs: shut down, then start Internet Recovery with Option + Command + R instead of Command + R or Shift + Option + Command + R.
When Activation Lock blocks recovery, turn off Find My Mac temporarily. In macOS, open Apple menu > System Settings > [your name] > iCloud > See All or Show More Apps > Find My Mac, turn it off, and enter your Apple Account password. Turn Find My Mac back on after Recovery works.
For an offline Mac, go to iCloud Find Devices, sign in to your Apple Account, select the Mac, then click Remove.
6. Remove Intel startup blockers
For a Boot Camp Mac set to start from Microsoft Windows, set Startup Disk preferences to start from macOS, shut down, then retry macOS Recovery or Internet Recovery.
For a firmware password, start macOS Recovery, choose Utilities > Startup Security Utility, authenticate, click Turn Off Firmware Password, enter the password, click Turn Off Password, quit Startup Security Utility, then retry the startup keys.
For an Intel NVRAM reset, shut down, turn on the Mac, immediately hold Option + Command + P + R for about 20 seconds, then retry Recovery. Skip this on Apple silicon.
For uncommon power, thermal, or hardware behavior, reset SMC on Intel. On an Intel desktop, shut down, unplug power for 15 seconds, plug it back in, wait 5 seconds, then press the power button.
Intel Macs have a few extra blockers that stop Recovery shortcuts from behaving normally. Do not use Command + S single-user mode as a modern Recovery fix. Apple lists single-user mode as disabled in macOS Mojave or later.
Do not use NetBoot-style network startup as a current consumer replacement for Internet Recovery on modern Macs; use macOS Recovery, Intel Internet Recovery, a bootable installer, an external startup disk, or firmware revive and restore.
7. Repair the startup disk
A damaged startup disk can break the reinstall after the internet connection succeeds.
Start up from macOS Recovery.
Select Disk Utility, then click Continue.
Choose View > Show All Devices.
Select the last volume under the startup disk.
Click First Aid, then click Run or Repair Disk.
Repeat upward for each volume, container, and finally the device.
Quit Disk Utility, then choose Apple menu > Restart.
If Disk Utility cannot repair the disk, back up first, then erase and reinstall macOS. Apple directs Apple silicon and Intel T2 Macs to Erase your Mac or Erase All Content and Settings. Intel Macs without the T2 chip can use Recovery Disk Utility, erase the volume as APFS, click Erase Volume Group, click Done, quit Disk Utility, then click Reinstall macOS.
8. Install macOS another supported way
Connect a USB flash drive or secondary volume.
Rename it MyVolume.
Open Terminal from Applications > Utilities.
Run Apple’s createinstallmedia command for the macOS version you downloaded.
Enter the administrator password, confirm erasing the volume, wait for Terminal to say the install media is available, then eject it.
Start the affected Mac from that installer.
When Internet Recovery still cannot download or install macOS, use Apple’s official macOS installer source on another compatible Mac. Download the full macOS installer from Apple. For App Store downloads, use Safari if the links do not work, click Get, and leave the installer in the Applications folder.
On a Mac with Apple silicon, the affected Mac still needs an internet connection when it starts from the bootable installer, so the installer can get firmware and other information specific to that Mac model. A bootable installer is not a fully offline workaround: if Recovery failed because of no usable network, a captive portal, or a proxy or firewall blocking the connection, fix that first or use another working network.
For an Intel Mac with the Apple T2 Security Chip, allow external boot media first. Start up from macOS Recovery, open Utilities > Startup Security Utility, authenticate with Enter macOS Password, choose Allow booting from external or removable media, quit the utility, then start from the USB installer.
You can also install macOS onto an external storage device and use it as the startup disk. Format the device as APFS for macOS High Sierra or later, install macOS to that device, click Show All Disks when the installer asks where to install, then select that device as the startup disk.
9. Revive firmware before you restore
Use firmware revive for a Mac with Apple silicon or a Mac with the Apple T2 Security Chip when it starts to an exclamation point in a circle, stays on a blank screen after other fixes, shows a firmware recovery indicator, or keeps failing during macOS installation. You need another Mac of any model running macOS 14 or later, connected to power and to the internet, with enough free storage to download the revive or restore data (32GB is more than enough), and a USB-C to USB-C cable that supports data and charging - do not use a Thunderbolt 3 cable, which is not supported even though it also fits the USB-C port.
- 1.Connect the affected Mac to the host Mac through its DFU port.
- 2.Enter DFU mode using Apple’s model-specific key sequence.
- 3.In the host Mac’s Finder DFU window, click Revive Mac, then click Continue.
- 4.Keep the host Mac awake until the process finishes.
If revive fails, use Restore Mac in the same DFU window, then click Restore and Update. Restore erases the affected Mac and returns it to factory settings. On networks using a proxy or firewall, allow traffic to Apple’s network 17.0.0.0/8; for managed networks, have the network administrator handle that access.
Frequently Asked Questions
Why does Mac Internet Recovery show a globe with an exclamation point?
Apple ties that warning to internet connectivity or recovery-service availability. Use Ethernet instead of Wi-Fi, try another network, try the Intel recovery key combinations again, or retry later.
Does Apple silicon have Internet Recovery key commands?
No. Apple silicon Macs enter Recovery by holding the power button until startup options appear, then choosing Options. Option-Command-R and Shift-Option-Command-R are for Intel Macs.
Should I reset NVRAM or SMC first?
No. Start with the correct Recovery startup method and network fixes. NVRAM reset applies only to Intel Macs, and SMC reset is mainly for uncommon power, thermal, or hardware behavior.
Will restoring Mac firmware erase my data?
Revive Mac is the first firmware repair step. Restore Mac erases the affected Mac and returns it to factory settings.