

To do a hanging indent on Google Docs, select your entries and click Format, then Align & indent, then Indentation options. Choose Hanging under Special indent, type 0.5 in the box next to it and click Apply. The first line of each entry stays at the margin and every line after it moves in half an inch, the layout a Works Cited or References page needs.
Two results surprised us when we tested this in Google Docs. The size box next to Hanging stayed empty until we typed a number, and the list Google's own citation tool built lost its hanging indent when we downloaded the file for Word.
The short version
- Select the entries, then Format > Align & indent > Indentation options. Set Special indent to Hanging, type 0.5 and click Apply.
- Use 0.5 inch for MLA and APA. If your box measures in centimetres, that is 1.27.
- On the ruler, drag the triangle to 0.5, then drag the small rectangle back to 0.
- If an entry starts half an inch in instead of at the margin, press Ctrl + Shift + P to show the line breaks that join your entries.
- Google documents the hanging indent for Docs on a computer. Its help for the phone and tablet apps shows Increase indent and Decrease indent buttons, but no hanging indent setting.
Hanging indent methods at a glance
| Method | Where it works | What you do | What you get |
|---|---|---|---|
| Indentation options | Google Docs on a computer | Format > Align & indent > Indentation options, Hanging, type 0.5, Apply | An exact hanging indent of the size you type |
| Ruler | Google Docs on a computer | Drag the triangle to 0.5, then the rectangle back to 0 | The same indent, set by dragging |
| Citation tool | Google Docs on a computer | Tools > Citations, add sources, then Insert works cited or Insert references | A headed, double-spaced list with a 0.5 inch hanging indent |
| Alt + / (Option + / on a Mac) | Google Docs on a computer | Type indentation and press Enter | The Indentation options box without the menus |
| Ctrl + ] (⌘ + ] on a Mac) | A computer, or a phone or tablet with a keyboard | One press | The whole paragraph moves in, so not a hanging indent |
| Google Docs app | iPhone, iPad and Android | Format, then the indent buttons | Indent buttons, with no hanging indent setting in Google's app steps |
| Shift + Enter, then Tab | Google Docs on a computer | A line break and a tab on each wrapped line | A look-alike that breaks when the text re-wraps |
Indentation options is the one to learn, because it gives an exact size and works on any number of entries at once. The ruler suits a quick change by eye, and the citation tool is the fastest route if it supports your style.
Make a hanging indent with Indentation options
Select every entry you want to indent, from the first letter of the first one to the end of the last. For a single paragraph, a click anywhere inside it is enough. Leave the Works Cited or References heading out of the selection.
Click Format in the menu bar, point to Align & indent and choose Indentation options at the bottom of the submenu. The same submenu lists Increase indent and Decrease indent, but those move whole paragraphs and are not what you want here.
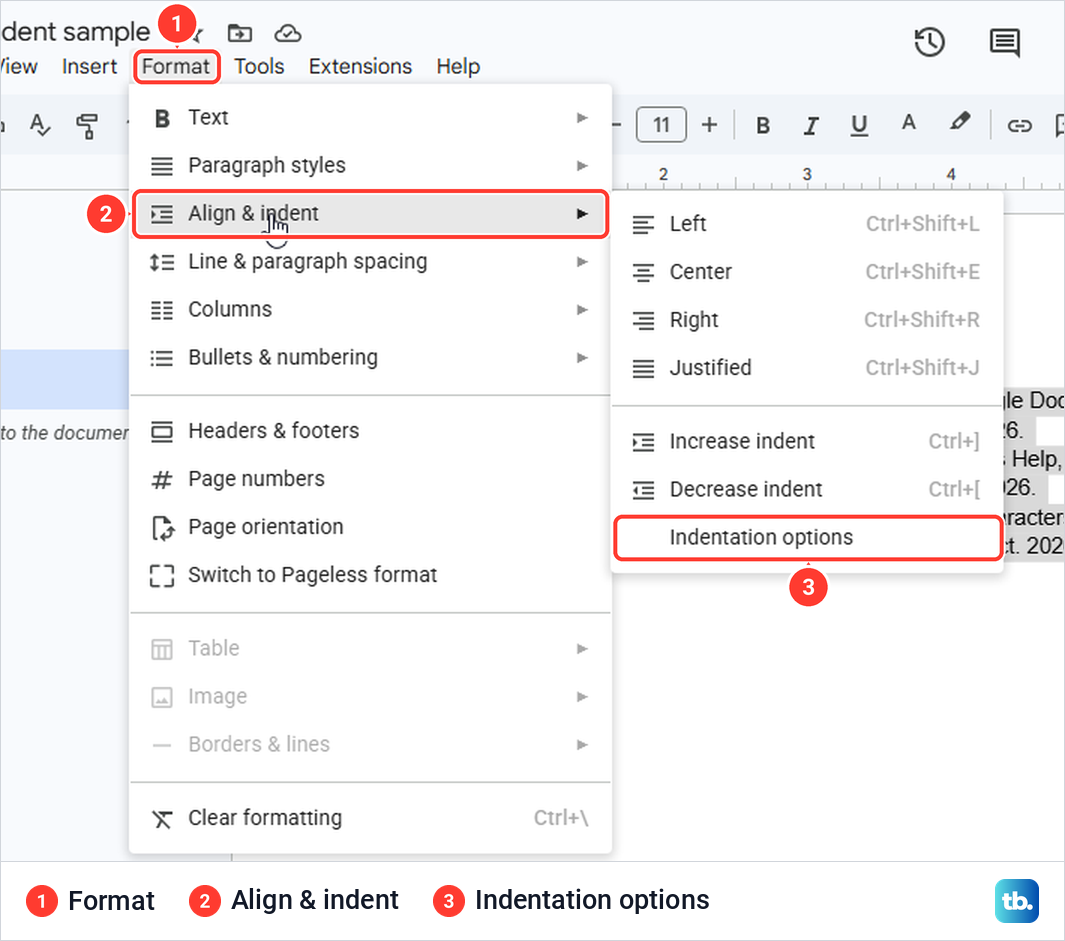
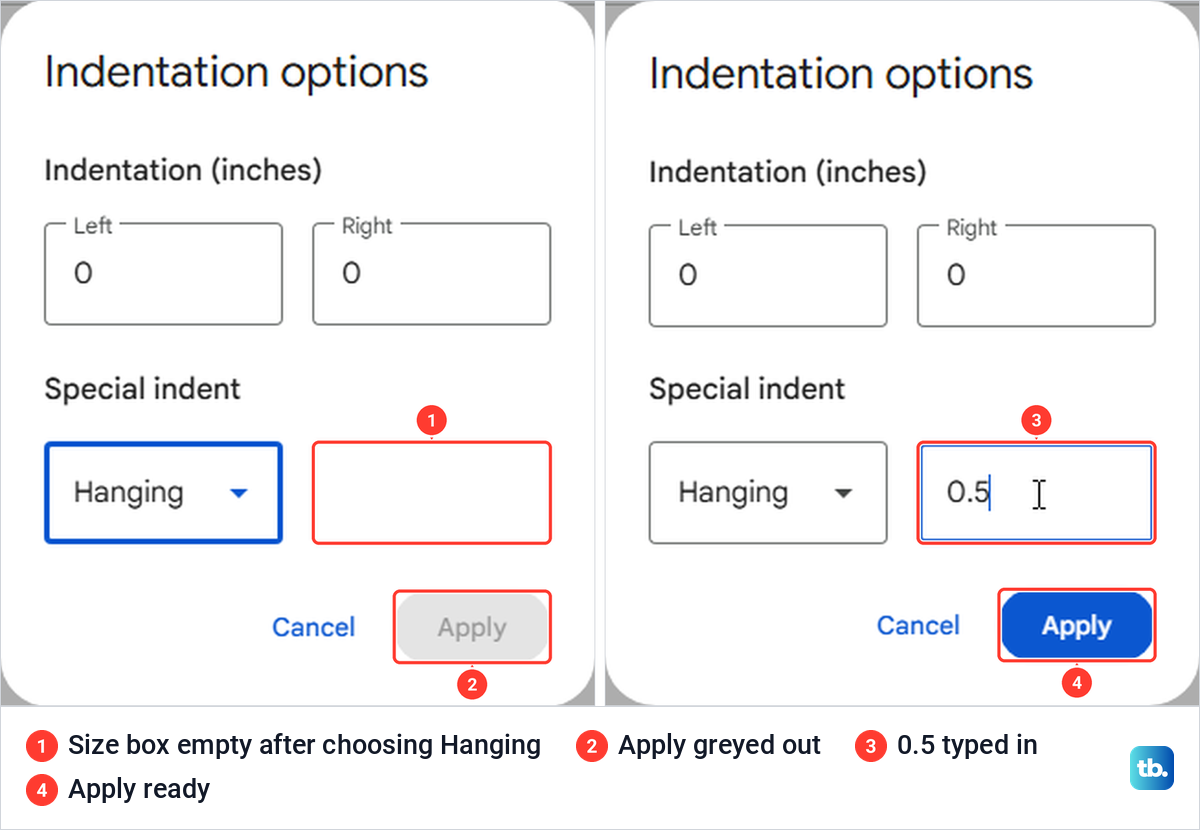
The box opens under the heading Indentation (inches), with Left and Right set to 0 and Special indent set to None. Open the Special indent list and choose Hanging. The other two choices are None and First line.
On our PC, a size box appeared next to Hanging, but it was empty and Apply stayed grey. Type 0.5 in that box and Apply turns blue. Click it.
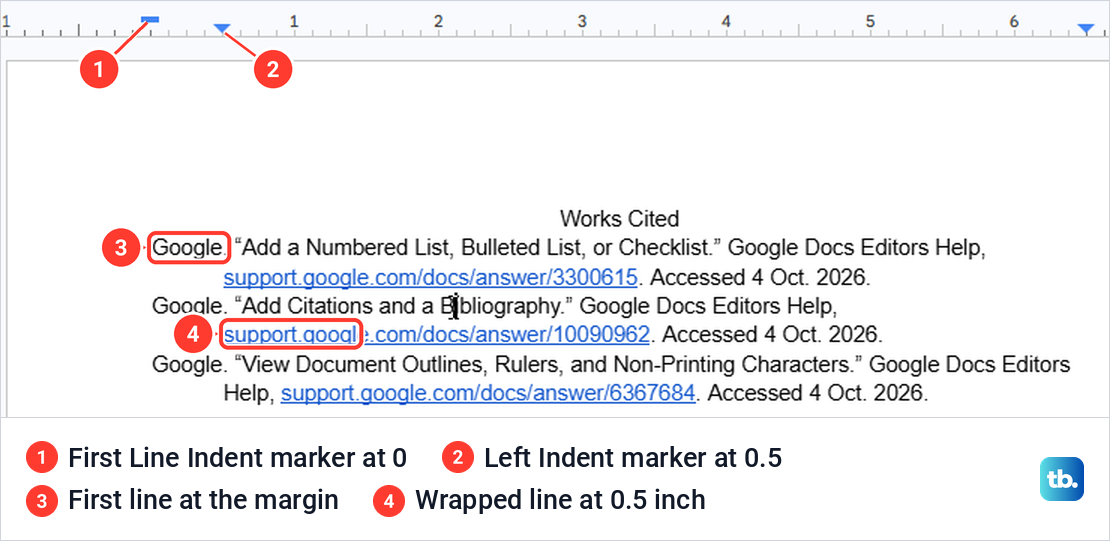
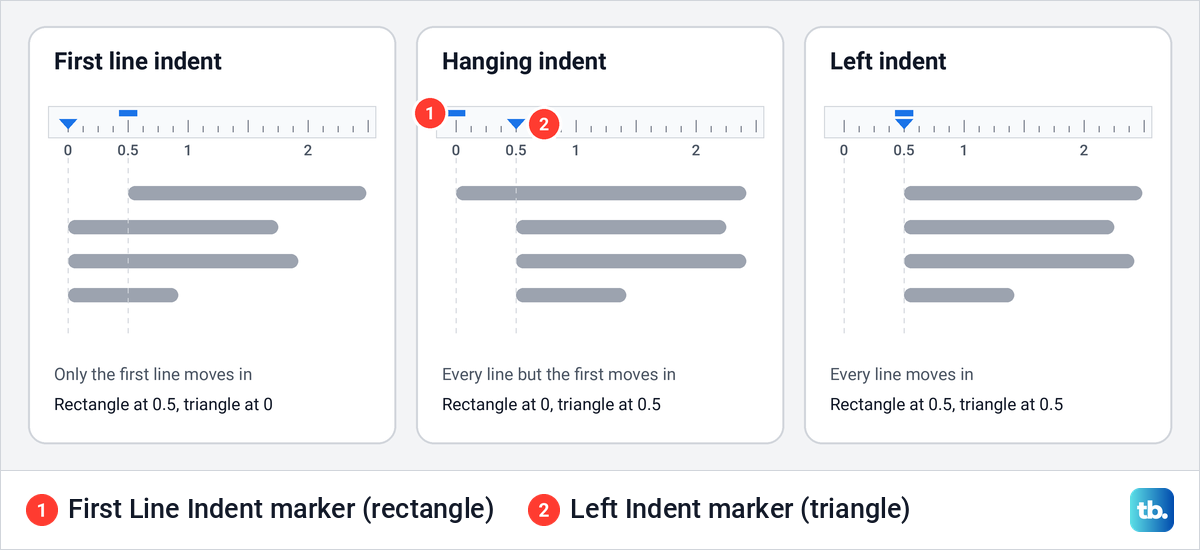
Each entry's first line now starts at the margin and every wrapped line starts half an inch in. With the cursor inside an entry, the ruler shows the result: a small rectangle sits at 0 and a triangle at 0.5. Hover over them and Docs names them First Line Indent and Left Indent.
Prefer the keyboard? Press Alt + / (Option + / on a Mac) to open Tool finder, the menu search, type indentation and press Enter. That opened the same box for us, already showing the values of the paragraph the cursor was in.
Check the numbers if the result looks wrong. In the Docs box, Left is where the first line starts, so a standard hanging indent reads Left 0 and Hanging 0.5. If yours also shows Left 0.5, the whole entry has been pushed in, which is exactly what one press of Increase indent did on our PC.
Make a hanging indent with the ruler
The ruler sits above the page and was showing when we opened the document. If yours is missing, click View and select Show ruler. Google says the ruler is only available in Docs on a computer.
At its left end are two markers, one above the other. The small rectangle is the First Line Indent and the triangle under it is the Left Indent. Select your entries, then drag the triangle right. The rectangle comes with it, and a tooltip shows the position as you drag, so let go when it reads 0.50.
At that point every line has moved in, which is a plain left indent. Now drag only the rectangle back to the margin, until its tooltip reads 0.00. The triangle stays where it is, and the entries hang.
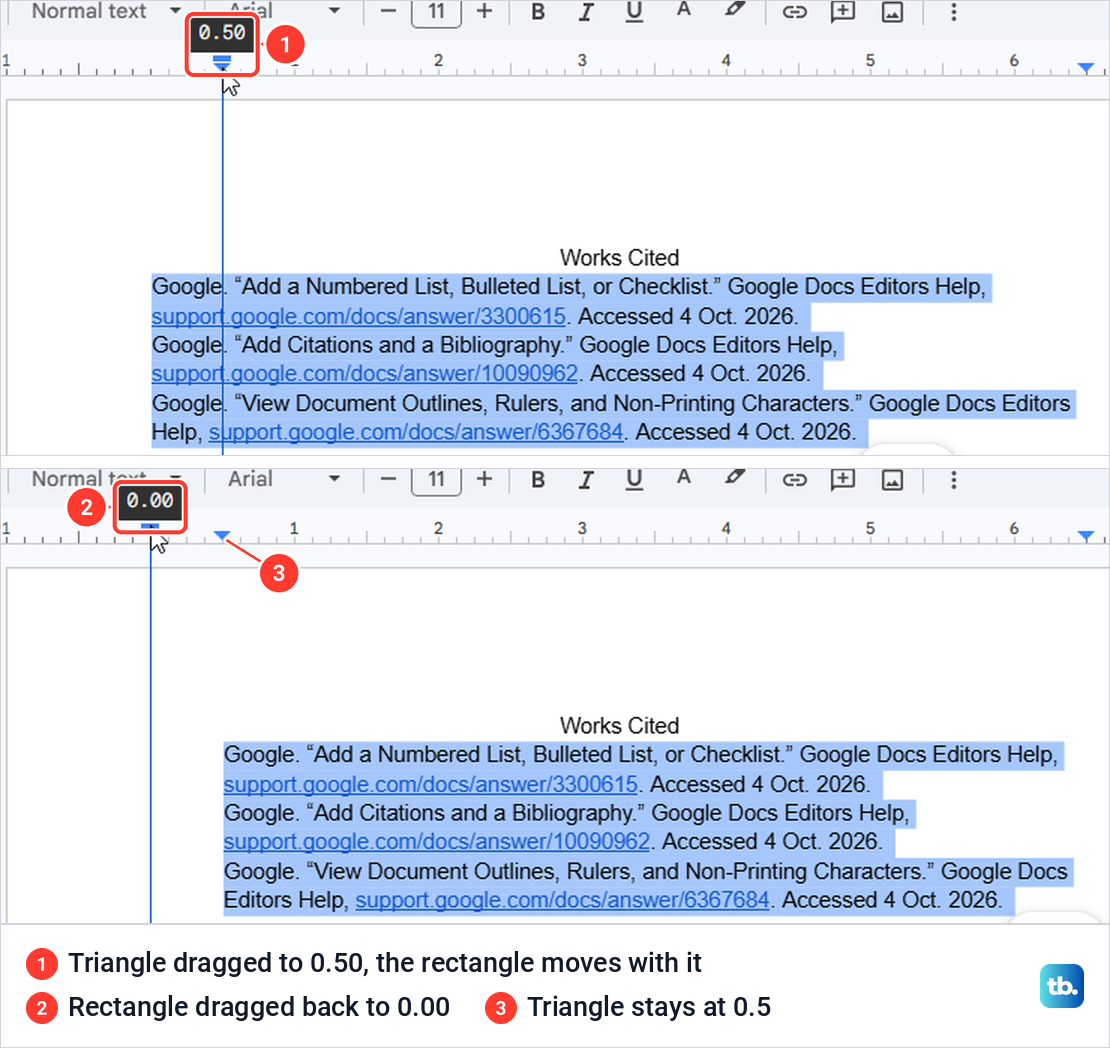
When we opened Indentation options afterwards, it read Hanging 0.5, exactly what the menu route gives. The drag was easy to land at normal zoom because the tooltip reads to two decimals.
The two markers sit in a different place for each kind of indent. If you drag the rectangle alone to 0.5, you get a first-line indent instead, the opposite of what a reference list needs.
The 0 on the ruler is the left page margin, not the edge of the paper. Margins belong to the page rather than the paragraph, and you set them separately when you change margins in Google Docs.
Format a whole Works Cited or References page
Select all the entries at once and apply the hanging indent in one go, leaving the heading out. Each entry has to be its own paragraph, so press Enter between entries and never Shift + Enter. The section on wrong lines below shows what happens otherwise.
New entries pick the format up by themselves. When we pressed Enter at the end of a hanging entry and typed the next citation, it hung straight away. To slot in a source mid-list, press Enter at the end of the entry before it.
Google's citation tool double-spaced every list it inserted for us. To match that by hand, select the entries, open Format > Line & paragraph spacing and choose Double, or see how to double space in Google Docs for a whole paper.
Bulleted lists already hang. When we started one, Docs put the bullet at 0.25 inch and the text at 0.5, and Indentation options read Left 0.25 with Hanging 0.25. That built-in hang is why wrapped lines in bullet points in Google Docs line up under the text.
Hanging indent size for MLA and APA
Use 0.5 inch. The MLA calls 0.5 inches "the standard spacing that the MLA recommends" for works-cited entries, and APA's formatting guidelines say "Reference list entries should have a hanging indent of 0.5 in." Google's citation tool used the same 0.5 inch for its Chicago Author-Date list.
Our box read Indentation (inches), and File > Page setup showed the margins in inches too. Docs did not convert units for us. Typing 1.27 cm, with or without the space, turned the box red with Special indent must be numeric and kept Apply grey.
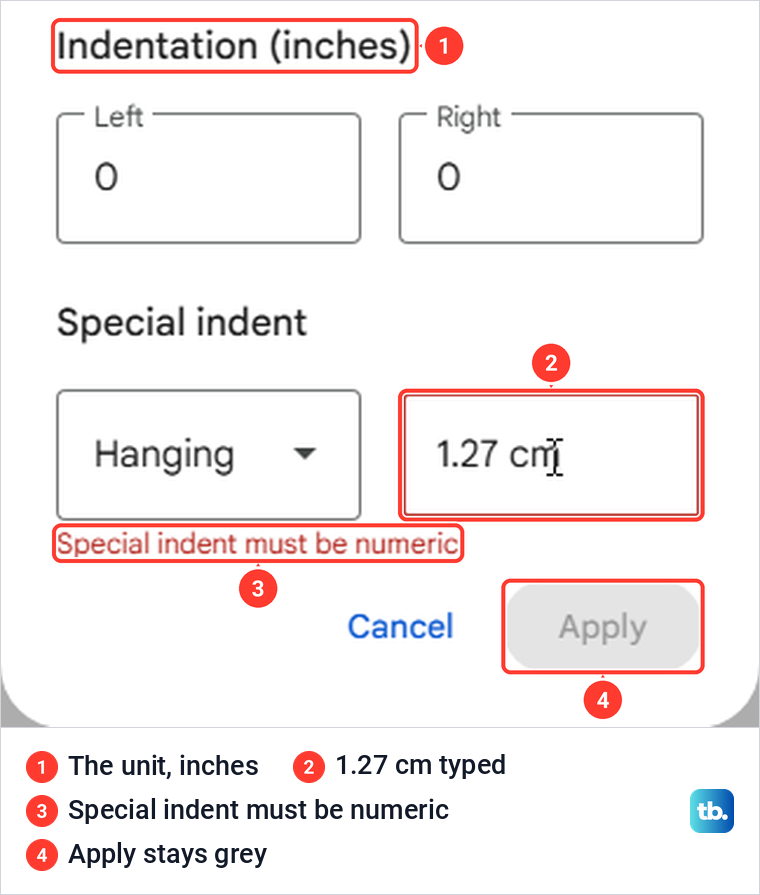
A bare 1.27 was accepted, but in an inch box that means 1.27 inches, more than double the size you want. So read the heading of the box before you type. If it says inches, type 0.5, and if it measures in centimetres, type 1.27.
Let the citation tool build the list
Google Docs can write the whole list for you. Click Tools > Citations and a Citations panel opens on the right, set to MLA (8th ed.) on our screen. Its style list also offers APA (7th ed.) and Chicago Author-Date (17th ed.), and Google says the tool works only in Docs on a computer. The style list names the edition each style follows, and Chicago's own site now answers from its 18th edition, so check the entries against the edition your teacher asks for.
Click Add citation source, pick a source type such as Website or Book, and fill in the form. Google says you can search for websites by URL and for books by ISBN. If the search finds nothing, Cite manually lets you type the author, title, site and dates instead.
Put the cursor where the list should go, then click the button at the bottom of the panel. Google's help calls it Insert bibliography. On our screen it read Insert works cited with MLA selected and Insert references with APA or Chicago.
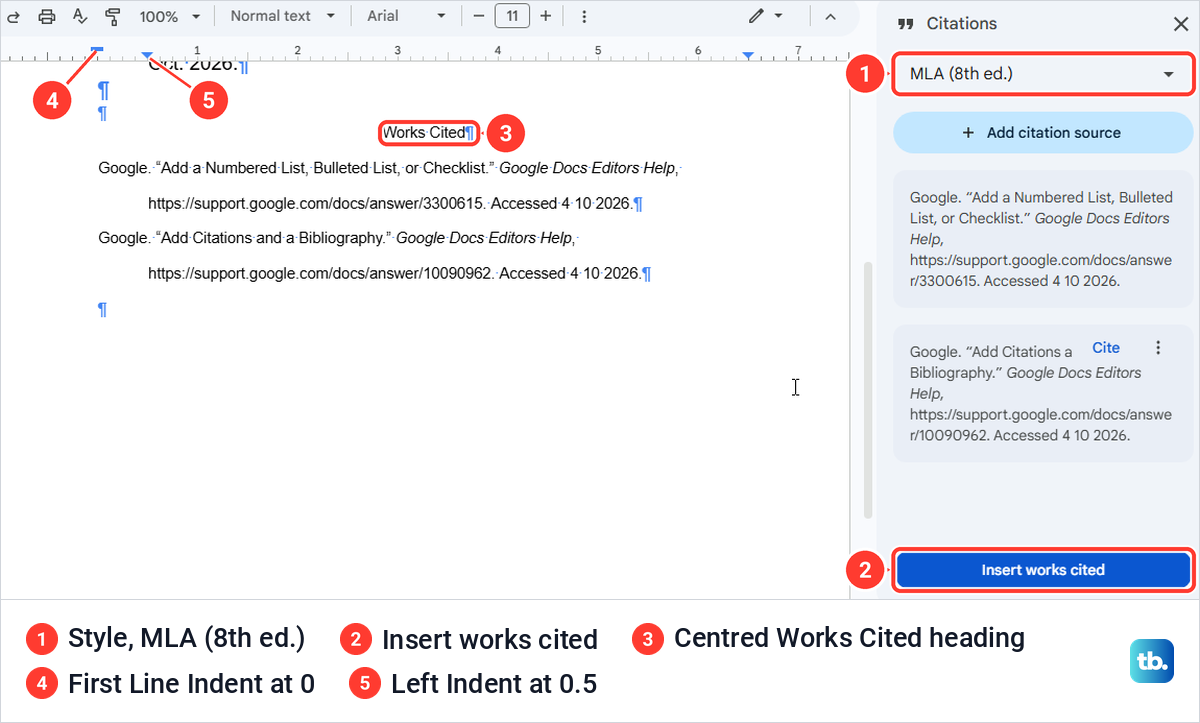
What it inserted is the useful part. The MLA list came with a centred Works Cited heading, double spacing and a 0.5 inch hanging indent, which Indentation options confirmed. APA gave a bold, centred References heading and Chicago Author-Date a plain one, both with the same indent and spacing.
There are two catches. Switching the style in the panel changed the source cards but not the list already in the document, so insert the list again after a switch and delete the old one. The tool also covers Chicago's author-date style only, so for the notes and bibliography style, insert footnotes in Google Docs and write the list yourself.
Google notes that the heading and other text the tool adds appear in English whatever language Docs is set to, and that you can translate them after inserting. To give it a heading style or change how it looks, see how to add a heading in Google Docs.
Hanging indent in the Google Docs app on iPhone, iPad and Android
Google's help describes the hanging indent for Docs on a computer only. The Android, iPhone and iPad versions of the same help article have no hanging indent steps, and Google says rulers and the citation tool need a computer too. On a phone or tablet, Google says to edit in the Google Docs app.
What Google documents in the app is the Increase indent and Decrease indent buttons, shown in its list steps. In Google's Android steps you tap Edit, tap Format, pick a list type and use Increase indent or Decrease indent at the bottom, and on iPhone and iPad the same buttons sit under Format, then Paragraph. With a keyboard attached, Google lists Ctrl + ] on Android and ⌘ + ] on iPhone and iPad, which move the whole paragraph.
The practical route is to set the hanging indent once in Docs on a computer. A reader on Google's help forum who had hanging indents in a document on an iPad asked how to remove them, and a volunteer suggested Format, Text, Normal text, or Clear formatting. For ordinary indents and list levels on a phone, see our guide to indenting in the Google Docs app.
When the hanging indent catches the wrong lines
A hanging indent works paragraph by paragraph. If two entries are joined by a line break, made with Shift + Enter, Docs treats them as one paragraph. The second entry then starts half an inch in, like a wrapped line of the first.
To see what is going on, open View > Show non-printing characters, or press Ctrl + Shift + P. Docs then marks the end of each paragraph with a blue ¶, each line break with a blue return arrow and each space with a dot.
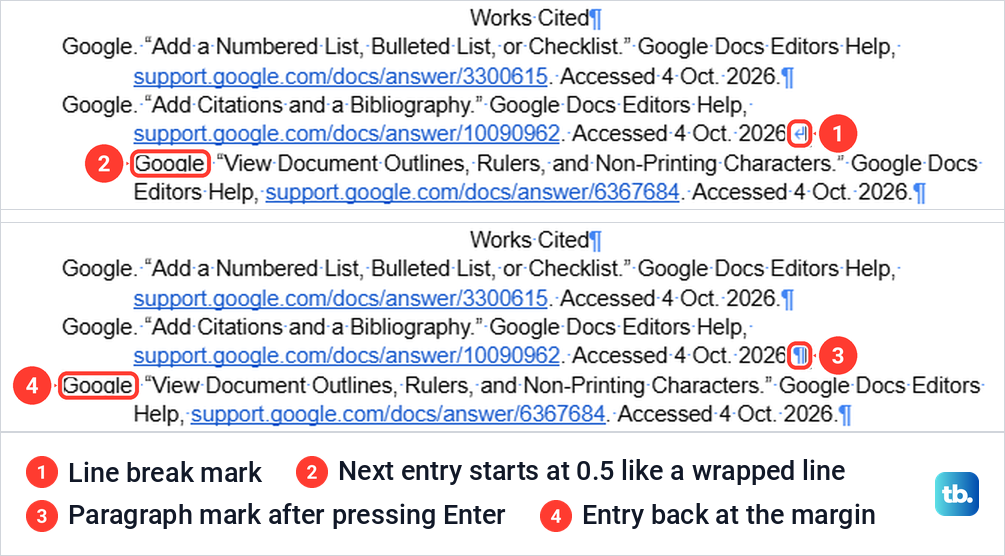
The fix needed no new formatting on our PC. Click just after the return arrow, press Backspace to delete the line break, then press Enter. The entry jumped back to the margin and hung like the others. Show non-printing characters stays ticked in the View menu while the marks are on, so select it again to hide them.
Why Tab, spaces and shortcuts are not a hanging indent
Google Docs has no hanging indent shortcut. Google's full shortcut list has none, and the indent keys it does list, Ctrl + ] and Ctrl + [ (⌘ + ] and ⌘ + [ on a Mac), move the whole paragraph. When we pressed Ctrl + ] in a hanging entry, its first line moved to 0.5 and its wrapped line to 1 inch, and Ctrl + [ put it back.
The common workaround is a line break where the first line wraps, then Tab. We made that fake next to a real hanging indent, and at 11 point the two looked the same. Then we changed both to 14 point.
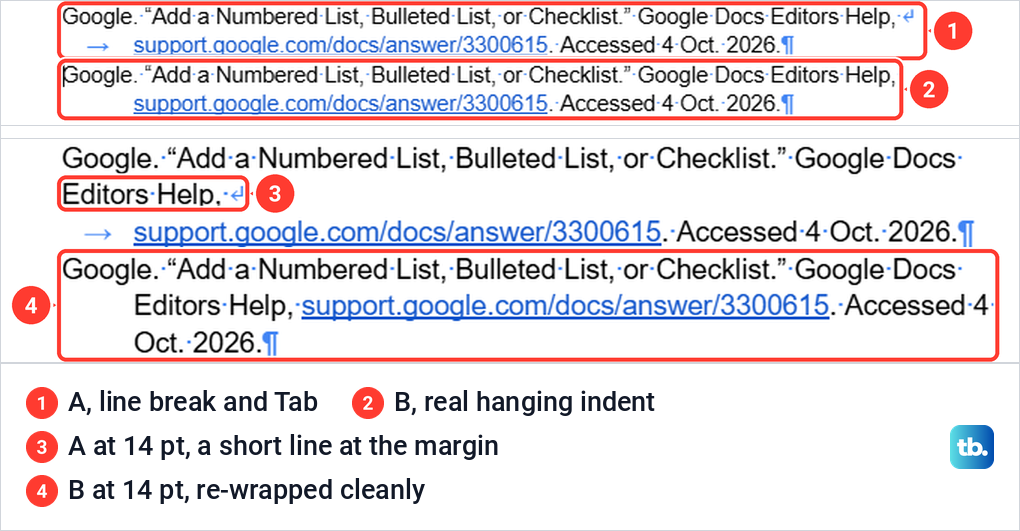
The fake left a short line at the margin with a tabbed line under it, while the real one re-wrapped cleanly. Anything that re-wraps the text does the same, because the break stays where you typed it. Spaces are no better, and APA's guidelines say not to use the space bar for indentation at all.
Tab on its own depends on where the cursor is. At the very start of a paragraph, it gave us a first-line indent of 0.5 inch, the opposite of a hanging indent, and Backspace removed it. After a line break in the middle of a paragraph, it typed a real tab character instead.
Copy the hanging indent to more paragraphs
Paint format is the quickest way to copy it. Click inside a hanging entry, click the paint roller in the toolbar, then click the paragraph that should match. On our PC it copied the hanging indent and the double spacing in one go.
Google's Copy text formatting and Paste text formatting keys did the same job. We pressed Ctrl + Alt + C in the hanging entry, clicked in the other paragraph and pressed Ctrl + Alt + V, and Google lists ⌘ + Option + C and ⌘ + Option + V for a Mac. If you build reference lists often, finish one page and create a template in Google Docs from it.
Change or remove a hanging indent
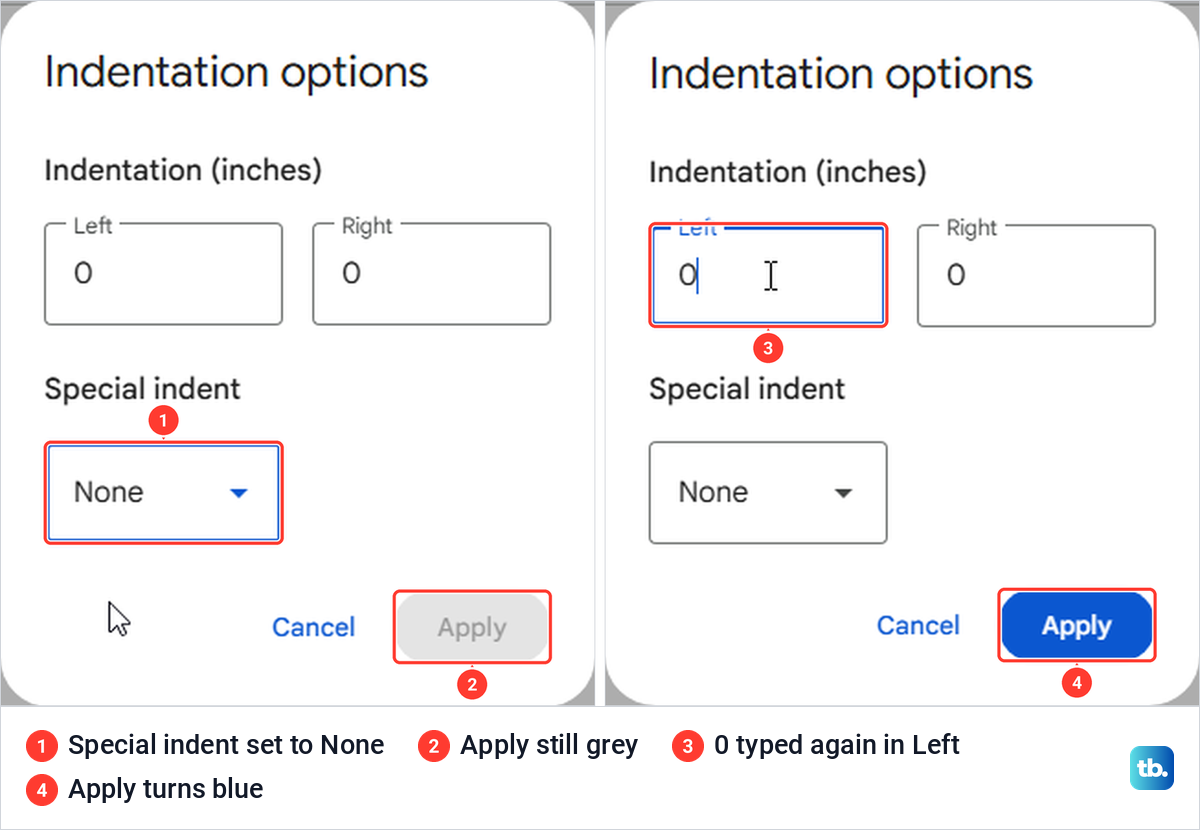
To change the size, select the entries, open Indentation options and type a new number next to Hanging. To remove it, choose None under Special indent. If Apply stays grey, as it did on our PC, click in the Left box, type 0 again and then click Apply.
Choosing None alone left Apply grey for us, and two clicks on the grey button did nothing. Once we had typed 0 in Left, Apply turned blue and the entries went back to the margin on every line.
Two faster routes worked too. Select the whole entry and press Ctrl + \ (⌘ + \ on a Mac) to clear its formatting, but note that with only the cursor in the entry, nothing changed. Google lists this key as Clear text formatting, so check any italic titles afterwards, or use Indentation options on entries that have them.
Ctrl + Alt + 0, the shortcut shown for Apply 'Normal text', also removed the indent. Clicking that same item in the Format menu did nothing on a paragraph that was already Normal text, so use the keys.
Keep the indent when you download Word or PDF
File > Download offers Microsoft Word, PDF, OpenDocument, plain text, rich text, a zipped web page, EPUB and Markdown. We downloaded our sample as a PDF and as a Word file, and the two did not agree.
In the PDF, every hanging indent survived, including the list the citation tool inserted. In Word for Microsoft 365, an entry we had indented with Indentation options arrived as Special Hanging, By 0.5 inch. The citation tool's entries did not: Word showed them as Left 0.5 inch with Special set to (none), so both lines of each entry sat half an inch in.
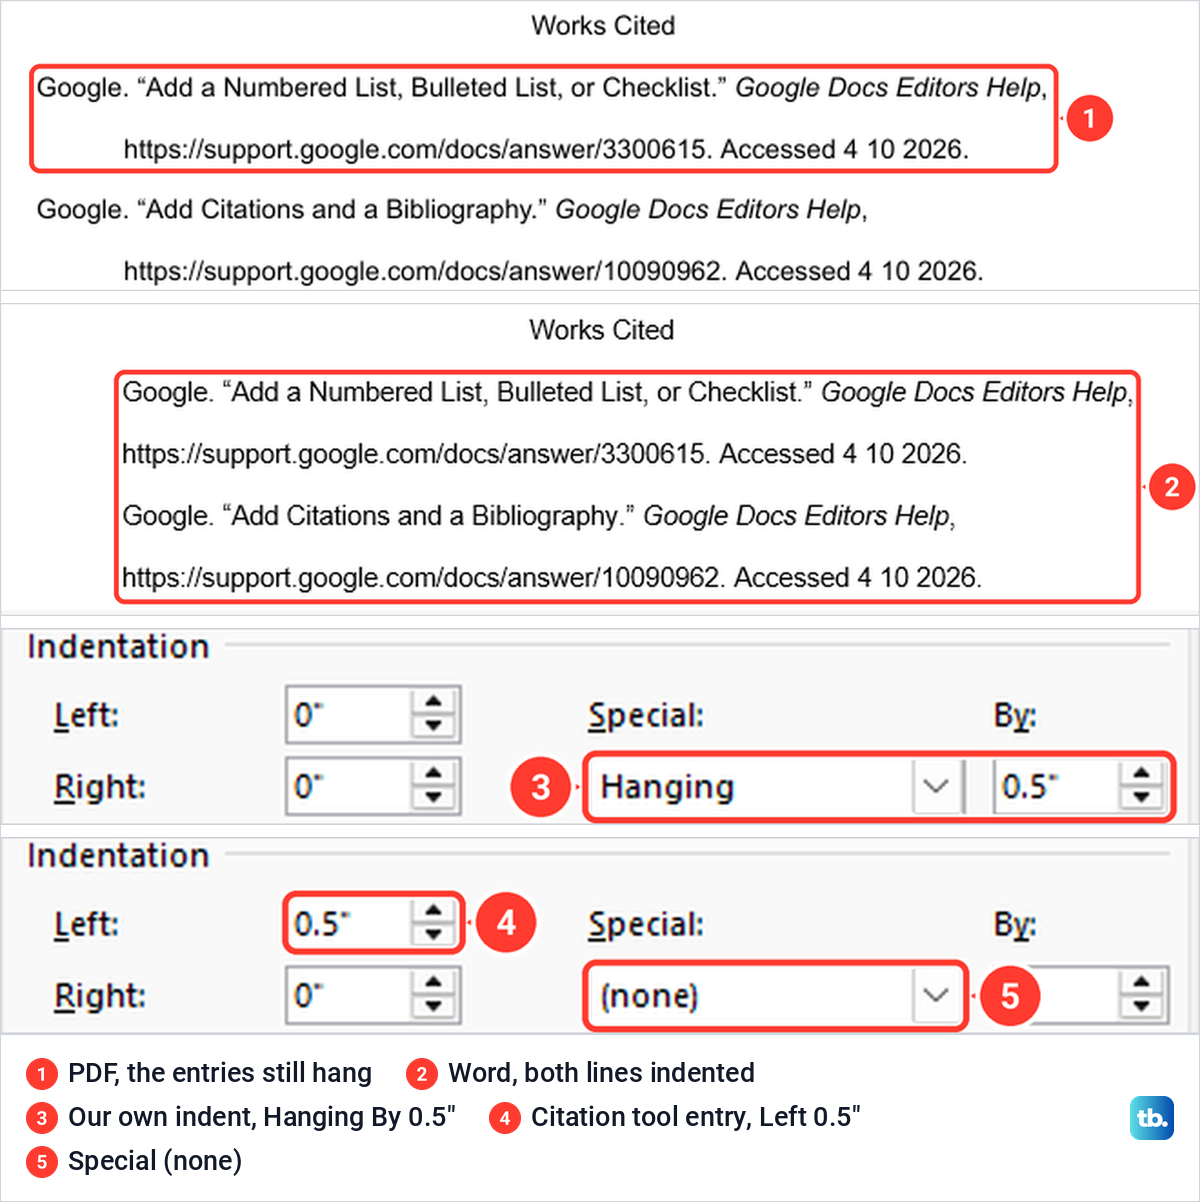
If you hand in a PDF, you are set. If you must submit a Word file, open it and check the list first: select the citation tool's entries, open the Paragraph dialog (in Word for Windows, press Alt, then H, P, G), set Left to 0 and set Special to Hanging, By 0.5 inch. Word opened our download in Protected View, so click Enable Editing before you change anything.
How we tested this guide
We tested this in Google Docs in Microsoft Edge on Windows 11, version 25H2, making hanging indents on a sample Works Cited list.
Frequently Asked Questions
Is there a keyboard shortcut for a hanging indent in Google Docs?
No. Google's shortcut list has no hanging indent key, and Ctrl + ] (⌘ + ] on a Mac) moves the whole paragraph in. Use Indentation options or the ruler, or press Alt + / and type indentation to reach the box quickly.
How big should a hanging indent be for MLA and APA?
Half an inch for both. Type 0.5 in the box next to Hanging, or 1.27 if your box measures in centimetres.
Can you do a hanging indent in the Google Docs app on an iPhone, iPad or Android?
Google documents the hanging indent, the ruler and the citation tool for Docs on a computer only. Google's help for the app shows Increase indent and Decrease indent buttons but no hanging indent setting, so set the hanging indent on a computer.
Why does my hanging indent only work on some entries?
Your entries are probably joined by line breaks, so Docs treats them as one paragraph. Press Ctrl + Shift + P to show the marks, delete each return arrow and press Enter instead.
How do I get rid of a hanging indent?
Select the entries, open Indentation options, choose None and click Apply. If Apply stays grey, type 0 again in the Left box first, then click Apply.
Does the Google Docs citation tool add the hanging indent for you?
Yes. The lists it inserted for us in MLA, APA and Chicago Author-Date all had a 0.5 inch hanging indent and double spacing. The indent was lost when we downloaded the file for Word, though, so check it there.
How do I do a hanging indent in Google Slides?
Slides keeps the setting in a different place, under Format > Format options > Text fitting, then Special indent. Our guide to a hanging indent in Google Slides walks through it.