To change the time on your MacBook, open the Apple menu > System Settings > General > Date & Time, turn off the option to set time and date automatically, click Set, enter your date and time, then click Set again. These controls apply to macOS Golden Gate 27, Tahoe 26, and Sequoia 15. Automatic synchronization, time zones, and clock appearance have separate controls.
The short version
- Manual changes: Turn off the option to set time and date automatically, then use Set to enter your date and time.
- Automatic time: Connect to the internet and turn on the option to set time and date automatically.
- Time zone: Enable location-based selection or turn it off and enter a city in Closest city.
- Clock appearance: Use 24-hour time, regional settings, or Clock Options to change the display.
| Task | Control or location | What it changes |
|---|---|---|
| Set the clock manually | Date & Time > Set | System date and time |
| Synchronize automatically | Option to set time and date automatically | System clock using network time |
| Choose a time server | Network server Set button | Source of automatic time |
| Select a zone automatically | Set time zone automatically using your current location | System time zone |
| Select a zone manually | Closest city | System time zone |
| Restore location access | Location Services > System Services | Automatic zone selection permissions |
| Restart after corrections | Restart your Mac | Completes Apple's troubleshooting sequence |
| Switch time notation | 24-hour time | 12-hour or 24-hour display |
| Change regional formats | Language & Region | Date and calendar formatting |
| Customize the menu clock on macOS 26 and 27 | Menu Bar > Clock Options | Menu-bar appearance |
| Customize the menu clock on macOS 15 | Control Center > Clock Options | Menu-bar appearance |
| Hear time announcements | Announce the time | Spoken clock output |
| Open settings with the keyboard | Command + Space | Access through Spotlight |
| Find settings by searching | System Settings search | Access to clock controls |
| Operate controls by voice | Accessibility > Voice Control | How you use the interface |
| Set the clock in Terminal | systemsetup date and time commands | System date and time |
| Configure network time in Terminal | systemsetup network time commands | Server and synchronization |
| Set a zone in Terminal | systemsetup time-zone commands | System time zone |
| Change a managed Mac remotely | Send UNIX Command | Remote system clock settings |
| Get Apple Remote Desktop | App Store | Administrator software for remote changes |
| Install time settings through a profile | Device Management | Managed server and time zone |
| Inspect or remove a time profile | Device Management | Installed configuration |
| Change World Clock cities | Clock > View > World Clock | Clocks shown in the app |
| Change a widget city | Edit “Clock” | Widget time zone |
| Change Calendar time zones | Turn on time zone support | Calendar view or individual event |
| Use iCloud Calendar time zones | Formats & Time Zone | Web calendar event settings |
| Change a reminder's schedule | Edit Details > Date & Time | Individual reminder |
Set the date and time manually
Open the Apple menu, choose System Settings, then select General > Date & Time. Turn off the option to set time and date automatically. Click Set beside the date and time, enter the values you want, and click Set again.
Keep automatic synchronization off while you use your manually chosen values. You can also reach these controls by opening System Settings, entering Date & Time in its search field, and clicking the matching result.
To operate the interface by voice, open System Settings > Accessibility > Voice Control and turn on Voice Control. Open General > Date & Time, say “Show numbers,” then say “Click” followed by the desired control's number.
Keep the clock updated automatically
Connect your MacBook to the internet, then open System Settings > General > Date & Time. Turn on the option to set time and date automatically to synchronize the system date and time. Your Mac needs an internet connection for synchronization.
Automatic time and automatic time-zone selection are separate settings. If you also want the zone to follow your location, enable Set time zone automatically using your current location. That option needs Location Services enabled.
Choose the correct time zone
To select a zone yourself, open System Settings > General > Date & Time. Turn off Set time zone automatically using your current location, enter a city in the desired zone in Closest city, then press Return. You can choose the zone manually while keeping automatic date and time synchronization enabled.
To return to location-based selection, turn Set time zone automatically using your current location back on. If the selected zone remains wrong, check location permissions using the next steps.
Fix automatic time that stays wrong
Make sure your MacBook is connected to the internet, then open System Settings > Privacy & Security > Location Services. Turn on Location Services, scroll to System Services, and click Details. Enable the settings for time zone and system customization.
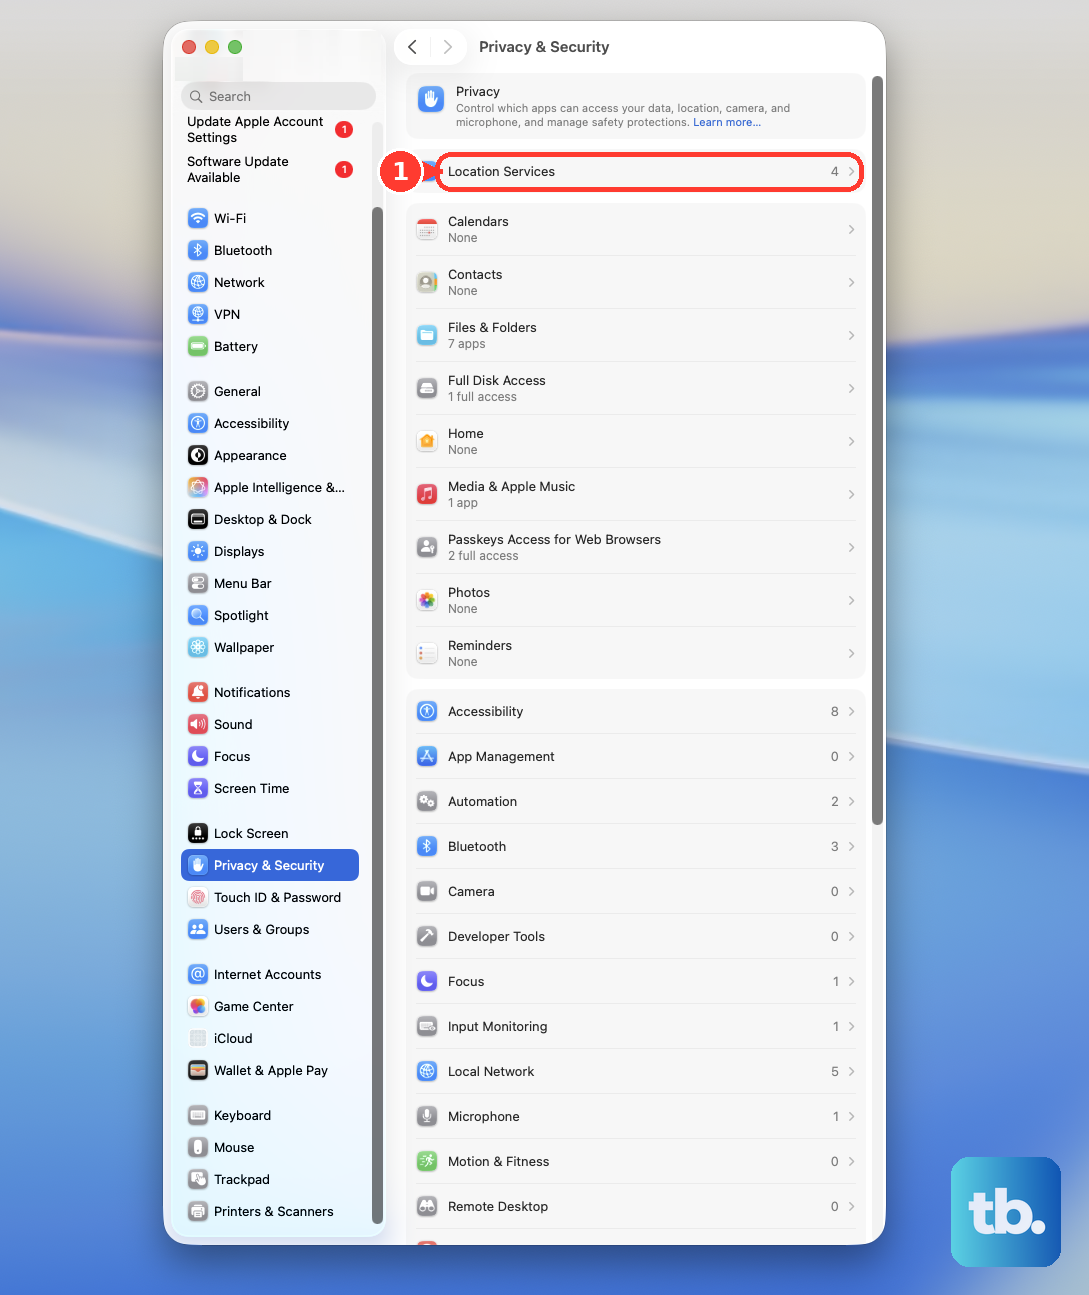
Return to General > Date & Time and enable both the option to set time and date automatically and Set time zone automatically using your current location. Apple says to restart after correcting these settings, so restart your MacBook or Mac. If automatic adjustment still leaves the clock incorrect, use the manual date, time, and time-zone controls.
If a configuration profile supplies time settings, open System Settings > General > Device Management and double-click the profile to inspect it. To remove a removable profile, select it and click Remove; contact your administrator if removal is unavailable. Apple says removing a time-server profile does not restore the previous settings, so correct Date & Time afterward.
Change the clock and date display
For 12-hour or 24-hour notation, open System Settings > General > Date & Time. Turn 24-hour time on for a 24-hour display or off for a 12-hour display. This changes the format without setting a different time.
For regional formatting, open System Settings > General > Language & Region. Choose Region for regional defaults, then use Date format, Calendar, and First day of week for individual adjustments. These choices affect displays on your Mac and in participating apps.
On macOS Tahoe 26 and Golden Gate 27, open System Settings > Menu Bar, then find Clock Options under Menu Bar Controls. On Sequoia 15, open System Settings > Control Center, find Clock under Menu Bar Only, and click Clock Options. These controls customize the menu-bar date and clock.
On macOS 26 and 27, set Show date to When Space Allows, Always, or Never. You can also change Show the day of the week and the clock's Style. Other controls include Show AM/PM, Flash the time separators, and Display the time with seconds. Choosing Analog makes those remaining time-display options unavailable.
Change time settings in Terminal
You can use Apple's systemsetup commands if you have administrator privileges. Open Terminal and authenticate as an administrator when prompted. To set the clock manually, run these commands in order, replacing mm:dd:yy with your date and hh:mm:ss with your time in 24-hour notation:
sudo systemsetup -setusingnetworktime off
sudo systemsetup -setdate mm:dd:yy
sudo systemsetup -settime hh:mm:ss
To configure automatic network time, set the server and then enable synchronization. Run the following commands, substituting another server address if needed:
sudo systemsetup -setnetworktimeserver time.apple.com
sudo systemsetup -setusingnetworktime on
You can disable network time again with sudo systemsetup -setusingnetworktime off. To set a time zone through Terminal, first turn off Set time zone automatically using your current location in General > Date & Time. Then list the available identifiers:
sudo systemsetup -listtimezonesCopy the identifier for your desired zone from the results. Replace zone_identifier in this command with that identifier, then run it:
sudo systemsetup -settimezone zone_identifierConfigure time on a managed MacBook
If you administer a MacBook running Sequoia 15 or Tahoe 26 with remote management configured, you can send the same commands through Apple Remote Desktop. Obtain the administrator app from the App Store if needed; it is separate from the client component included with macOS. You do not need this software to change your own MacBook's clock locally.
In Remote Desktop, select a computer list and the MacBook, then choose Manage > Send UNIX Command. Enter the required systemsetup commands, choose to execute them as root, and click Send. Omit sudo when executing as root.
You can also deploy Apple's TimeServer configuration payload through device management, using PayloadType set to com.apple.MCX with the timeServer and timeZone keys. Apple supports this device-channel payload on macOS 10.12.4 and later and permits manual installation. The deployment controls depend on your management provider.
For a manually supplied profile, open the profile, then go to System Settings > General > Device Management > Downloaded. Double-click the profile, review it, and select Continue, Install, or Enroll as presented.
Change the cities in World Clock
To change the clocks shown in the app, open Clock and choose View > World Clock. Click Add to add a city, then drag clocks to reorder them. To remove a city, hover over its clock and click Remove.
These choices change the world clocks you see in the app. Your MacBook's system date, time, and time zone remain controlled by Date & Time, while Clock widgets have their own city selection.
Adjust calendar events and reminders
In Calendar on Tahoe 26 or Sequoia 15, open Calendar > Settings > Advanced and select Turn on time zone support. Choose a zone from the pop-up menu left of the search field to change the calendar view. Select Other if you need an additional zone.
For an individual event, double-click it, click its date, and use Time Zone to choose the zone. Select Floating when you want the event's displayed time to stay the same as you switch zones.
For the browser version, sign in to iCloud Calendar and open the Actions menu at the top of the sidebar. Choose Settings > Formats & Time Zone, select Enable time zone support, then close the settings. Use the Time Zone pop-up menu when creating an event. These changes can sync to devices with iCloud Calendars and time-zone support enabled.
In Reminders, hover over a reminder and click Edit Details. Under Date & Time, select Date and choose or enter a date, then select Time and enter the hour and minute. After entering a time, click the city beside Time Zone to choose its zone.
Full reminder functionality requires updated iCloud reminders, and other providers may have limitations. Calendar and reminder settings change their events or reminders without changing your MacBook's system clock.
Frequently Asked Questions
Is there a keyboard shortcut to open the date and time settings?
Press Command + Space, type System Settings, select the app result, and press Return. Then open General > Date & Time. This uses Spotlight to reach the controls; it does not change the clock directly.
How do you choose a different network time server in System Settings?
Open System Settings > General > Date & Time and turn on the option to set time and date automatically. Click Set for the network time server, enter its address, then click Done.
How do you change the city shown in a Clock widget?
Hold Control and click a City or World Clock widget on the desktop or in Notification Center, then choose Edit “Clock”. Click the city name, choose another location, and click Done. If your city is unavailable, choose one in the same time zone.
Can your MacBook announce the time aloud?
On macOS 26 and 27, open System Settings > Menu Bar > Clock Options and turn on Announce the time. Select Interval, then choose Voice. Use Customize Voice to adjust the announcement voice settings.