When your Galaxy S26 Ultra's microphone stops picking up your voice, it can turn simple tasks into a real headache. Calls drop out, voice notes are silent, and Bixby just stares back at you. Since this is a brand new device, early software bugs are a definite possibility, but there are plenty of other things to check first.
A fast way to narrow this down is a browser based mic test. If the meter responds when you talk, the mic itself is fine and the problem sits in software or settings.
Test Your S26 Ultra Microphone
Before you start troubleshooting, it's smart to confirm the problem. The easiest way is to open your Voice Recorder app. Tap the red record button, speak clearly for a few seconds, and then play it back. If you hear nothing or your voice is muffled, you've got a confirmed issue.
You can also try making a quick video with the Camera app. Switch to video mode, record a short clip while talking, and check the audio on playback. Another good test is to open Bixby, or hold the Side button if you have set Advanced features > Side button > Long press to Bixby. Ask a simple question like "What's the weather?" If Bixby doesn't respond correctly, it points to a microphone problem.
Remove Your Case and Check for Blockages
This is the most common fix and it only takes a second. Some cases, especially rugged ones with thick lips, can completely cover the microphone pinholes. Take the case off and test your microphone again immediately.
With the case off, take a close look at the microphone openings. Your S26 Ultra has several: one at the bottom next to the USB-C port, one at the top, and others near the camera array. Shine a light on them and look for any packed-in lint, dust, or debris. A can of compressed air can gently blow out any loose particles.
Disconnect Bluetooth Accessories
If you have Galaxy Buds, a smartwatch, or a car stereo connected, your phone might be trying to use that device's microphone instead of its own. Swipe down from the top of your screen to open the Quick Settings panel and tap the Bluetooth icon to turn it off temporarily.
Now try your microphone test again. If it works, you know the issue was with audio routing. You can then go into Settings > Connections > Bluetooth, tap the gear icon next to the problematic device, and make sure "Call audio" isn't set to always use that device.
Restart Your Phone
A simple reboot clears out temporary glitches in the software that could be affecting the audio subsystem. Just press and hold the Side/Power button and the Volume Down button together for about ten seconds.
You'll see the Samsung logo appear on screen. Let the phone boot up completely, then test the microphone. I've found this resolves more microphone issues than people expect, especially on new devices that have been running non-stop since unboxing.
Check App Permissions
If the microphone only fails in specific apps like WhatsApp, Zoom, or Instagram, the app likely doesn't have permission to use it. Go to Settings > Apps, select the app giving you trouble, and tap Permissions.
Look for the Microphone permission and make sure it's set to "Allow." If it's denied, that's your problem. Toggle it on and go back to the app to test. Remember, you have to grant permission for each app individually.
Clear the App's Cache and Data
For app-specific microphone failures, corrupted cache data is a common culprit. Head back to Settings > Apps, find the problematic app, and tap on it. Select Storage and then tap Clear Cache first.
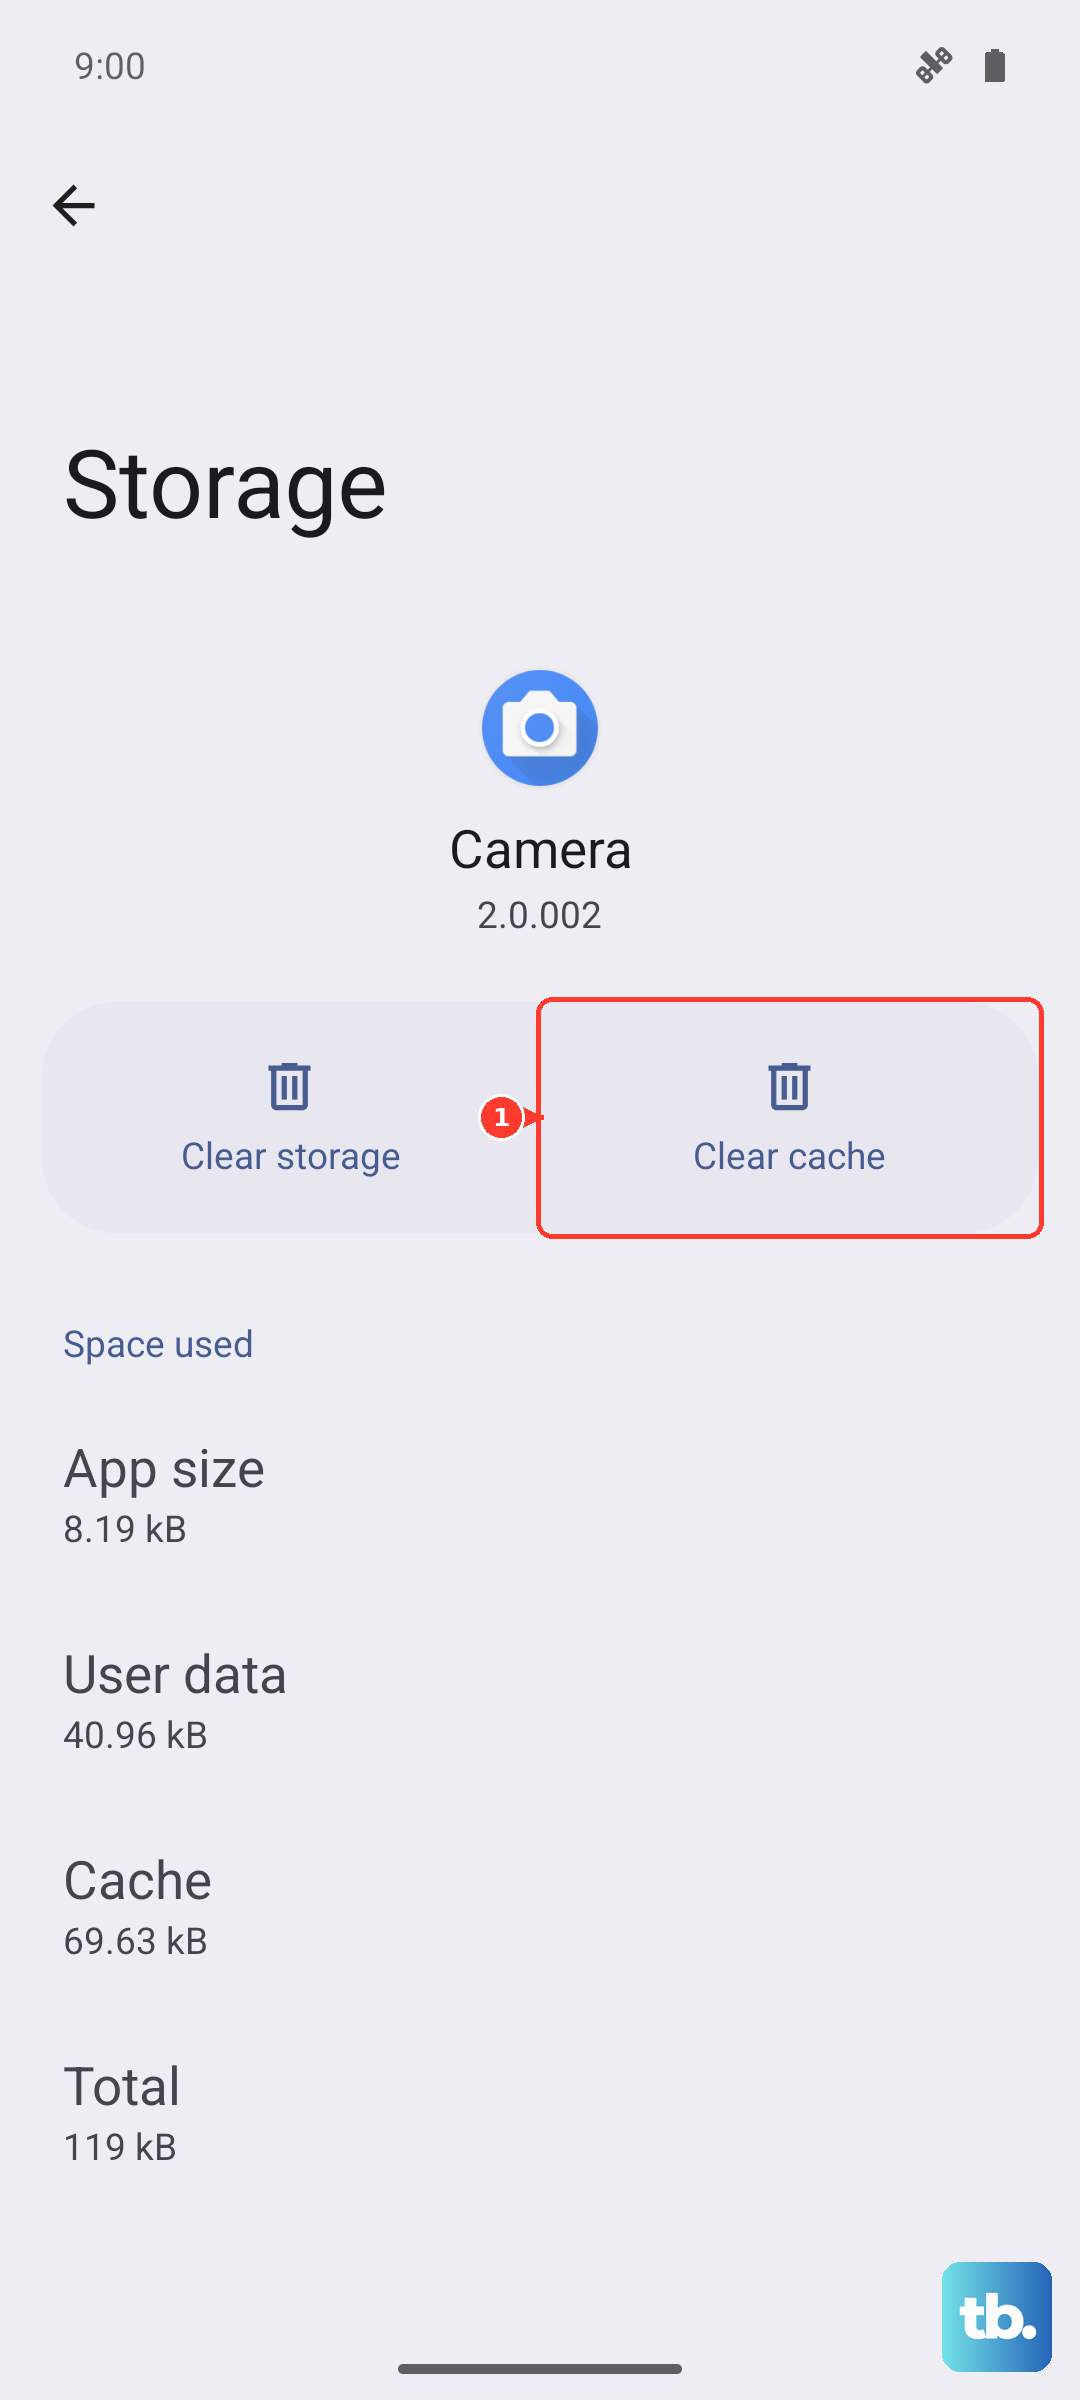
If that doesn't work, you can try Clear Data. Just be warned, this will reset the app to its default state and you may lose saved settings or login information within that app. It's a more thorough fix, but use it as a second step after clearing the cache.
Update Your Software
Given that the S26 Ultra is a 2026 release, Samsung is actively pushing out updates to squash early bugs. A microphone issue could easily be fixed in a patch you haven't installed yet. Go to Settings > Software update and tap Download and install.
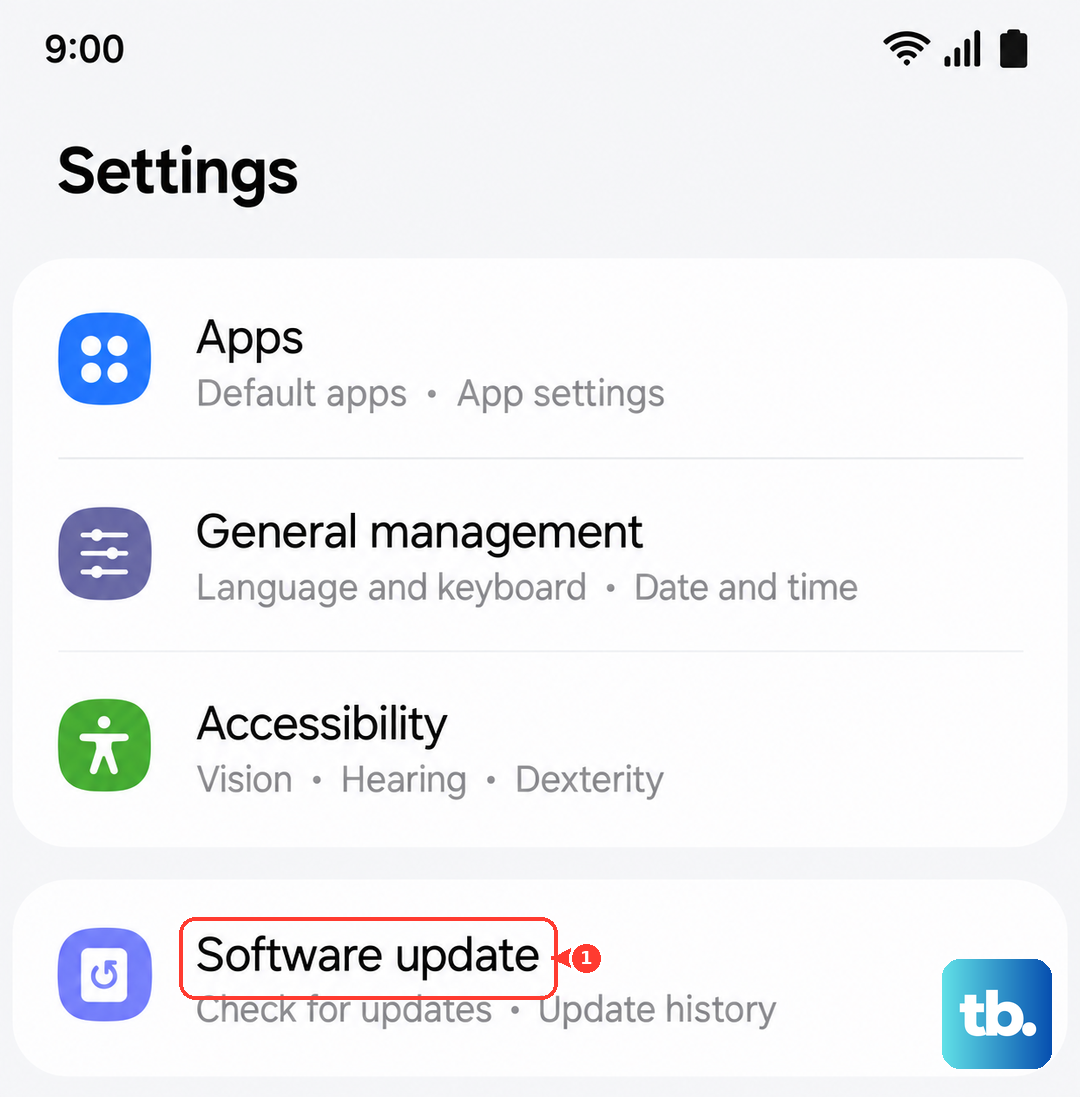
Make sure your phone is connected to Wi-Fi and has a good charge before you start. If an update is available, let it install completely. The phone will restart on its own. After it boots up, check if the microphone is behaving.
Check for Moisture Detection Errors
The S26 Ultra is known to sometimes throw a false "Moisture detected" warning in the USB-C port, which can disable certain functions. Even if you don't see the alert, it's worth checking. If you see a water droplet icon in your status bar, that's the sign.
To clear it, power the phone off completely. Use a dry cotton swab to gently clean the USB-C port, being careful not to bend the center pin. You can also try using a can of compressed air to dry it out. Leave the phone off for an hour or so before turning it back on to see if the warning clears.
Reset All Settings
This is a bigger step, but it won't delete your personal data like photos or messages. It resets your phone's general settings to their defaults without erasing apps or data. Samsung says this reset does not erase security or language settings, accounts, personal data, or settings for downloaded apps.
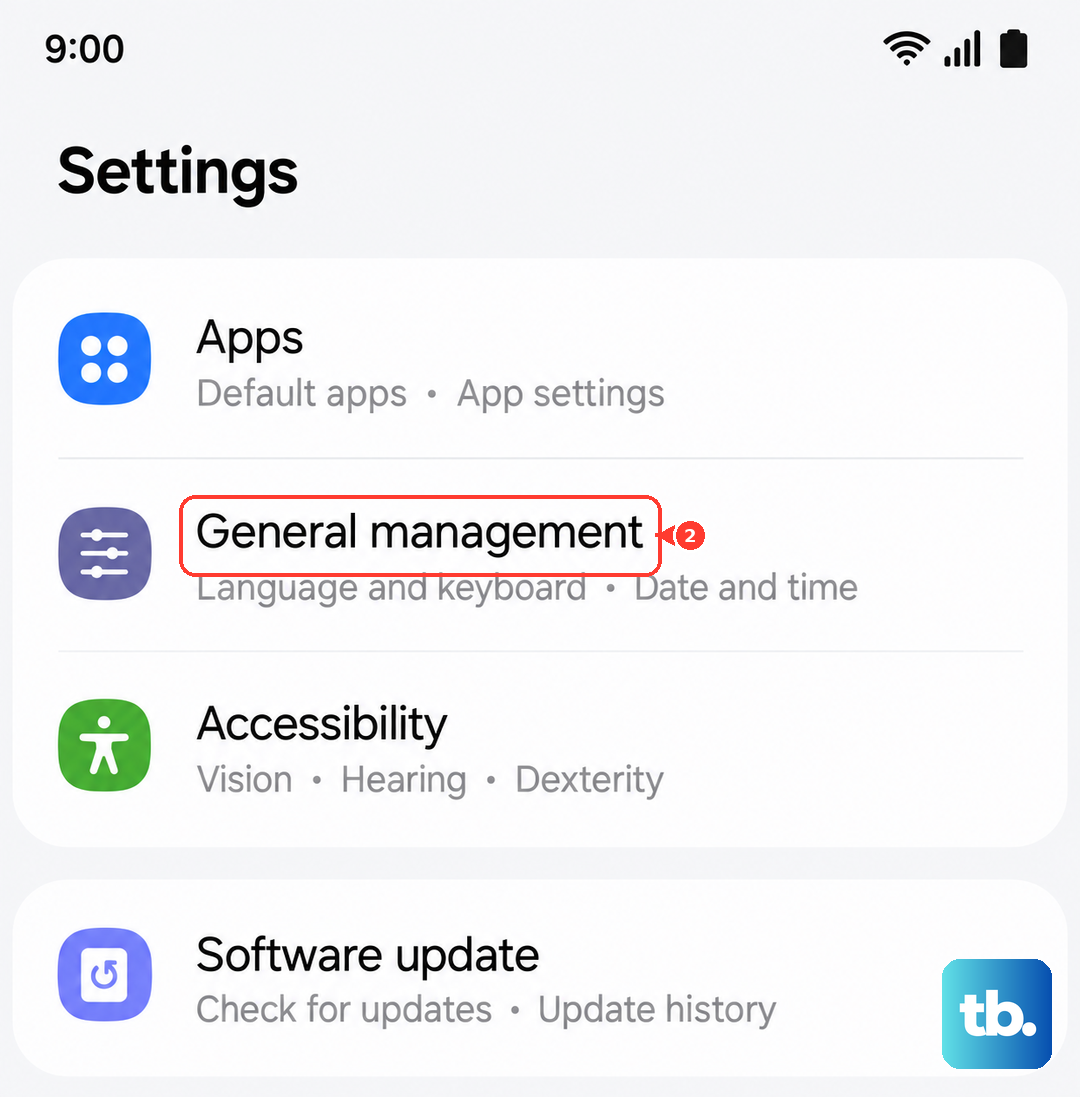
To do it, go to Settings > General management > Reset > Reset all settings. Enter your PIN if prompted and confirm. Your phone will restart. After it reboots, you'll need to reconfigure your preferences, but it can resolve deep-seated software conflicts affecting hardware like the microphone.
Consider a Factory Reset
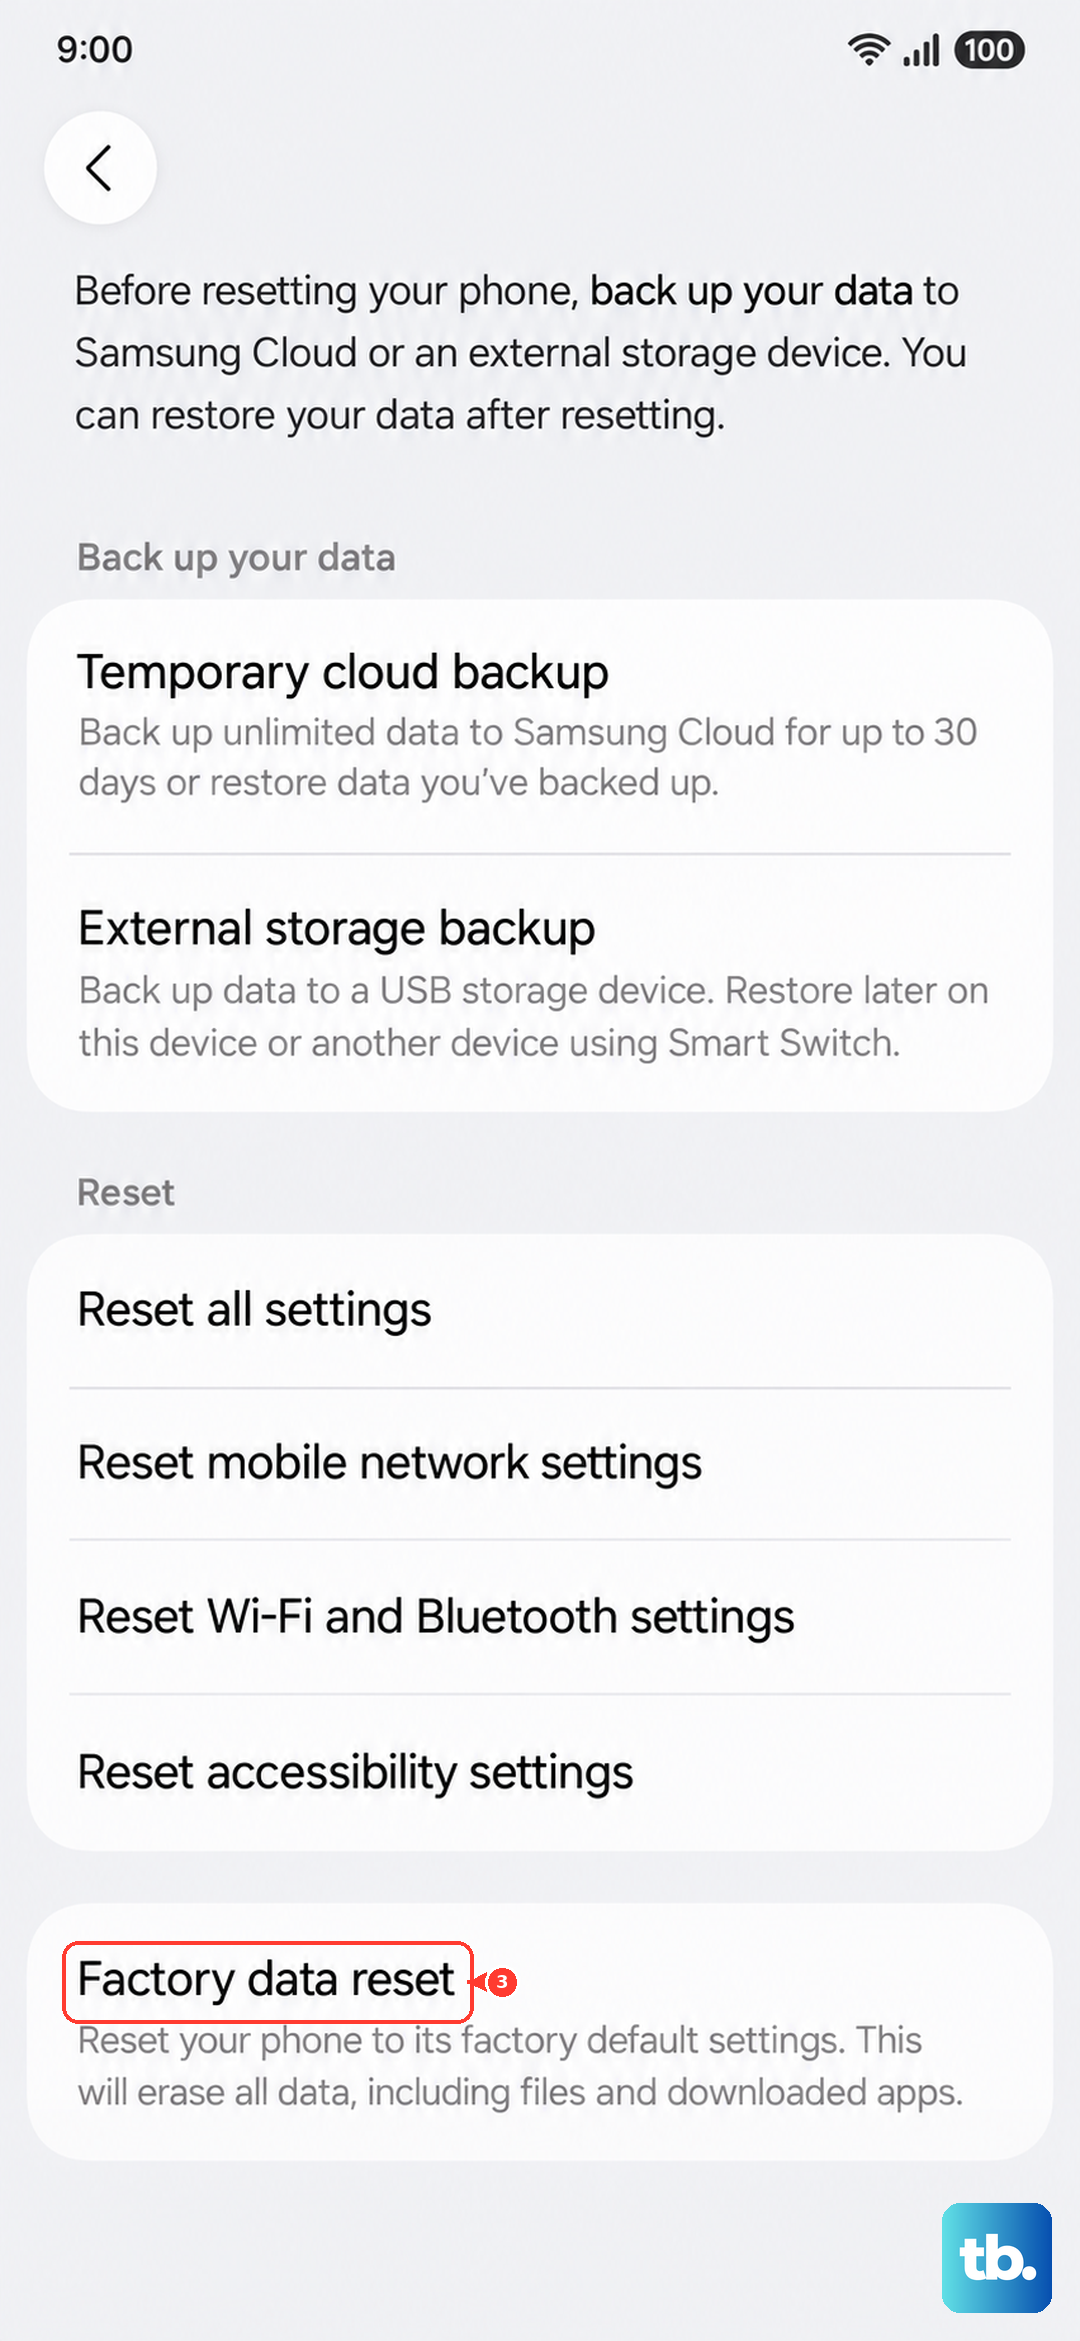
If you've tried everything else and the microphone is still dead, a factory reset is the final software step. This will erase everything on your phone, so a full backup is absolutely essential first. Use Samsung Cloud or a computer to back up your data.
Once backed up, go to Settings > General management > Reset > Factory data reset. Tap "Reset" and then "Delete all." The process will take several minutes. After the phone restores itself, set it up as new initially to test the microphone without restoring a backup that might contain the problem.