You lined up the perfect shot on your iPad (10th generation), tapped the shutter, and got back a soft, hazy, or smeared photo instead of a crisp one. Blurry results from this iPad are almost always fixable at home, because the rear 12MP Wide camera (f/1.8, five-element lens) uses real autofocus with Focus Pixels, so the usual culprits are a dirty lens, something covering it, or a focus that landed on the wrong spot. Work through the fixes below in order, starting with the quickest and safest, and only move toward a reset or a service visit if the picture is still soft at the end.
Why your iPad 10th generation shots come out soft
The iPad (10th generation) carries a rear 12MP Wide camera and a front 12MP Landscape Center Stage camera (f/2.4) with screen-based Retina Flash. Because the rear camera autofocuses, a blurry image usually means it could not lock focus or that something physical is degrading the view, not that a setting is broken.
It also helps to know what this model does not have, so you do not waste time hunting for toggles that are not there. There is no Macro mode, no Night mode, and no Cinematic mode, the rear camera has no LED or True Tone flash, and there is no automated lens-cleaning feature, so the fixes that follow stay focused on the things that genuinely affect sharpness on this iPad.
Start with a clean lens
Apple's official guidance is direct here. If the photo is blurry, clean the front and back camera lenses with a microfiber cloth. Fingerprints, skin oil, dust, and pocket lint on the rear 12MP lens are the single most common reason an image looks soft or hazy, so this is the first thing to try.
Gently wipe both the front and rear lenses, then take a fresh photo to compare. Avoid paper towels or your shirt, which can smear oils across the glass or leave fibers behind that make the next shot worse.
Clear anything covering the rear camera
The official support guidance also says to remove any case, film, or accessory (such as a polarizer, extender, or magnifier) that might block the camera or flash or that places a magnet near the camera. A case lip that sits slightly over the lens, or a stick-on screen film that wraps the rear glass, is a frequent cause of blur on the iPad (10th generation).
If you notice motion blur in low light while using a lens converter, a metallic case, or a magnetic lens mount, take that accessory off and shoot again. Removing the obstruction lets the autofocus see a clean view and often sharpens the picture immediately.
Set focus by tapping the screen
The rear camera focuses automatically, but you can also point it at the right subject yourself. Open Camera, then tap the screen to show the automatic focus area and exposure setting (in yellow), and tap where you want to move the focus area.
If you are taking several shots of the same scene and want the focus to stay put, touch and hold the focus area until you see AE/AF Lock, then tap the screen to unlock settings. This fixes the common case where the camera focused on the background or the wrong object instead of your subject.
Find out which camera is actually blurry
Before you change anything deeper, confirm where the problem lives. Apple's camera troubleshooting says to take a test photo, and because this iPad has both a front and rear camera, check whether one or both are affected.
Switch between the rear 12MP Wide camera and the front 12MP Center Stage camera and shoot the same subject with each. If only one is soft, you have narrowed the fault to that single camera. If both are soft, the next software steps are more likely to help.
Power the iPad off and on
A simple restart clears temporary glitches that can leave the camera misbehaving, and the official camera article lists it as an early step. To restart the iPad (10th generation):
- 1.Simultaneously press and hold the top button and either volume button until the Power Off slider appears, then drag the slider to turn off iPad.
- 2.Wait a few seconds for it to fully power down.
- 3.Press and hold the top button until you see the Apple logo.
If you prefer to shut down from a menu, you can instead go to Settings > General > Shut Down, then power back on with the top button.
Force a restart when the Camera app locks up
If the Camera app freezes, stays black, or the screen stops responding, a force restart is the right move. This model has no Home button, so the button sequence matters. Follow it exactly:
- 1.Press and quickly release the volume button nearest to the top button.
- 2.Press and quickly release the volume button farthest from the top button.
- 3.Press and hold the top button.
- 4.When the Apple logo appears, release the top button.
A force restart does not erase any of your photos or data; it simply forces the system to reload, which often clears a stuck camera process.
Install the newest iPadOS
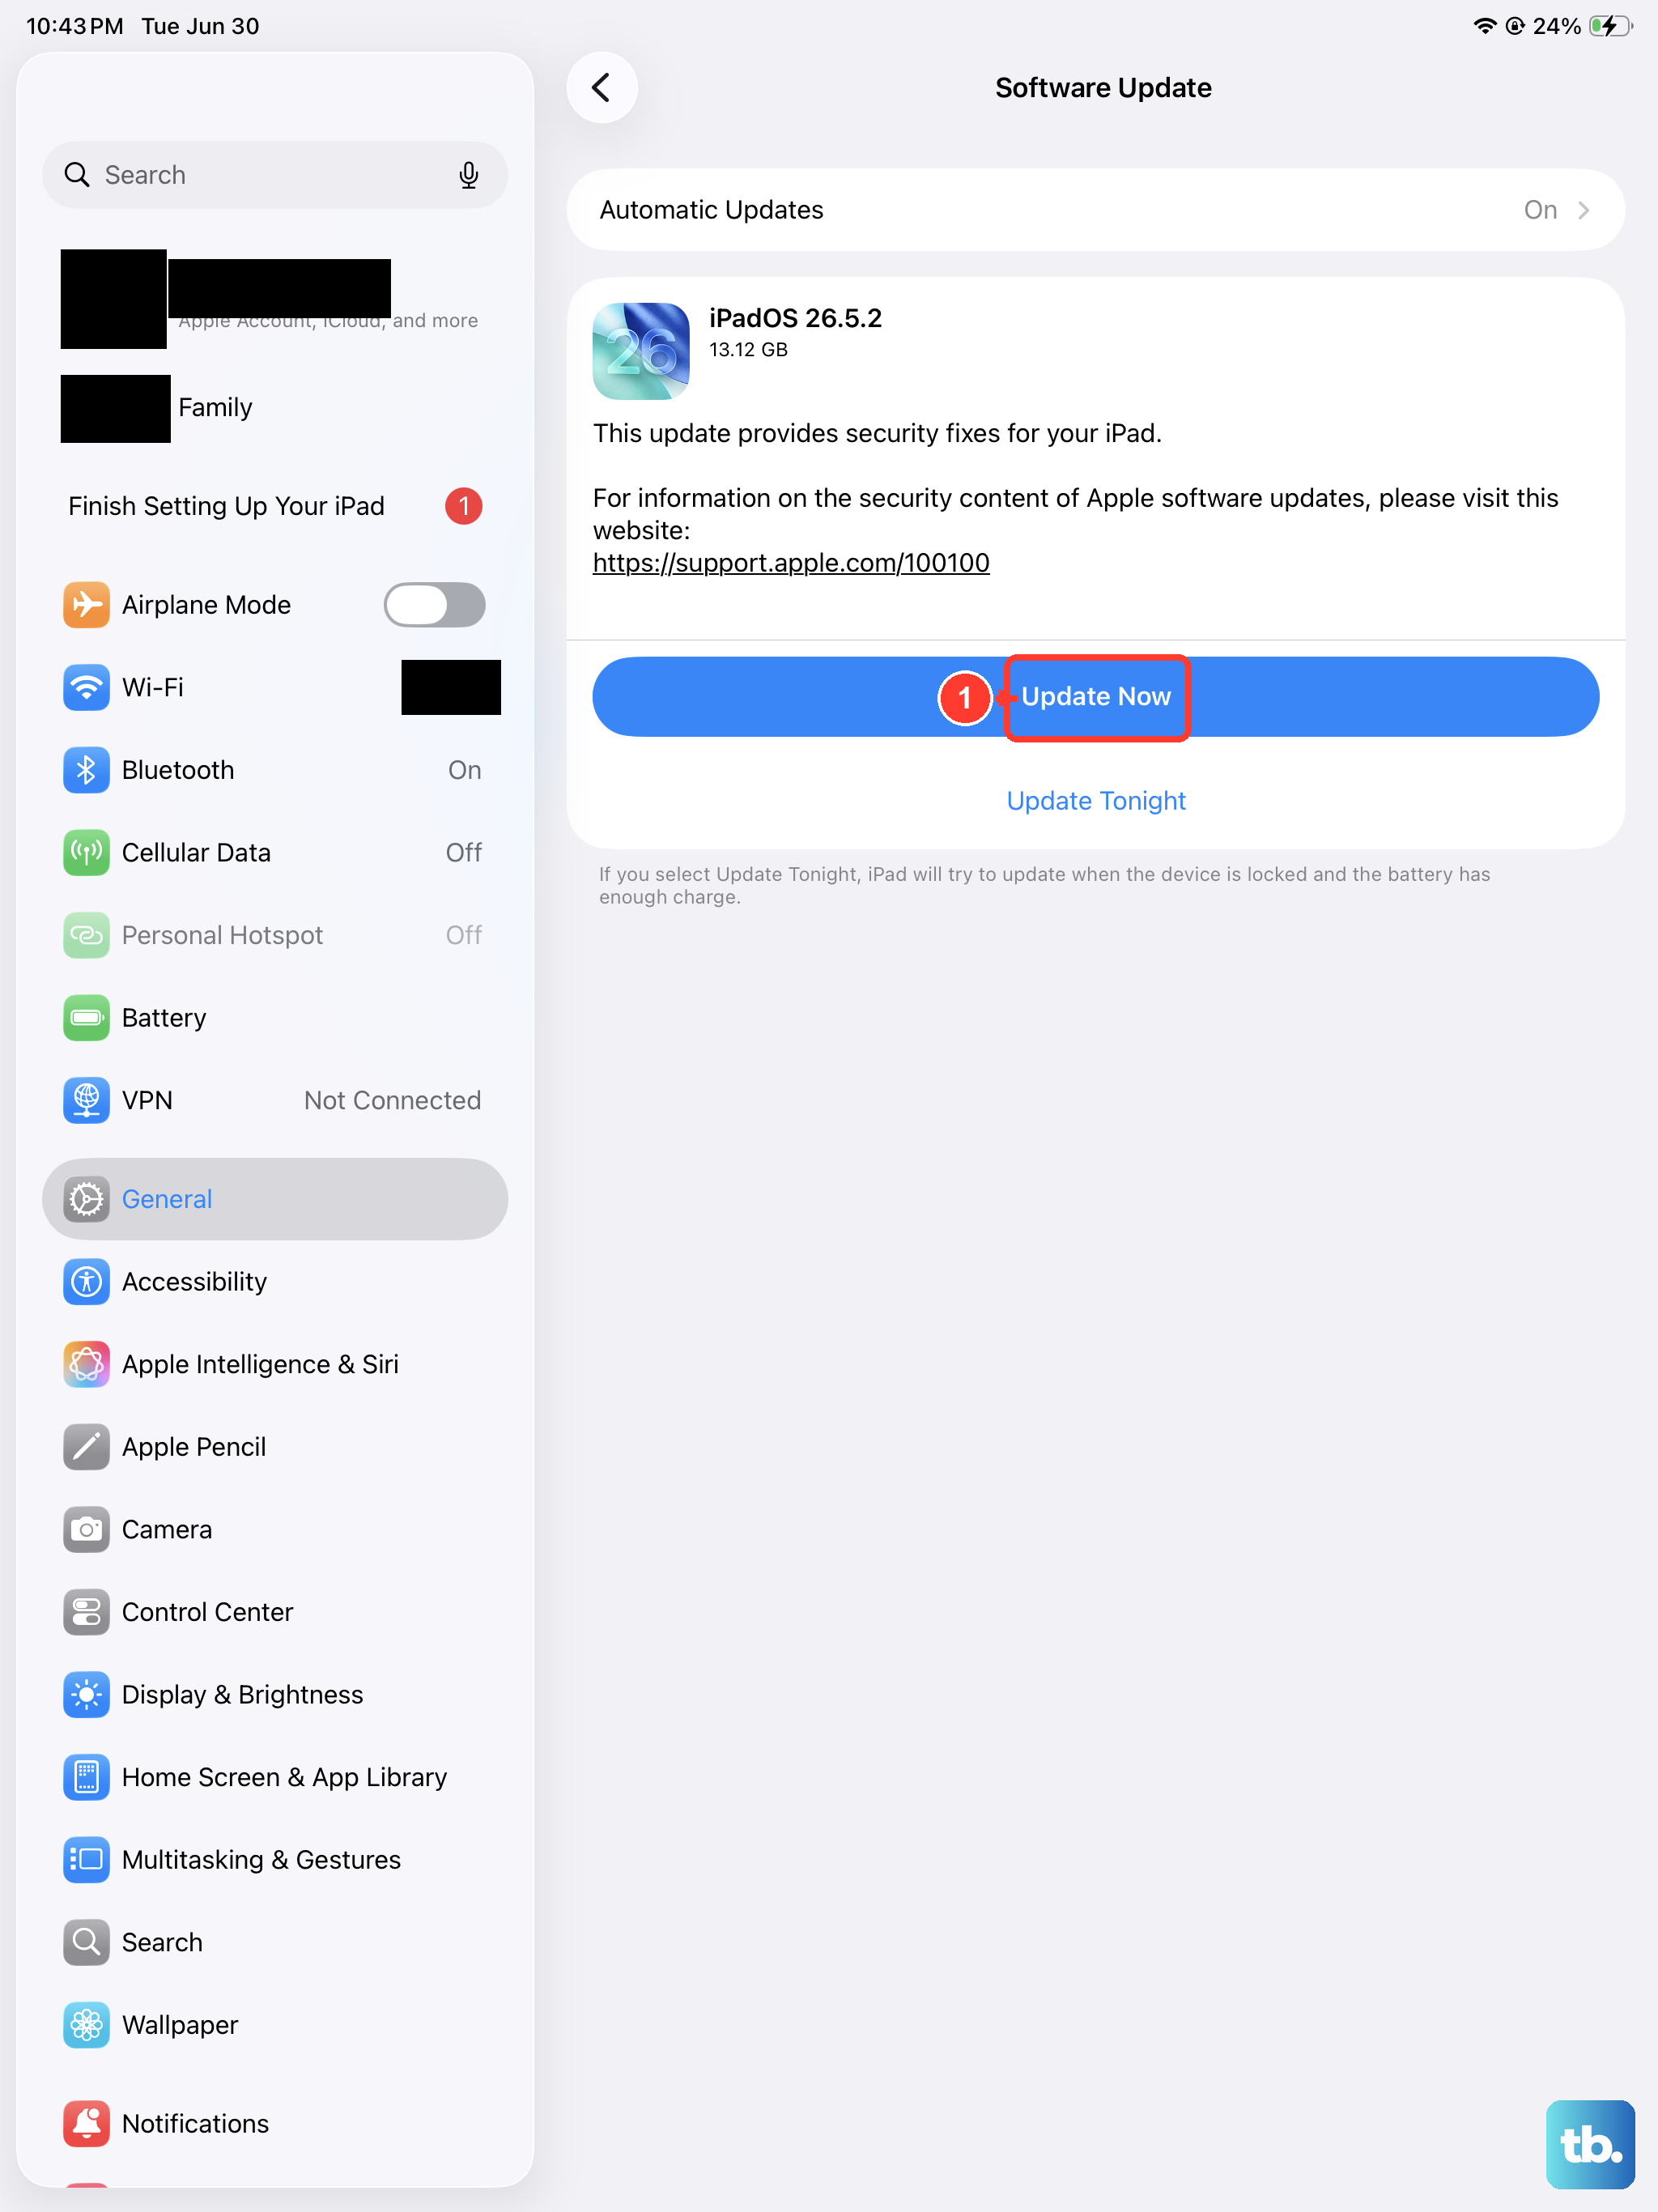
Software bugs can affect the camera, so the official troubleshooting advice is to update to the latest software. Go to Settings > General > Software Update and tap Update Now.
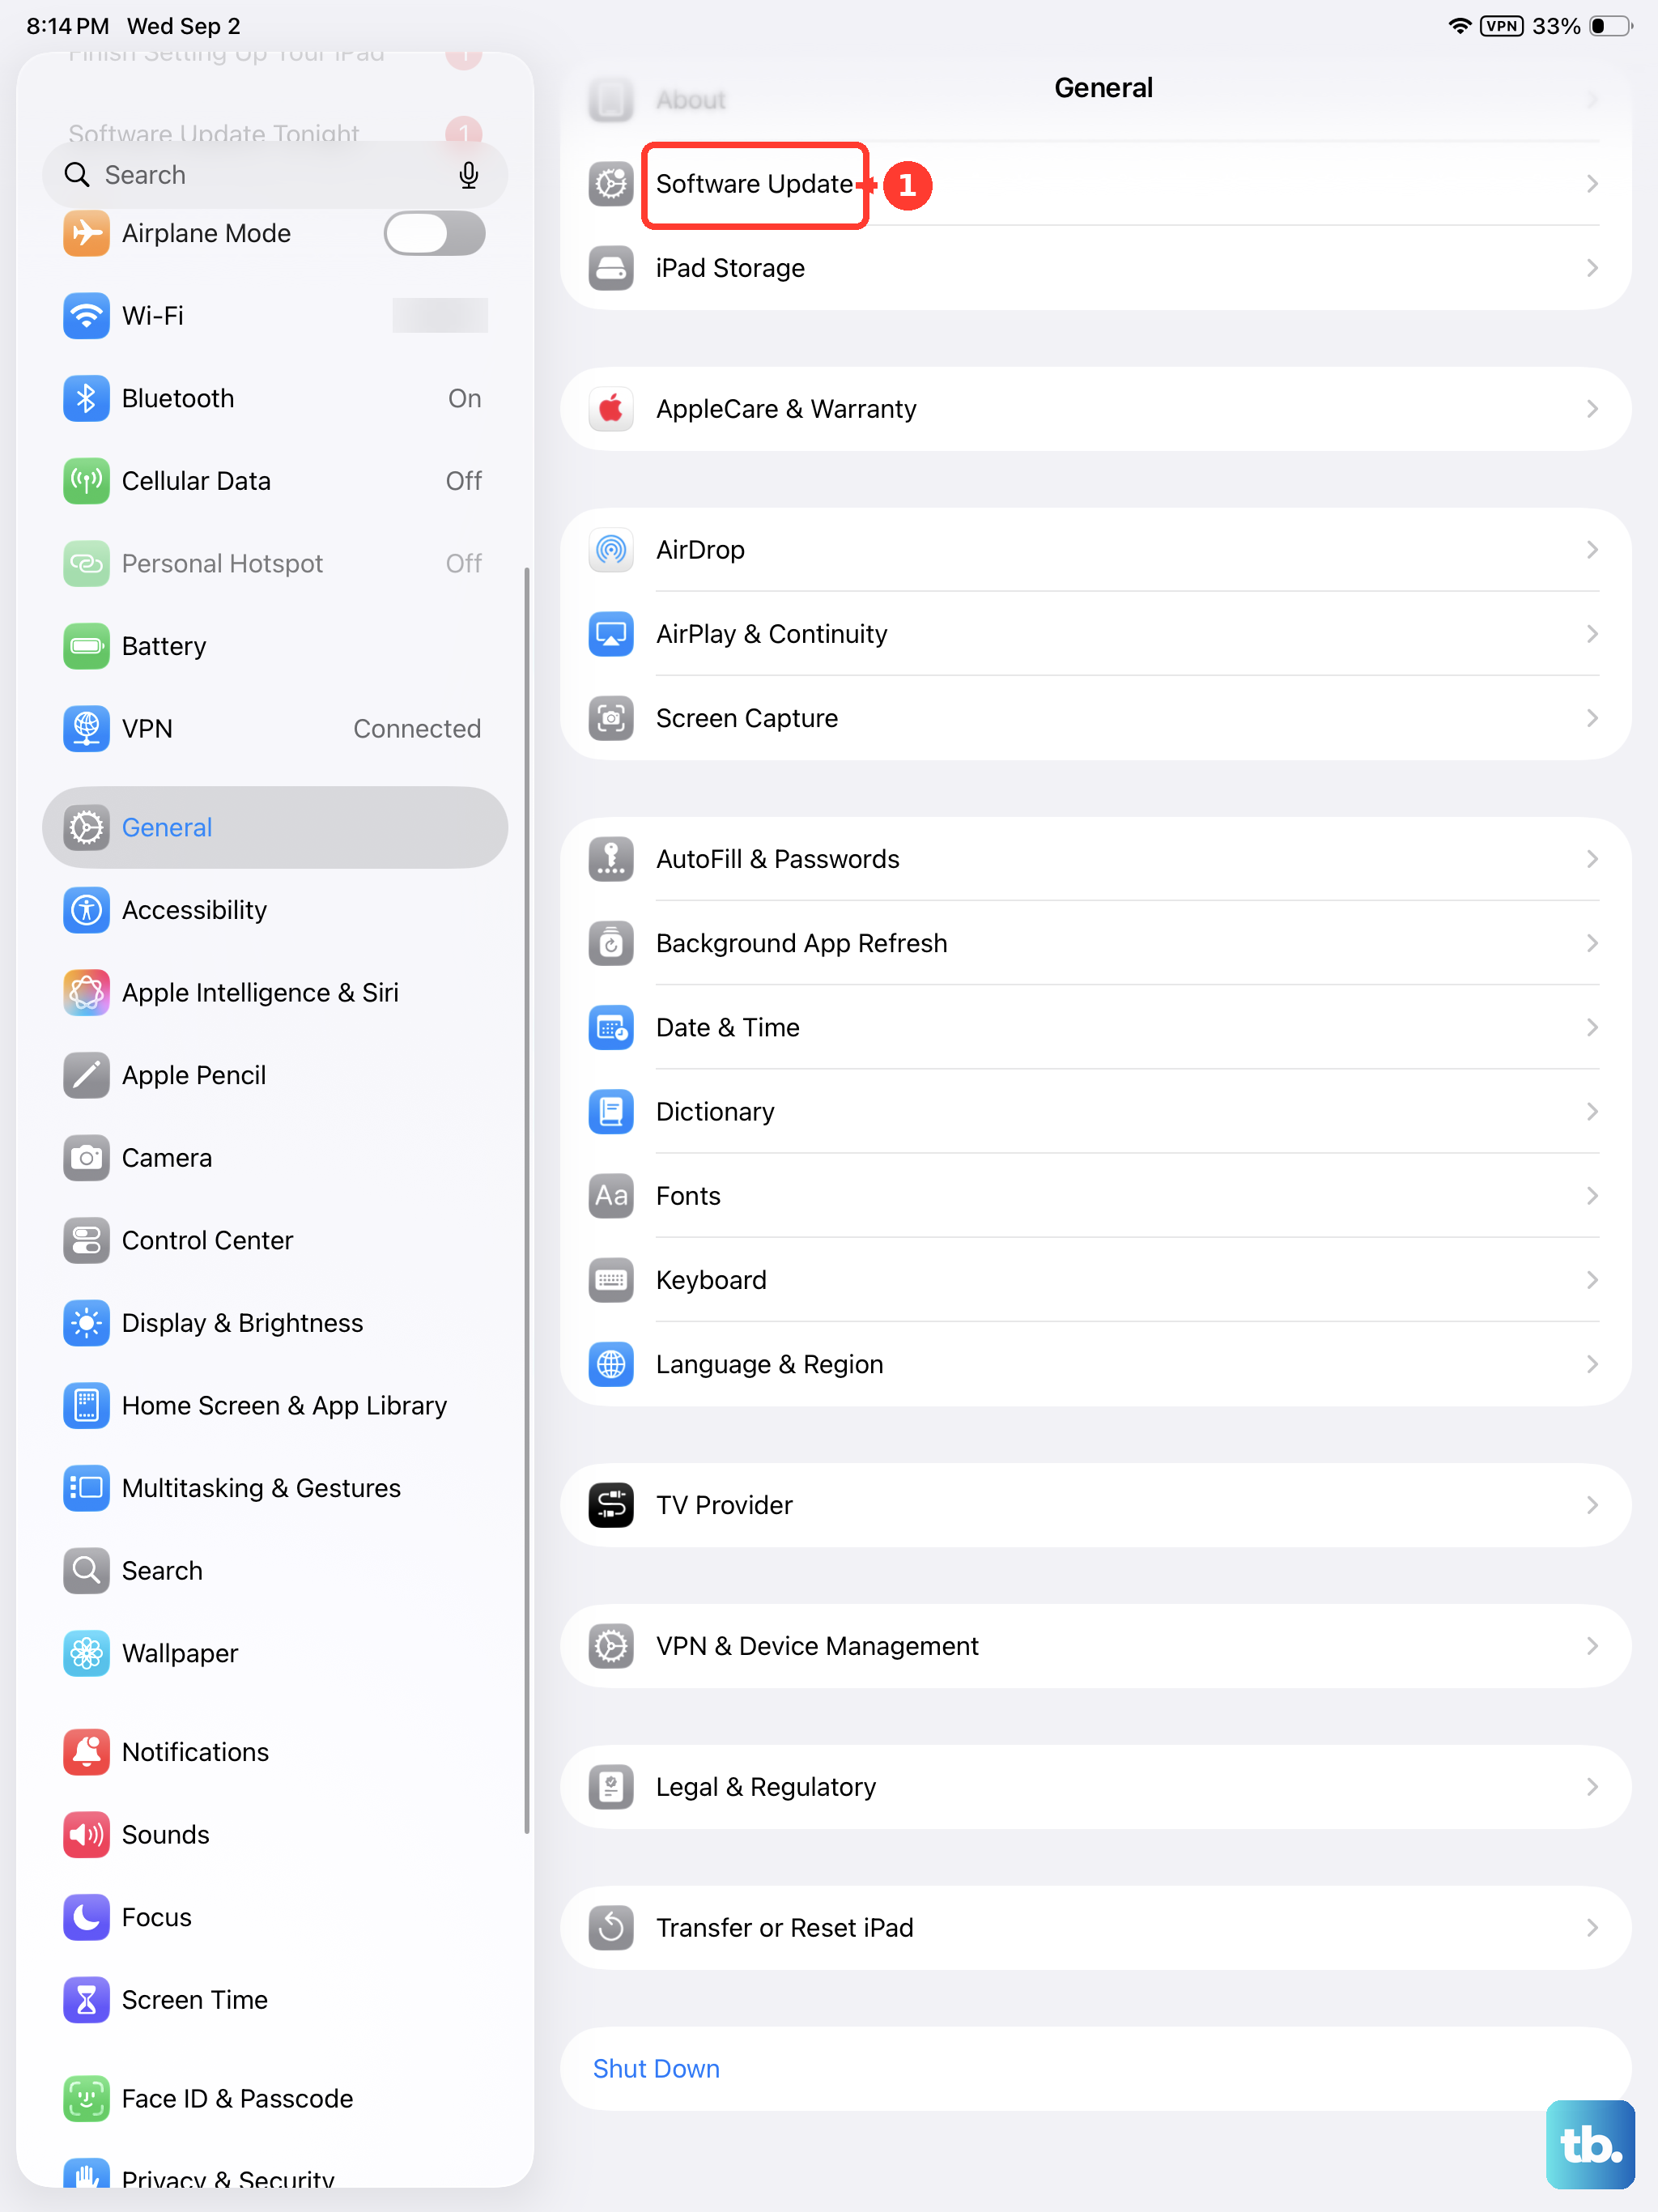
The iPad (10th generation) shipped with iPadOS 16, is compatible with iPadOS 18, and is on Apple's iPadOS 26 compatibility list, so install the newest version available to you. Updating leaves your photos, apps, and settings unchanged. To stay current automatically going forward, you can turn on Settings > General > Software Update > Automatic Updates.
Reset settings without losing your photos
If the camera still behaves oddly after updating, you can return system settings to their defaults without erasing any content. Go to Settings > General > Transfer or Reset iPad > Reset.
This restores system settings to their defaults while keeping your photos, apps, and files in place. It is the safe middle step to try before considering a full erase, and it can clear a misconfigured option that a normal restart leaves untouched.
Erase the iPad as a final software step
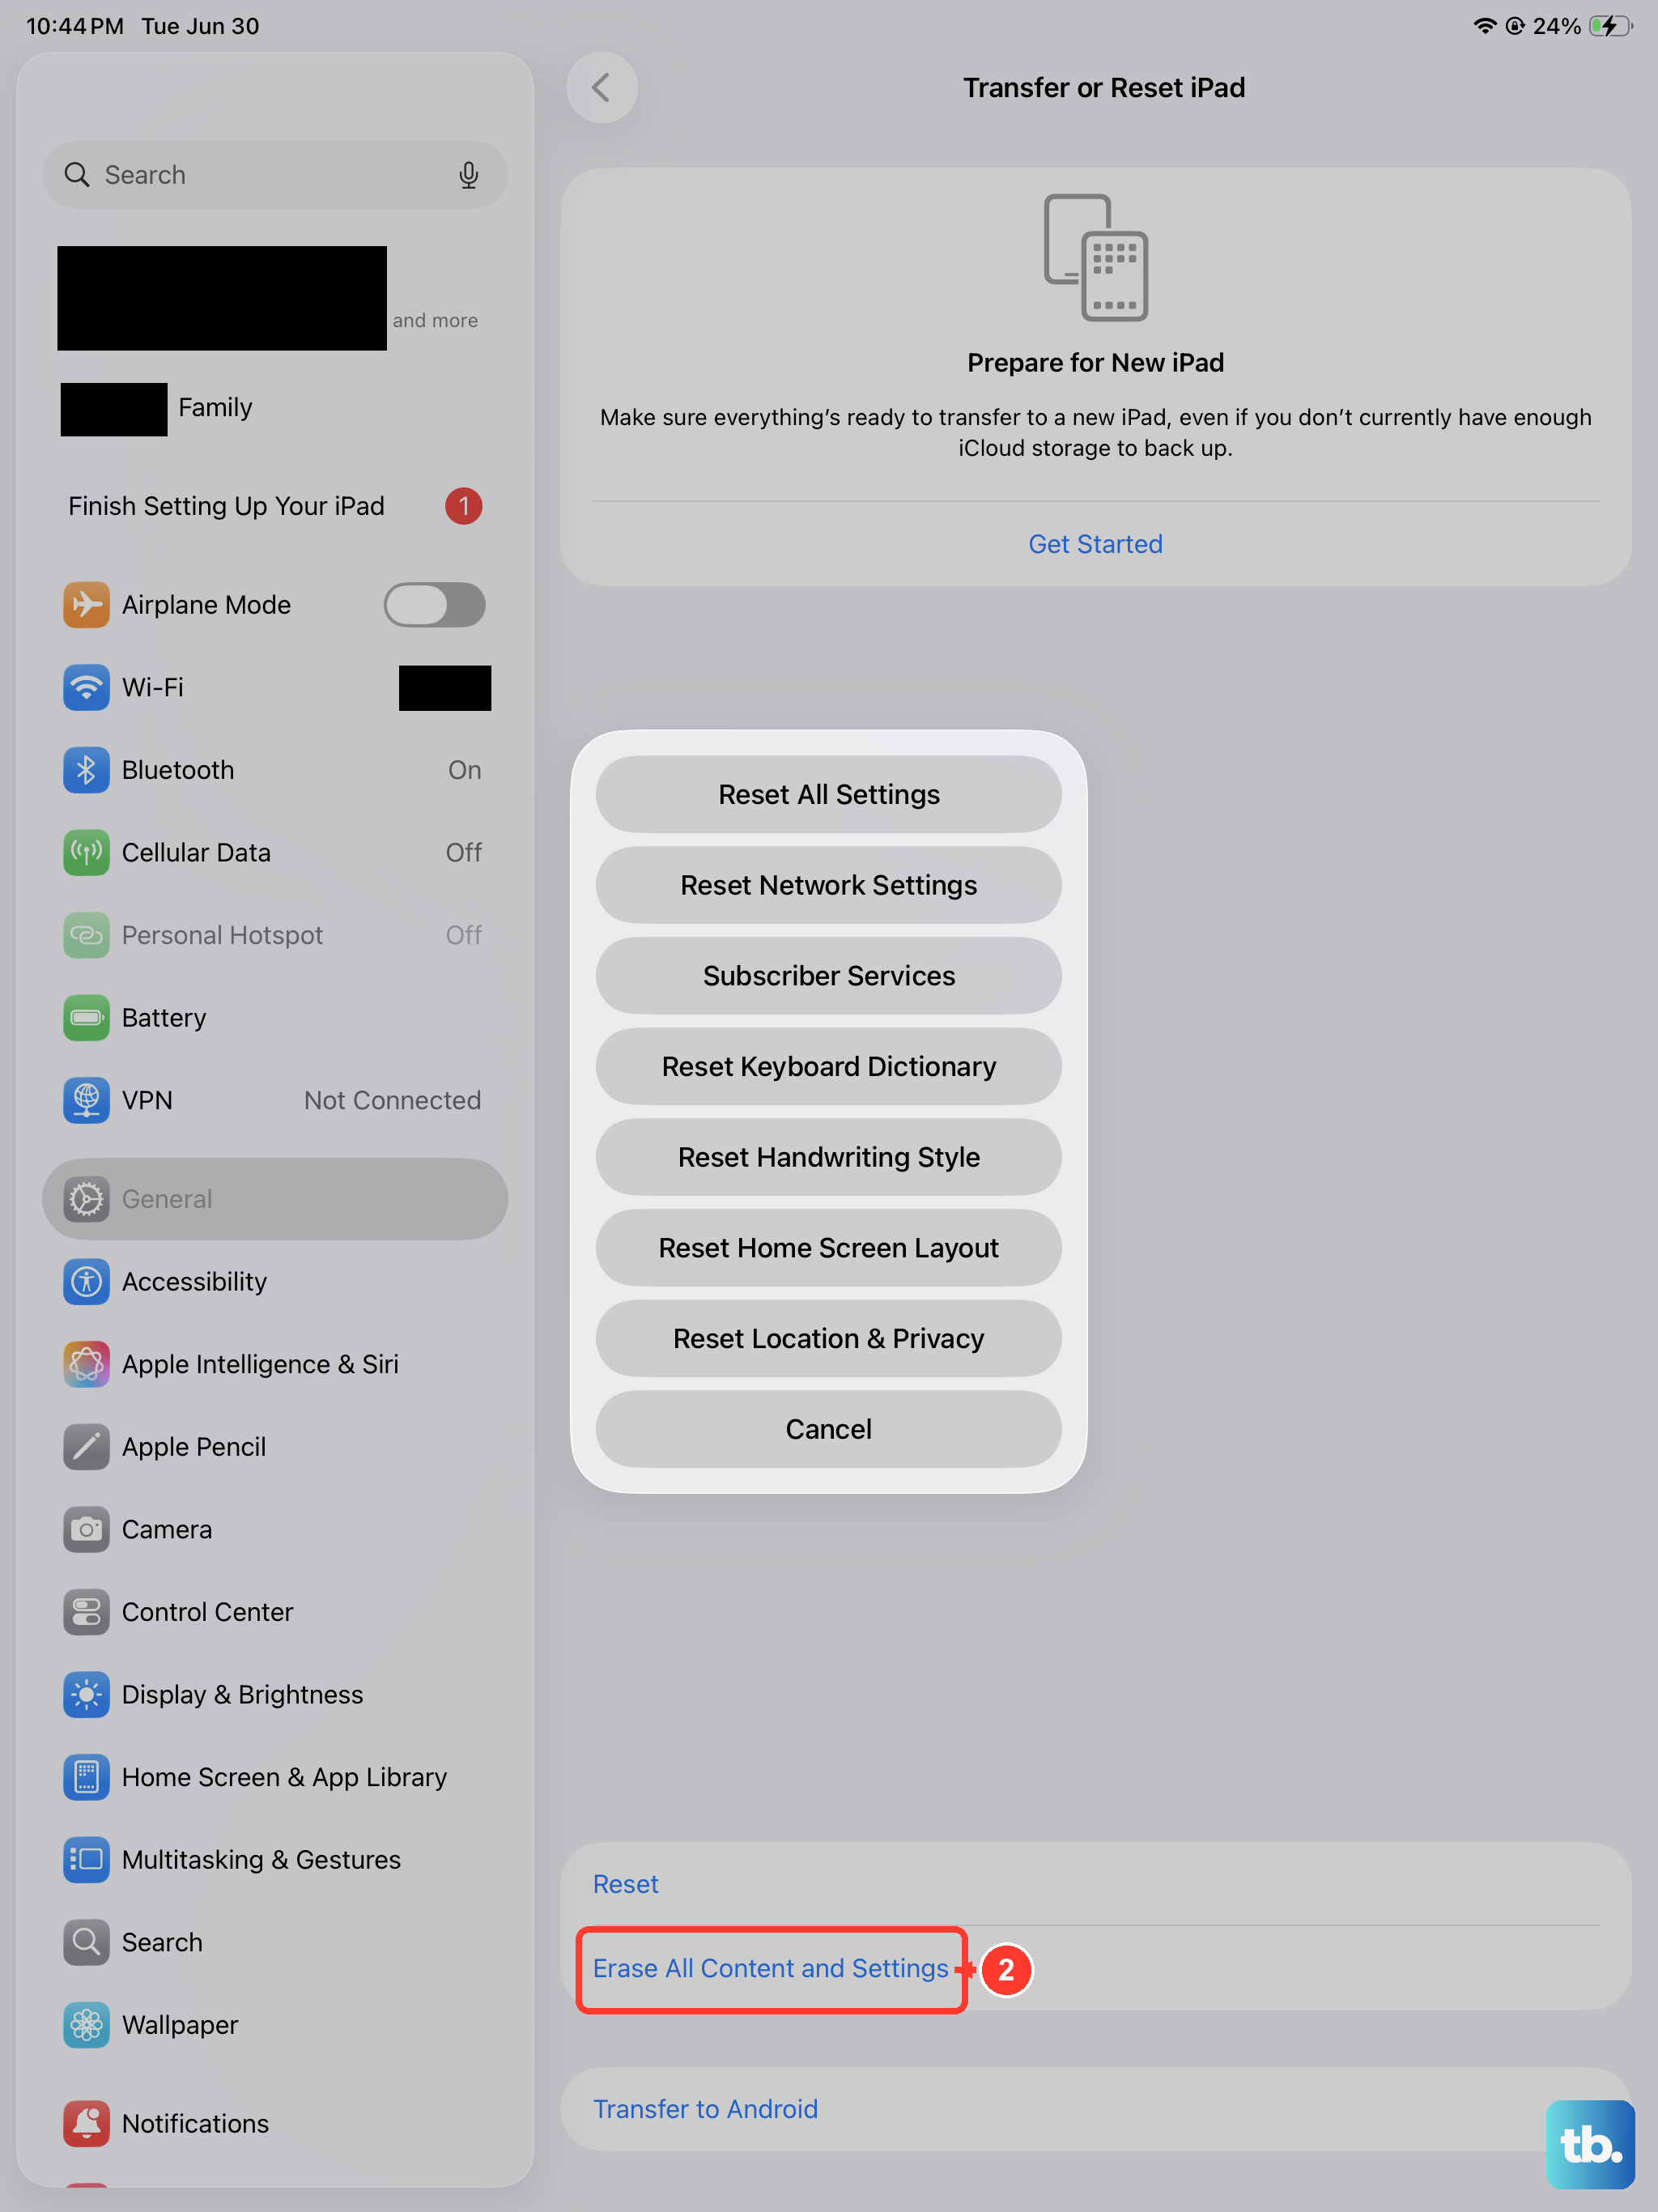
If nothing above works, a full erase is the last self-service software fix. This deletes all of your data, so back up to iCloud or a computer first so you can restore everything afterward.
- 1.Make a current backup of your iPad.
- 2.Go to Settings > General > Transfer or Reset iPad > Erase All Content and Settings.
- 3.Enter your passcode or Apple Account password.
- 4.Tap Continue.
Once the erase finishes, follow the on-screen setup steps and restore from your backup so your photos and apps come back. Take a test photo right after setup to confirm whether the blur is gone before you decide on service.
When to hand it to Apple
Persistent blur that survives cleaning the lens, removing cases and films, restarting, updating, and erasing points to a possible hardware fault with the autofocus camera module. At that stage there is no further home fix worth trying.
Apple's guidance is to contact Apple Support to discuss service options if the camera still is not working properly after these steps. Have your test photos ready so you can describe whether the front camera, rear camera, or both are affected.
Frequently Asked Questions
Does the iPad 10th generation have Night mode or Macro mode to sharpen photos?
No. Per Apple's tech specs, this model has no Macro mode, no Night mode, and no Cinematic mode, and there is no automated lens-cleaning feature. Sharpness on this iPad comes down to a clean lens, an unobstructed camera, and correct focus rather than a special mode.
Why is only one of my cameras blurry?
Take a test photo with the rear 12MP Wide camera and another with the front 12MP Center Stage camera. If just one is soft, the issue is isolated to that camera, which helps you (and Apple Support, if needed) pinpoint the cause faster.
Will updating or resetting delete my photos?
Updating to the latest iPadOS leaves your data and settings unchanged, and Reset (Settings > General > Transfer or Reset iPad > Reset) keeps your photos, apps, and files. Only Erase All Content and Settings deletes your data, which is why you should back up before using it.
Should I check the rear camera flash if low-light shots are blurry?
The rear camera on the iPad (10th generation) has no LED or True Tone flash, so there is no rear flash to test. Only the front camera offers screen-based Retina Flash. For soft rear shots in dim rooms, clean the lens, remove any lens accessory, and steady the iPad instead.