Windows 10 has many great features you can use regularly and get the most out of your PC. One of them is the CHKDSK – check disk feature. It allows you to analyze your hard drive and see if there are any errors. In addition, this feature will automatically repair them so your PC can run smoother and better. Here, we will show you how to use Windows 10 Check Disk.
How to use Windows 10 Check Disk
This feature can quickly fix all the minor errors you might be experiencing, and using this tool is super simple. Let’s see how you can do that.
- The first step is to open File Explorer.
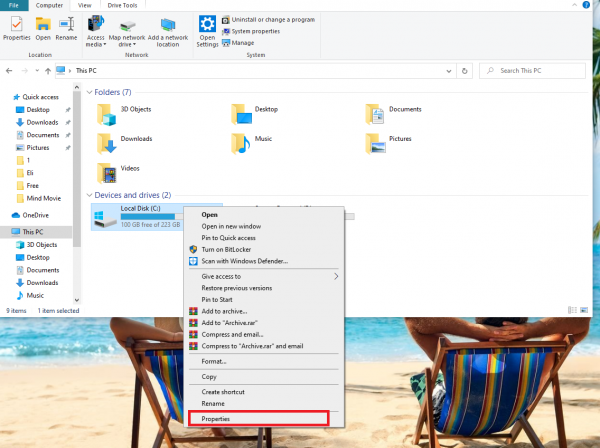
- Next, click on This PC located on the left side of the Explorer
- Now click on the drive you want to scan
- Right-click on that drive and then click Properties
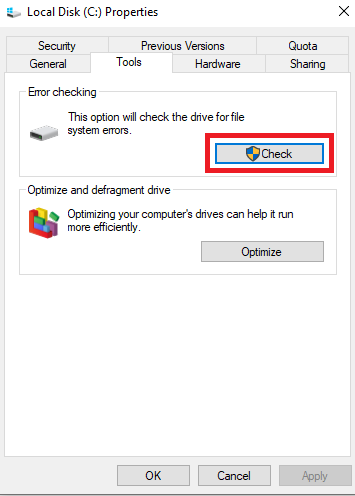
- Next, click on the Tools tab
- Now click on “Check.”
- If there is no reason to check for system errors, you will see the following
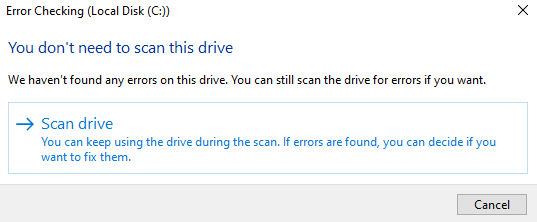
- You can click on Cancel, but you can scan the drive anyway if you like by clicking on that option.
- If you do click on that option, the process will start and it may last for a while (it depends on the size of the drive)
After completing the process, you will see a message saying no errors have been found. On the other hand, if there are some errors, the PC will start fixing them.
As you can see, using this tool is very simple. Just a few clicks and that’s it. The most important thing is the fact it’s super helpful and that it can automatically fix errors if any are found in the first place. Make sure to try it out!
Also Read


Recent
Ottocast Car TV Mate Max Review – A Versatile In-Car Entertainment Adapter
iPhone Battery Dying In Minutes? 23 Real Fixes That Work
Ottocast Play2Video Pro Ups the Game in Affordable Car Entertainment
Ottocast OttoAibox P3 Powers a Smarter Driving Experience
How to Disable WebRTC in Your Browser Settings
Guides

Lenovo Debuts Solar-Charging Laptop That Turns 20 Minutes of Sunlight Into Hour of Video

Why Do Smartphones Get Slower Over Time?

Decoding Tech Jargon: The A to Z Cheat Sheet (Free Downloadable PDF)

How to Clear an App's Cache on Your Samsung Device

Why Are My iPhone Messages Green Instead of Blue?

Everything Google Knows About You (And How to Stop It)
