The Microsoft account security page is where a personal Microsoft account keeps its main protection tools. If you need to change a password, check a strange sign-in, add Authenticator, create a passkey, or remove old sessions, start there. Start by opening the page, checking account activity, then tightening the ways you sign in.
1. Open the Security page from the account dashboard
The direct route is the fastest one. Open account.microsoft.com/security. Sign in with your personal Microsoft account, and use the page options Microsoft lists there, including Change password, Review activity, and Manage how I sign in.
You can also start from account.microsoft.com/account. Sign in, then select Security on the Microsoft account dashboard.
2. Check recent activity before changing settings
If you are here because something feels wrong, review sign-ins first. Microsoft’s Recent activity page shows Microsoft account use from the last 30 days.
- 1.Go to account.microsoft.com/security.
- 2.Select Review activity.
- 3.Expand a listed activity to see the date, time, location, IP address, device, and browser details shown for that entry.
- 4.For an unusual activity entry, select This was me or This wasn't me.
- 5.For suspicious recent activity, expand the item and select Secure your account.
When an unusual sign-in alert arrives by email or text, go directly to account.microsoft.com/security instead of using the alert link. Open Review activity, respond there, then return to Security basics and select Change password if someone accessed the account.
3. Change a password you still know
Go to account.microsoft.com/account and sign in. Select Security, then select Change Password.
Enter your new password. Select the optional checkbox to update your password every 72 days. Select Save.
Use this path when you can sign in and want to replace the current password yourself. This is different from account recovery. If you are already locked out, use a recovery code only if you generated one earlier, as covered below.
4. Add better sign-in and verification methods
Manage how I sign in is where Microsoft puts the current personal-account options for signing in and proving who you are. Open account.microsoft.com/security and sign in. Select Manage how I sign in.
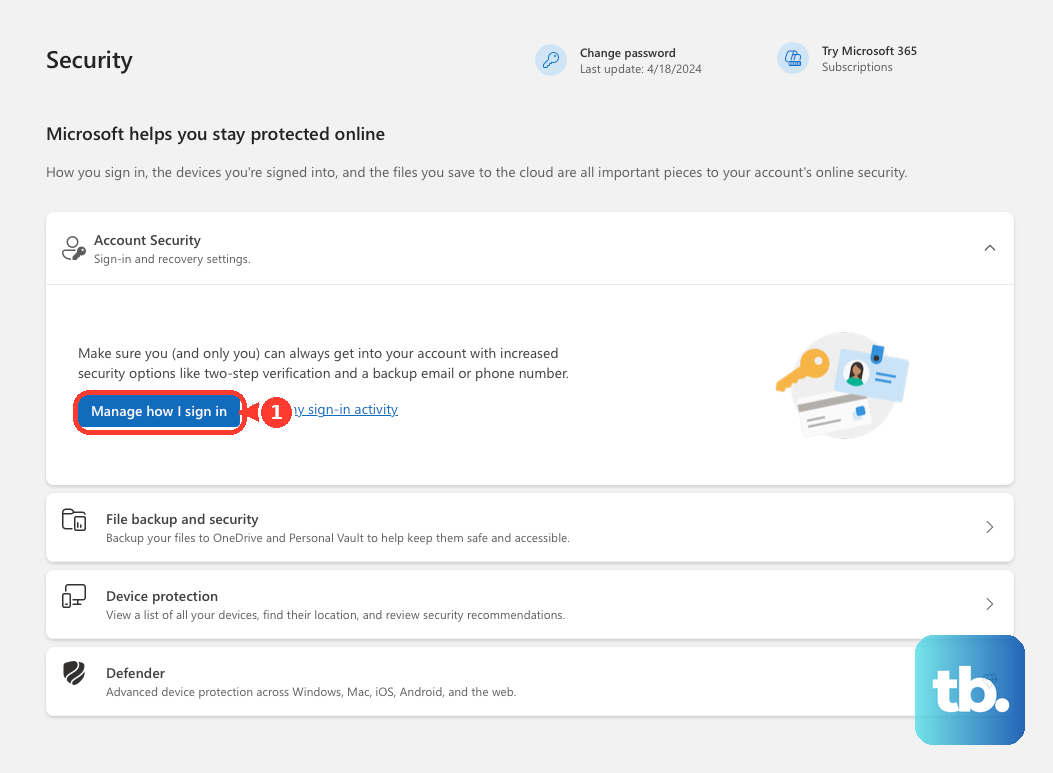
Select Add a new way to sign in or verify. Choose an email address, authenticator app, or passkey. Follow the prompts for the method you selected.
Do not set up new personal-account instructions around adding a phone number. Microsoft’s current consumer security-info guidance says phone numbers can no longer be added for increased security, and its verification-code guidance says SMS is being phased out for personal-account authentication and recovery.
To remove an existing verification method, open Advanced security options, expand the verification option, select Remove, then select Remove again to confirm.
5. Set up Microsoft Authenticator on your phone
Microsoft Authenticator is supported on iOS and Android. Microsoft does not offer Authenticator for PC or Mac, and versions more than one year old are no longer supported.
Get the app from Microsoft’s official Authenticator download page at support.microsoft.com/en-us/authenticator/download-microsoft-authenticator or from Microsoft’s mobile authenticator app page. Go to account.microsoft.com/security. Select Manage how I sign in, then select Add a new way to sign in or verify.
Select Use an app. Select Get it now, or select Set up a different Authenticator app and then Next to show a QR code.
On your phone, open Authenticator. Select the plus icon, choose Personal account, then select Scan a QR Code. If the camera cannot scan the QR code, choose I can't scan the bar code on the PC, then use Enter code manually on the phone.
6. Turn on two-step verification or passwordless sign-in
Go to account.microsoft.com/security and sign in. Select Manage how I sign in. Under Additional security and Two-step verification, choose Turn on or Turn off.
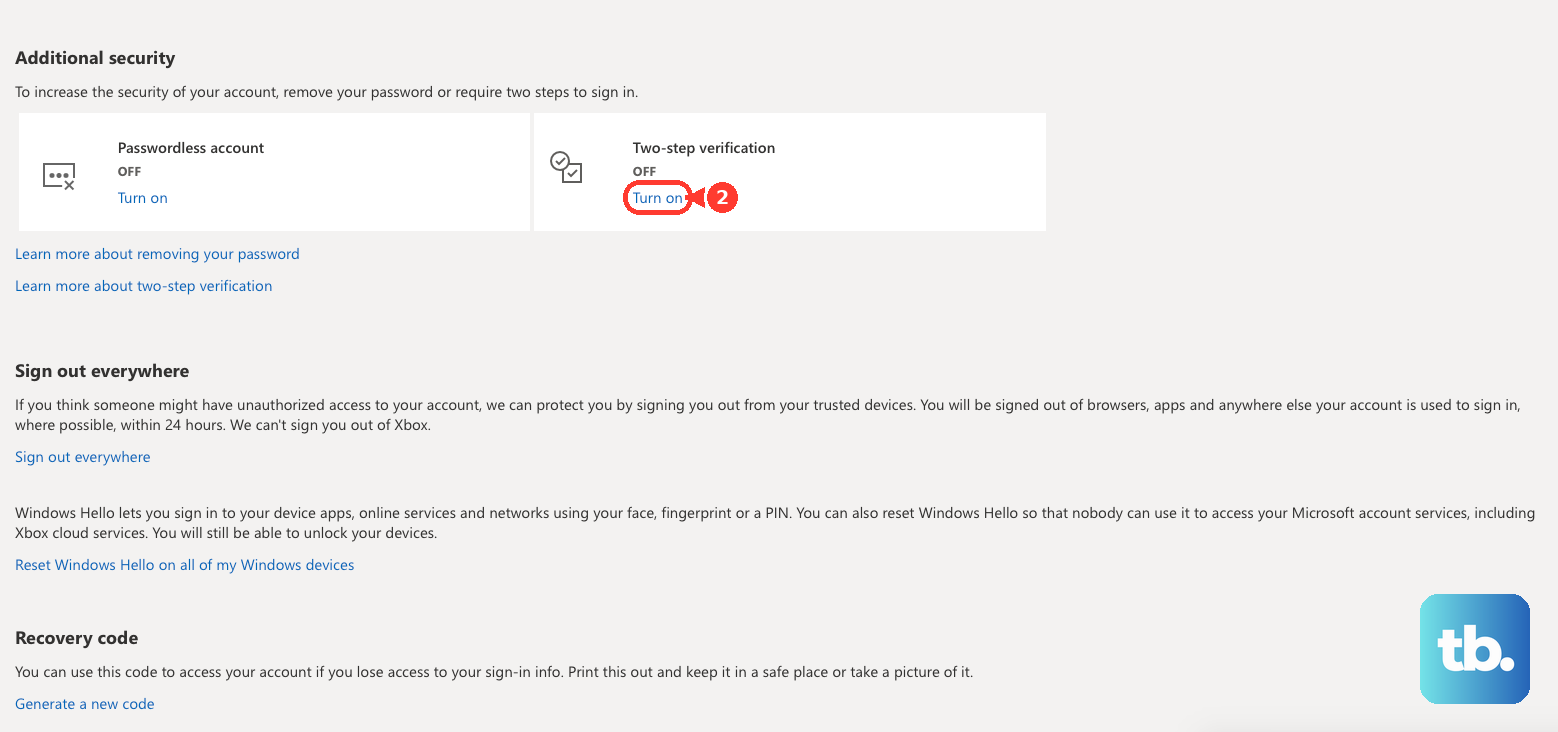
Follow the on-screen instructions. Two-step verification adds another check to the sign-in process. Microsoft recommends having three pieces of security info before you enable it.
For passwordless sign-in, open Additional security options, find Passwordless account, select Turn on, verify your account, and approve the request in Microsoft Authenticator. To add a password back, return to Additional security options, choose Passwordless account, select Turn off, select Next, and follow the prompts.
Keep a password or app password available for older products that still require one, including Xbox 360, Office 2010 or earlier, Office for Mac 2011 or earlier, IMAP and POP services, Windows 8.1 or 7 or earlier, Remote Desktop, Credential Manager, and some command-line or task-scheduler services.
One exception: for Outlook.com, Hotmail, or Live email, third-party POP and IMAP clients can no longer sign in with a password or app password, because Microsoft retired Basic Authentication for personal Outlook accounts on September 16, 2024; those apps now need modern authentication (OAuth), such as a current Outlook app or another client that shows the Microsoft sign-in screen.
7. Create passkeys and manage security keys
Passkeys belong in the same security area, but Microsoft sends this flow through Advanced Security Options. Sign in at account.live.com/proofs/manage. Select Add a new way to sign in or verify.
Select Face, Fingerprint, PIN, or Security Key. Follow the instructions for your device. Finish with Continue, Create, or Change / Save another way, depending on the prompt shown.
A passkey can be saved to Microsoft Password Manager, another synced credential manager, an iPhone, iPad, Android device, physical security key, or Windows Hello device. To rename or remove a saved account passkey, return to Advanced Security Options, review Ways to prove who you are, expand the passkey section, and select Rename or Remove.
For a physical security key, open the Microsoft account page, select Security, then More security options, then Add a new way to sign in or verify, then Use a security key. Choose USB or NFC, select Next, insert or tap the key, create or enter the security-key PIN, touch the key button or gold disk when prompted, and name the key.
On Windows 11, open Settings, select Accounts, then Passkeys. Select the menu next to a passkey and choose Delete passkey. For storage settings, open Advanced options and toggle services such as Save passkeys to this Windows device.
8. Generate recovery codes and remove old access
Go to account.live.com/proofs/manage/additional. Scroll to Recovery code. Select Generate a new code.
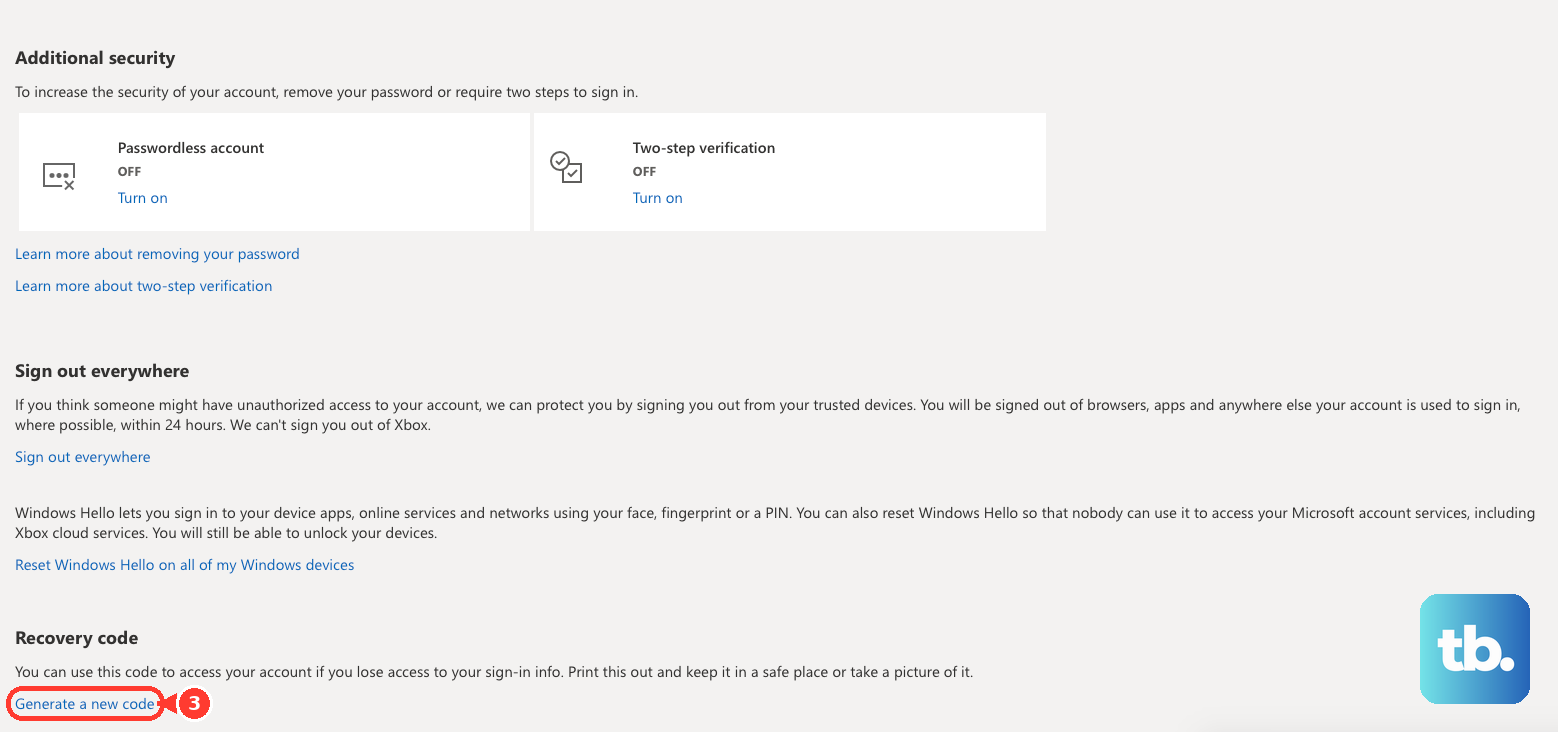
Print the code and keep it safe. A recovery code helps only after you create it. Microsoft says existing recovery codes cannot be retrieved or downloaded, and a new code invalidates previous codes.
To use that code during lockout, start at account.microsoft.com/account, select Other ways to sign in, then Use my password, then Forgot password?, then Use a different verification option, then I don't have any of these. At Do you have an account recovery code?, enter the recovery code and update the password when prompted.
To force old sessions off the account, open Advanced security options, scroll to Sign out everywhere, and select Sign out.
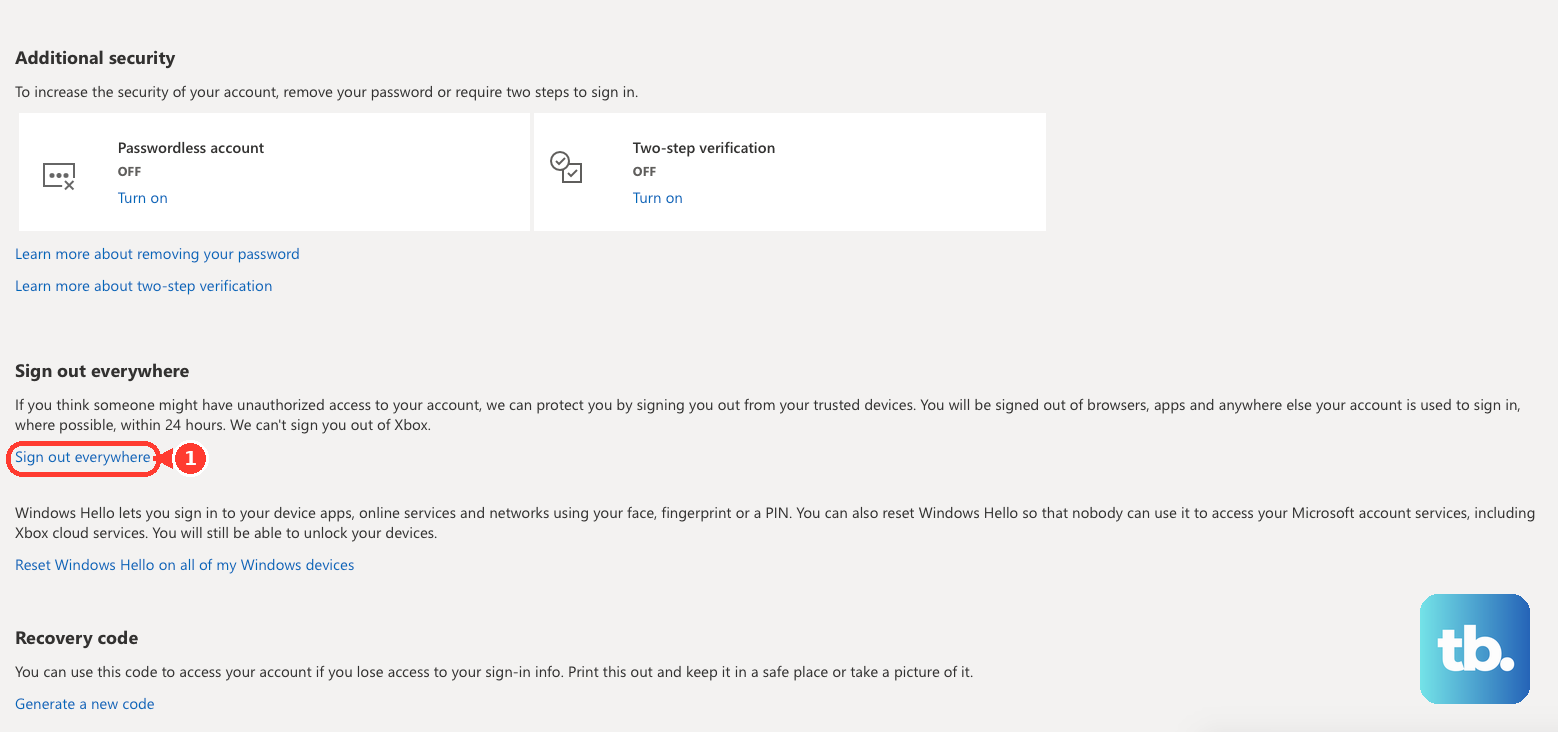
Microsoft says this signs you out of browsers, apps, and anywhere else the account is used within 24 hours, except an Xbox console, which you sign out of separately. To remove a device, go to account.microsoft.com/devices, find the device, select Remove device, check the confirmation box, and select Remove.
For content-linked devices, go to account.microsoft.com/devices/content, select Unlink, review the details, then select Unlink. For mobile devices, go to account.microsoft.com/devices/android-ios, find the device, and select Unlink.
9. Use My Sign-ins for work or school accounts
A personal Microsoft account uses the Microsoft account security dashboard. A work or school account uses mysignins.microsoft.com/security-info, and the available methods are controlled by the organization.
Go to mysignins.microsoft.com/security-info. Sign in with your work or school account. Select Add sign-in method.
Choose a method allowed by your organization. Follow the prompts. To edit an existing work or school method, select the method and use the available Change or Delete action.
In Microsoft Authenticator, a work or school account can also show shortcuts for Recent account activity, Change password, and Update security info when the organization enables them.
Frequently Asked Questions
What is the Microsoft account security page used for?
It is used to change a known password, review recent sign-in activity, manage sign-in and verification methods, set up two-step verification, create passkeys, generate a recovery code, and sign out active sessions.
Can I add a new phone number as Microsoft account security info?
No. Microsoft’s current consumer guidance says phone numbers can no longer be added for increased security. Use an email address, Authenticator, or a passkey instead.
Where do I check a suspicious Microsoft account login?
Go directly to account.microsoft.com/security, select Review activity, expand the sign-in, and choose This was me or This wasn't me. Use Secure your account or Change password when the activity was not yours.
Does Microsoft Authenticator work on a PC or Mac?
No. Microsoft Authenticator is available for iOS and Android, and Microsoft says versions more than one year old are no longer supported.
Is the work or school security-info page the same as the personal Microsoft account security page?
No. Personal accounts use account.microsoft.com/security. Work and school accounts use mysignins.microsoft.com/security-info, and the organization controls which sign-in methods are available.