A black line on your MacBook screen leaves you wondering whether an app is acting up or the display needs repair. Start with a restart, then check whether the line appears in a screenshot viewed on another device. These quick comparisons help you decide which software checks to try and when to book a repair assessment.
Start with a restart
When the line stays across the desktop or several apps, start here. Restart your Mac before changing settings.
Save your work.
Choose the Apple menu > Restart.
Check the screen after you log back in.
If the Mac is unresponsive and cannot restart, hold its power button for up to 10 seconds until it turns off. On models with Touch ID, use the Touch ID button. A forced shutdown can lose unsaved work.
Press and release the power button to start the Mac again.
Does the line show up in a screenshot?
Compare the captured image and the physical screen to narrow down where the problem appears.
- 1.Press Shift-Command-3 to capture the entire screen.
- 2.View the saved screenshot on another device or a known-good display and check whether it contains the line.
- 3.If you have a compatible external display, connect it using a supported video port and cable.
- 4.Open the Apple menu > System Settings > Displays.
- 5.Select the external display and use Use as to choose mirroring.
- 6.Compare the same content on both screens. A line missing from the screenshot viewed elsewhere, or confined to the built-in screen, is a clue pointing toward hardware. A line captured in the image gives you a reason to investigate software. These comparisons do not conclusively identify a failed panel, cable, or graphics component.
Remove surface marks and sources of pressure
Shut down the Mac before cleaning its screen.
Disconnect power and accessories.
For standard display glass, gently wipe with a clean, soft, lint-free cloth slightly dampened with water. Never spray liquid directly onto the screen.
For a MacBook Pro with nano-texture glass, use the polishing cloth supplied with the display to remove dust or smudges.
Remove camera covers, keyboard covers, palm-rest covers, and any material between the keyboard and display before closing the lid. This prevents further pressure damage; it does not reverse existing panel damage.
If unusual heat accompanies the line, move the Mac to a stable, ventilated surface within an ambient temperature of 50–95°F (10–35°C).
Keep bedding and objects away from the keyboard and ventilation openings.
Remember that cleaning removes surface marks, not failed pixels.
When only one app has the line
If the line appears only in one app, focus your troubleshooting there first.
Save your work.
Press Command-Q to quit the app.
Reopen it and check for the line.
For an unresponsive app, press Option-Command-Esc to open the force-quit window.
Select the app and click Force Quit. For an unresponsive Finder, select Finder and click Relaunch.
For an App Store app, open App Store > Updates.
Install the app's available update. For an app obtained elsewhere, use the developer's official update or download page. Included Apple apps receive updates through macOS.
For a line confined to a webpage, open that page in another browser to compare.
In Safari, press Command-R to reload the page.
Open Safari > Settings > Extensions.
Deselect extensions to test the page without them.
If reopening and updating the app do not help, try safe mode next to investigate software loaded during startup.
Test startup software in safe mode
Use safe mode to check whether software loaded during startup is involved. The startup procedure depends on whether your Mac uses Apple silicon or an Intel processor.
Open the Apple menu > About This Mac. A field labeled Chip identifies Apple silicon; Processor identifies an Intel Mac.
On Apple silicon, shut down the Mac.
Hold the power button until startup options appear.
Select the startup volume.
Hold Shift and click Continue in Safe Mode.
On Intel, start or restart while holding Shift until the login window appears.
Log in and check for Safe Boot.
Compare the screen with what you saw during normal startup.
Restart normally afterward.
If the line disappears in safe mode but returns during normal startup, open the Apple menu > System Settings > General > Login Items & Extensions.
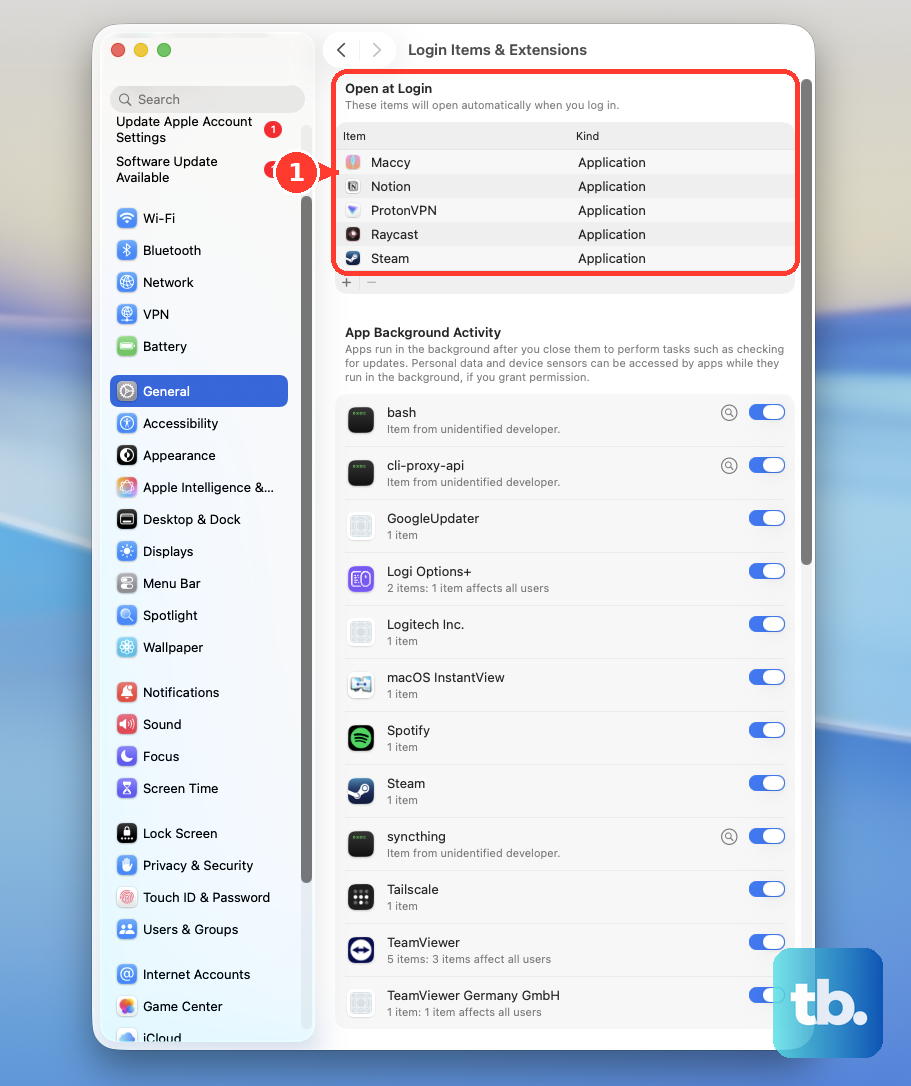
Record the Open at Login list before changing it.
Select its items and click the minus removal button.
Restart the Mac.
If the line disappears, add items back individually.
Restart after each addition to identify the software involved.
Update macOS and compare the Recovery screen
Connect a suitable backup disk before updating or reinstalling macOS.
Open System Settings > General > Time Machine > Add Backup Disk.
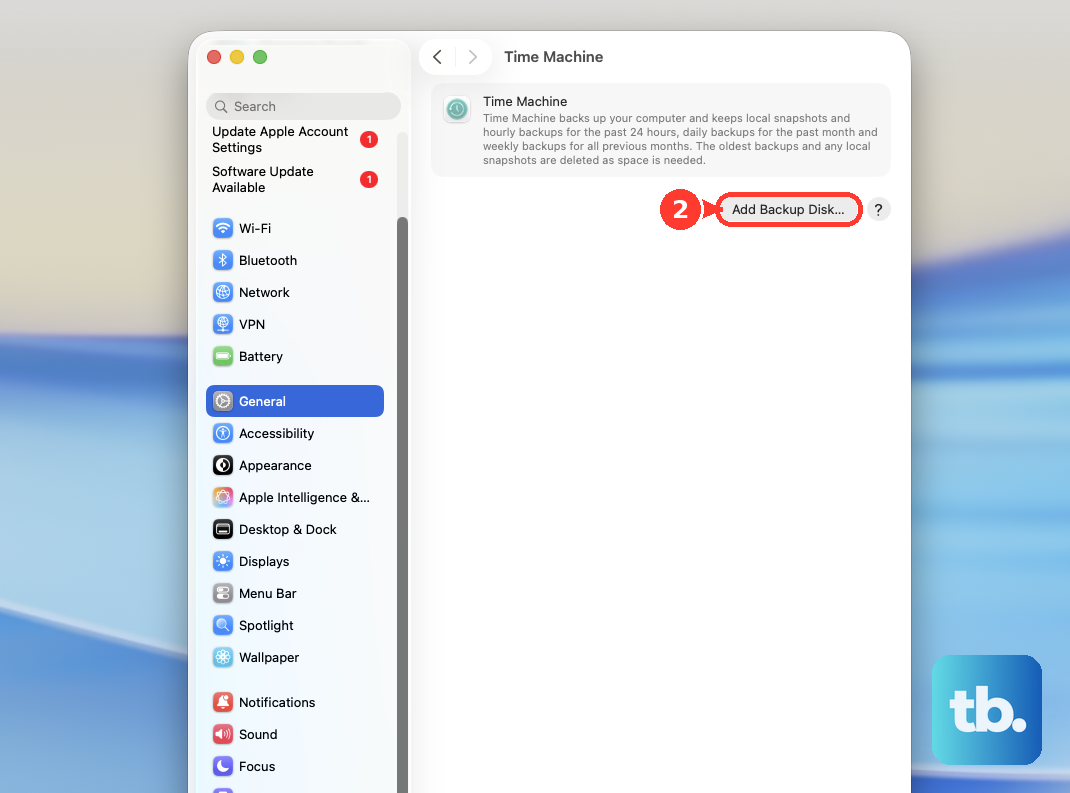
Select the disk and click Set Up Disk. If setup requires erasing the chosen backup volume, that erases its existing contents.
After setup, choose the Time Machine menu > Back Up Now.
Open the Apple menu > System Settings > General > Software Update.
Install the compatible update offered, leaving the lid open during installation.
If the line remains, compare the screen in macOS Recovery. On Apple silicon, shut down the Mac.
Hold the power button until startup options appear.
Click Options > Continue.
On Intel, start while holding Command-R until an Apple logo or globe appears.
Authenticate if requested.
Check whether the line remains in Recovery. Persistence outside the normal desktop is a stronger clue pointing toward hardware, but it does not identify the responsible component.
Choose the Apple menu > Restart to exit Recovery.
If the earlier checks still point to a macOS problem, back up before trying reinstallation without erasing the startup disk. In normal operation, this retains apps and personal data.
Return to Recovery using the procedure for your Mac above.
Select Reinstall macOS and click Continue.
Follow the installation prompts. If offered Macintosh HD and Macintosh HD - Data, select Macintosh HD.
Keep the lid open until installation finishes.
Skip repeated software changes when the line persists outside the normal desktop and move on to hardware diagnostics.
Run Apple's hardware diagnostics
Use Apple Diagnostics to test supported hardware and collect reference codes for your repair assessment.
- 1.Update macOS if possible, then shut down and disconnect nonessential devices.
- 2.On Apple silicon, hold the power button until Options appears, release it, then hold Command-D.
- 3.On Intel, start while holding D. If that does not work, try Option-D.
- 4.Follow the prompts and select the built-in display diagnostic when offered. macOS Tahoe 26 and later offer selectable diagnostics; earlier versions select tests automatically.
- 5.Choose Run Offline when offered unless Apple has initiated an online session.
- 6.Record any reference codes. Share them with support alongside the results of your screenshot, external-display, and Recovery comparisons.
A persistent line needs a repair assessment
If the line remains after these checks, particularly when it is confined to the built-in display or persists in Recovery, arrange professional diagnosis. The comparisons help isolate the problem, but they cannot determine the exact repair.
Back up your Mac before service using the Time Machine steps above.
Open Apple's Mac laptop service and repair page and click Get started.
Describe the line and provide any diagnostic reference codes.
Follow the support route offered for your Mac. Options include a Genius Bar or Apple Authorized Service Provider visit and mail-in service, depending on region, model, and parts availability.
To check coverage, open the Apple menu > System Settings > General > AppleCare & Warranty.
Select your Mac to view its coverage. Coverage information alone does not establish whether this particular display problem is covered; the repair scope and price require inspection.
For experienced owners considering Self Service Repair, start with the exact model's repair manual. The procedure requires the specified parts and tools. Display procedures are model-specific. For example, Apple's display troubleshooting procedure includes reseating the display cable, but it covers only 2024 and later Mac laptops with Apple silicon. Follow only the guidance for your exact model.
Frequently Asked Questions
Will changing brightness or resolution remove a black line?
Brightness adjustments test visibility, and default resolution addresses scaling or image-quality problems. Apple does not document either setting as a repair for damaged display pixels.
Should I reset NVRAM or the SMC on an Apple silicon MacBook?
Apple's NVRAM reset shortcut applies only to Intel Macs and is unnecessary on Apple silicon. For SMC-related troubleshooting on Apple silicon, connect power and restart, or shut down and turn the Mac on again. Apple requires no further SMC-reset steps. These procedures are not documented black-line repairs.
Is the old 13-inch MacBook Pro backlight service program still available?
No. The former Display Backlight Service Program has ended. Use Apple's ordinary service and coverage routes.
What if the black line is only on my external monitor?
Secure the monitor's power and video connections. Use a cable and adapter that support the intended resolution and refresh rate. Bypass the hub or dock by connecting the display directly to the Mac. An external video cable does not serve the MacBook's built-in screen.