In this article, we will show you how to share your screen in Microsoft Teams meeting with other members of the meetings. This is a super easy process. But first, let’s talk about Microsoft Teams for a bit, shall we?
What is Microsoft Teams?
Microsoft Teams is a platform mainly used by schools, companies, and smaller groups who cannot see each other in real life. It is a great way of communication, and all you need to do to connect with your friends, coworkers, and students is have an account on Microsoft Teams and a stable internet connection.
Microsoft Teams offers you many different features, one of which is the screen sharing feature, which allows you to share your screen with other meeting participants. But more on that topic is in the second paragraph of this article, so head over there.
Steps to sharing your screen in Microsoft Teams
This is a very easy thing to do. The process will only last a few minutes, and there are a few steps that you need to follow to be able to share your screen when you are in a meeting on Teams.
Well, to be able to share your screen with someone, you must first be in the Microsoft Teams meeting. Screen sharing is very cool and one of the most used features in online video chatting. You can share your screen with other meeting attendants so they can see its content. If you are, perhaps, in a video conference and you want to share and present your PowerPoint presentation, this feature does come in handy. Here are the steps to share your screen in Microsoft Teams without further ado.
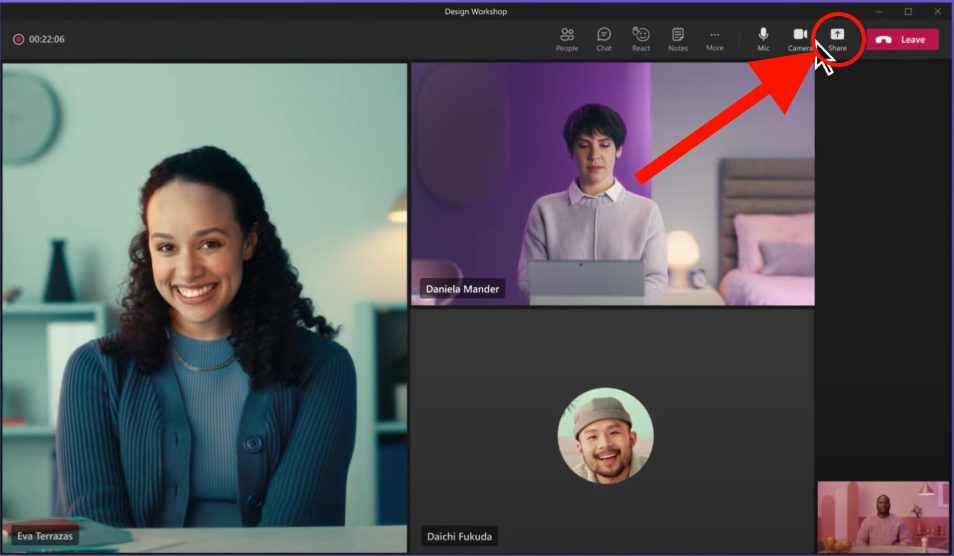
- When you are in the meeting, move your cursor to that meeting window to uncover all of the options available to you.
- Remember that this screen-sharing option is only available for Windows 10 and Mac OS users. Once you have moved your cursor to the meeting window, you can see the upper toolbar with many options. We are looking for a button with a square logo and an arrow. It should be somewhere in the middle of that toolbar. Once you have spotted that button, click on it.
- You should now be able to see a new window pop up on your screen. In this window, you will have to choose whether or not you want to share your whole computer screen or just one currently open window. Click on the Desktop option to share your whole desktop, or click on the Window option to choose which window you want to share with others. This is up to you; you can choose whichever option you want. If you are sharing your whole desktop screen, keep in mind that everyone will be able to see it, so make sure that the shareable content is visible and not any other.
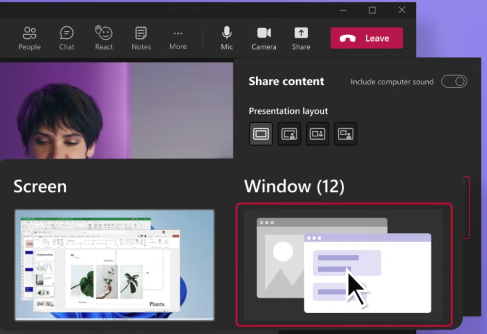
- After choosing between those two options, screen sharing will begin immediately.
- Also, if you wish to end the screen-sharing session, click on the Stop Sharing button at the bottom toolbar of your meeting. After that, your screen will no longer be visible to your other meeting buddies.
And that is it; you have now learned how to share and stop sharing your screen in a meeting on Microsoft Teams.
Also Read


Recent
Ottocast Car TV Mate Max Review – A Versatile In-Car Entertainment Adapter
iPhone Battery Dying In Minutes? 23 Real Fixes That Work
Ottocast Play2Video Pro Ups the Game in Affordable Car Entertainment
Ottocast OttoAibox P3 Powers a Smarter Driving Experience
How to Disable WebRTC in Your Browser Settings
Guides

Lenovo Debuts Solar-Charging Laptop That Turns 20 Minutes of Sunlight Into Hour of Video

Why Do Smartphones Get Slower Over Time?

Decoding Tech Jargon: The A to Z Cheat Sheet (Free Downloadable PDF)

How to Clear an App's Cache on Your Samsung Device

Why Are My iPhone Messages Green Instead of Blue?

Everything Google Knows About You (And How to Stop It)
