iTunes has a great option to share your library with others on your local network. You can set up five PCs, and share different kinds of things. You can share movies, certain types of audio files, radio stations, and more. However, you can’t share the files you have purchased from Audible and QuickTime sound files and programs. If that’s something you want to do and you are using iTunes on your Windows 10 PC. we are going to show you the steps to set it all up. See how to share your iTunes library on your local network on Windows 10.
How to Share Your iTunes Library on Your Local Network on Windows 10
You must enable the option first to share your iTunes library on your local network. Here's how to do just that:
- Open iTunes on your Windows 10 PC
- Next, click on Edit
- Then click Preferences
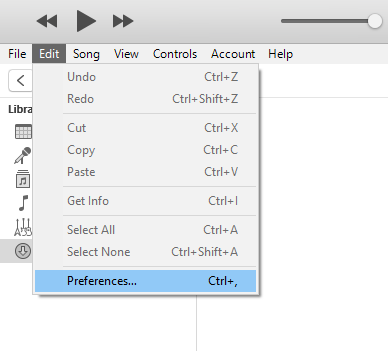
- Select Sharing
- Tick the box next to “Share my library on my local network.”
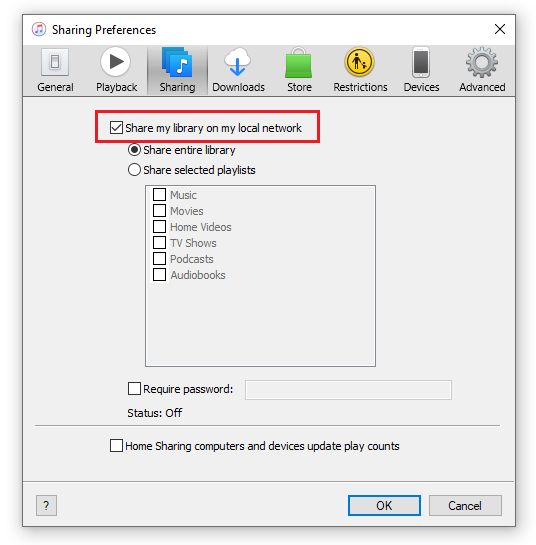
- Select the option you want. You can share your entire library, or you can share certain playlists. If you go for the second option, you’ll be able to select the playlists you want to share.
- In addition, you can request a password that users need to enter to access your playlist. Tick that option and then enter the password you want.
- Once you are done, click OK.
That would be all. You have successfully enabled the option that allows you to share your iTunes library on your network.
Also Read

Updated APN settings for AT&T

Updated APN settings for Verizon
Updated APN settings for T-Mobile
Samsung Confirms Launch Date for Galaxy F54 5G in India and Provides a Glimpse of Design
iOS 17 Rumors and Concept Showcase Exciting Features Ahead of Apple's Announcement

How To Fix a Samsung TV That Won't Turn On (Tried & Tested)
Recent
Ottocast Car TV Mate Max Review – A Versatile In-Car Entertainment Adapter
iPhone Battery Dying In Minutes? 23 Real Fixes That Work
Ottocast Play2Video Pro Ups the Game in Affordable Car Entertainment
Ottocast OttoAibox P3 Powers a Smarter Driving Experience
How to Disable WebRTC in Your Browser Settings
Guides

Why Do Smartphones Get Slower Over Time?

Decoding Tech Jargon: The A to Z Cheat Sheet (Free Downloadable PDF)

How to Clear an App's Cache on Your Samsung Device

Why Are My iPhone Messages Green Instead of Blue?

Everything Google Knows About You (And How to Stop It)

How To Delete Cookies On Your Android Device (And Why You Should)
