System Data is taking up a big chunk of your Mac’s storage, and there’s no button to clear it. You can still reclaim space by clearing some caches, removing unwanted backups, and using apps’ built-in cleanup controls. Start with the storage screen, then tackle the items you actually use.
Find out what is taking up space
Open Apple menu > System Settings > General > Storage. This path applies to macOS Ventura 13 and later.
System Data includes caches, logs, temporary files, VM resources, fonts, app support files, and plug-ins. It has no selectable file list or clear button.
Click the Info button beside a category that offers file inspection. Start with identifiable content instead of guessing which folders account for the total.
Watch available disk space as well as the category graph. Removing downloads, photos, or messages frees space in their own categories, even when System Data stays large.
Use Safe Mode to clear some system caches
Safe Mode clears some system caches. Those caches regenerate, so this is a cleanup step rather than a permanent limit on their size.
On a Mac with Apple silicon, shut down your Mac.
Hold the power or Touch ID button until startup options appear.
Select your startup disk.
Hold Shift and click Continue in Safe Mode.
On an Intel Mac, start or restart while holding Shift until the login window appears.
Log in to your Mac.
To return to normal operation, choose Apple menu > Restart.
Remove old device backups
Backing up an iPhone, iPad, or iPod touch to your Mac leaves local backups on its drive.
Connect the device to your Mac with a USB cable.
Open Finder.
Select the device in Finder.
Open General > Manage Backups.
Right-click an unwanted backup and choose Delete. Keep any backup you still need for restoring the device; this deletes the local backup, not an iCloud backup.
Click OK when you finish.
To locate backups for identification or copying, open Finder > Go > Go to Folder.
Enter ~/Library/Application Support/MobileSync/Backup/. Use Manage Backups when you want to delete a backup.
Let Time Machine reclaim snapshot space
Time Machine removes aging local snapshots and reclaims their space when needed. macOS already counts that space as available, so their presence alone does not mean you are running out of usable storage. To trigger removal yourself, open Apple menu > System Settings > General > Time Machine > Options.
Set Backup Frequency to Manually.
Click Done.
After a few minutes, return to Time Machine > Options > Backup Frequency and restore your previous automatic backup frequency. No cleanup command is required.
Clear app caches through the apps themselves
App cache controls clear cached data; supplied uninstallers remove unused apps and associated files.
For Spotify, open your profile picture > Settings > Storage.
Click Clear cache. Cached streams and offline downloads are separate, so treat downloaded content separately.
For Slack, choose Help > Troubleshooting > Clear Cache and Restart from its Mac menu bar. The cache grows again with use.
To remove an unused app, quit it first.
Open Finder > Go > Applications.
Look for the app’s Uninstall or Uninstaller utility. Apple recommends a supplied uninstaller for removing associated extensions, login items, and data stored elsewhere.
Run the supplied uninstaller for the app you want to remove.
For an app without an uninstaller, select it in Applications.
Choose File > Move to Trash. Required macOS apps cannot be removed this way, and deleting an app does not automatically delete documents you created with it.
Choose Finder > Empty Trash to permanently remove the discarded files.
Empty browser caches
Use your browser’s cleanup controls to remove its cached browsing data. Leave other data types unselected when you want to keep them.
In Safari, open Safari > Settings > Advanced.
Enable Show features for web developers.
Close Settings.
Choose Develop > Empty Caches.
To remove Safari website storage as well, open Safari > Settings > Privacy > Manage Website Data. Removing website data also removes site-local data and can sign you out.
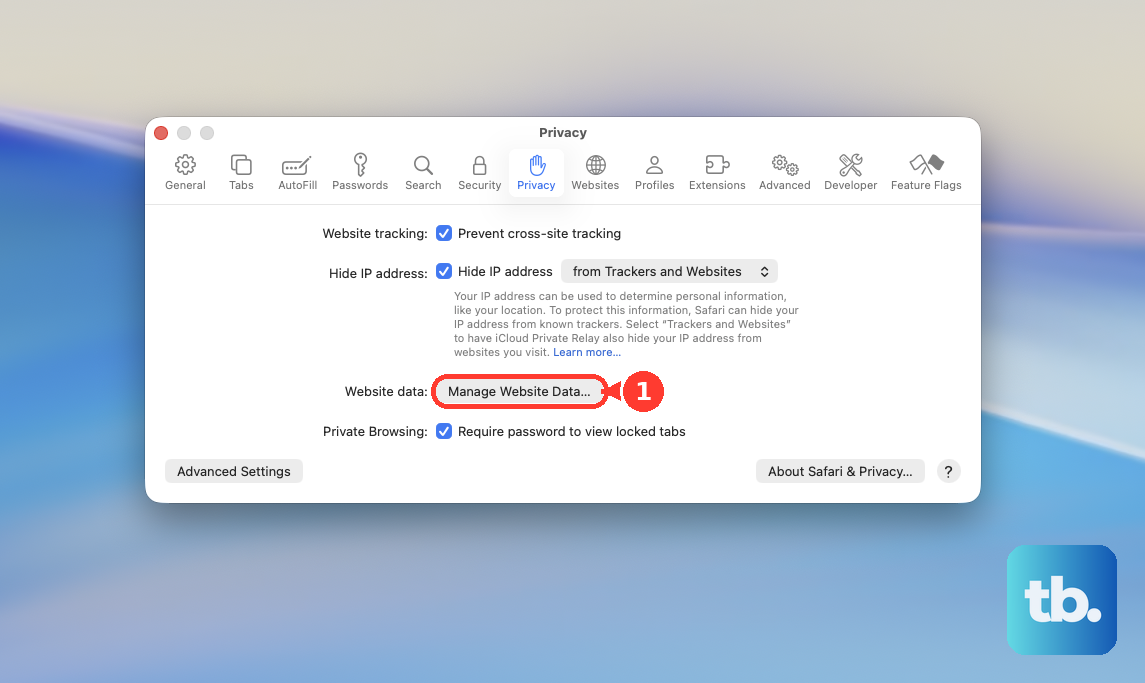
Select the sites you want to clear.
Click Remove, or choose Remove All to clear every listed site.
In Chrome, open More > Delete browsing data.
Choose All time as the time range.
Select Cached images and files, leaving other data types unselected unless you also want to remove them.
Click Delete data. Clearing download history does not delete downloaded files themselves.
In Firefox, open the menu panel > History > Clear Recent History….
Set When to Everything.
Select Temporary cached files and pages.
Deselect any data types you want to retain.
Click Clear.
Free more space from files you recognize
Open System Settings > General > Storage. The following cleanup targets files in other storage categories, so watch available space rather than expecting every deletion to reduce System Data.
Click the Info button beside Documents.
Inspect large files, downloads, or File Browser.
Sort by Size to find the largest items.
Select a file you recognize and no longer need.
Click Show in Finder to locate it before deciding whether to remove it.
Click Delete in the storage view for an unwanted item.
For ordinary files you want to keep elsewhere, copy them to an external storage device. App libraries require their own migration procedure where the app specifies one.
Check that the destination copies are usable.
Remove the originals only after confirming the copies.
For downloaded iCloud Drive files, open Finder > iCloud Drive.
For an item pinned with Keep Downloaded, Control-click it and deselect that option first.
Control-click a downloaded item and choose Remove Download. This removes the local download while keeping the cloud file; downloading it again requires an internet connection.
Choose Finder > Empty Trash to permanently remove discarded files.
For ongoing cleanup, enable Finder > Settings > Advanced > Remove items from the Trash after 30 days.
Judge the result by the available disk space you recover, even when System Data stays large.
Frequently Asked Questions
Does Optimize Storage clear all System Data?
No. Optimize Storage removes watched Apple TV downloads and retains only recent email attachments when space is needed. It mainly reduces other storage categories and does not clear all System Data.
Should I delete the entire Library Caches or Application Support folder?
No. Apple’s storage guidance doesn’t list bulk deletion of those folders as a System Data cleanup method. Use the app’s own controls to remove the data you intend to clear.
Will turning off Apple Intelligence free its downloaded model storage?
Apple’s current macOS 27 guidance makes no promise that turning off its AI features removes downloaded models. Apple’s checked macOS 27 guidance doesn’t document a separate method for removing downloaded model storage.
Do I need to erase my Mac to reduce System Data?
No. Erasing your Mac is a destructive reset, not routine System Data maintenance. Erase All Content and Settings removes user data while preserving the installed operating system on compatible Apple silicon or T2-equipped Macs. Back up needed files before an erase.