You want to record yourself on your MacBook, but the choice between camera, screen, and audio recording leaves you wondering which app to open. Start with QuickTime Player to capture your face and voice and save the video to your Mac. For a screen demonstration, an iPhone camera, or a voice-only recording, use the matching option below.
Start with QuickTime for a video of yourself
If your recording shows your desktop instead of your face, you've opened screen recording instead of camera recording. Open QuickTime Player, which is included with macOS. Then choose File > New Movie Recording to open the camera recording window.
Click the arrow beside the recording button, then select your MacBook's built-in camera under Camera. Choose your built-in microphone or a compatible external microphone under Microphone. Set your preferred Quality.
Click Start Recording when you're ready to speak. Click Stop Recording when you're finished. Choose File > Save to save your video.
Make a quick camera clip in Photo Booth
Photo Booth gives you another built-in way to record and export a camera clip. Open Photo Booth. If you're viewing an existing item, click View Photo or View Video to return to capture mode.
Click Video at the bottom left, then click Record Video to begin, or hold Option while clicking it to skip the countdown. Click Stop when you've finished speaking.
Select the recording's thumbnail. Choose File > Export to export the clip as a MOV file, or drag the thumbnail to your desktop.
Use your iPhone as the camera
Continuity Camera turns a supported iPhone into your MacBook's webcam. It requires macOS Ventura 13 or later and an iPhone XR or later running iOS 16 or later. For a compatible external webcam instead, connect it and select it under Camera in QuickTime's recording options.
For Continuity Camera, sign in to the same Apple Account with two-factor authentication on both devices. Enable Wi-Fi and Bluetooth on both devices.
On your iPhone, open Settings > General > AirPlay & Continuity (labeled AirPlay & Handoff on some iPhones) and enable Continuity Camera. Mount the nearby iPhone with its rear cameras facing you. Lock the iPhone.
Select the iPhone under Camera in QuickTime's recording options, then use the QuickTime recording and saving steps above. Wireless use has additional restrictions involving AirPlay, Sidecar, and internet sharing. USB also works after you connect the iPhone and trust the Mac.
Capture your screen with your voice
Press Shift-Command-5 to open the Screenshot toolbar, which records your screen with optional microphone narration and no webcam overlay. Select Record Entire Screen or Record Selected Portion. Choose your microphone under Options > Microphone, or select None to disable microphone recording. Set the destination under Options > Save to.
Click Record to begin. Press Command-Control-Esc to stop; the recording saves to your selected location. Tip: On macOS Tahoe 26 or later, choose Record Selected Window and click the target window to record just that window.
Put your face and screen in the same recording
Clipchamp captures your camera and screen together, with clips you can position separately. Open app.clipchamp.com in Chrome or Edge on your MacBook; its recorder does not support Safari. Create or open a project.
Choose record & create > screen & camera in a personal account, or record & create > screen and camera in a work account. Allow camera access when prompted, then allow microphone access when prompted. Select your microphone.
Click the recording button. Select the browser tab, window, or screen you want to capture. Click Share.
Click Stop sharing when you're finished. Choose save and edit to bring the recording into the editor. Use export to create the finished video.
Record just your voice
For audio without video, use Voice Memos on your Mac.
- 1.Open Voice Memos.
- 2.Click Record to begin.
- 3.Use Pause and Resume for breaks.
- 4.Click Done to save the recording.
Restore camera and microphone access
A recorder needs permission to use your camera, microphone, and screen. Start with the permission for whichever part isn't working.
For camera access, open Apple menu > System Settings > Privacy & Security > Camera. Enable the recording app. Built-in apps such as Photo Booth automatically have camera access, even when they aren't listed here. Next, for microphone access, open Apple menu > System Settings > Privacy & Security > Microphone.
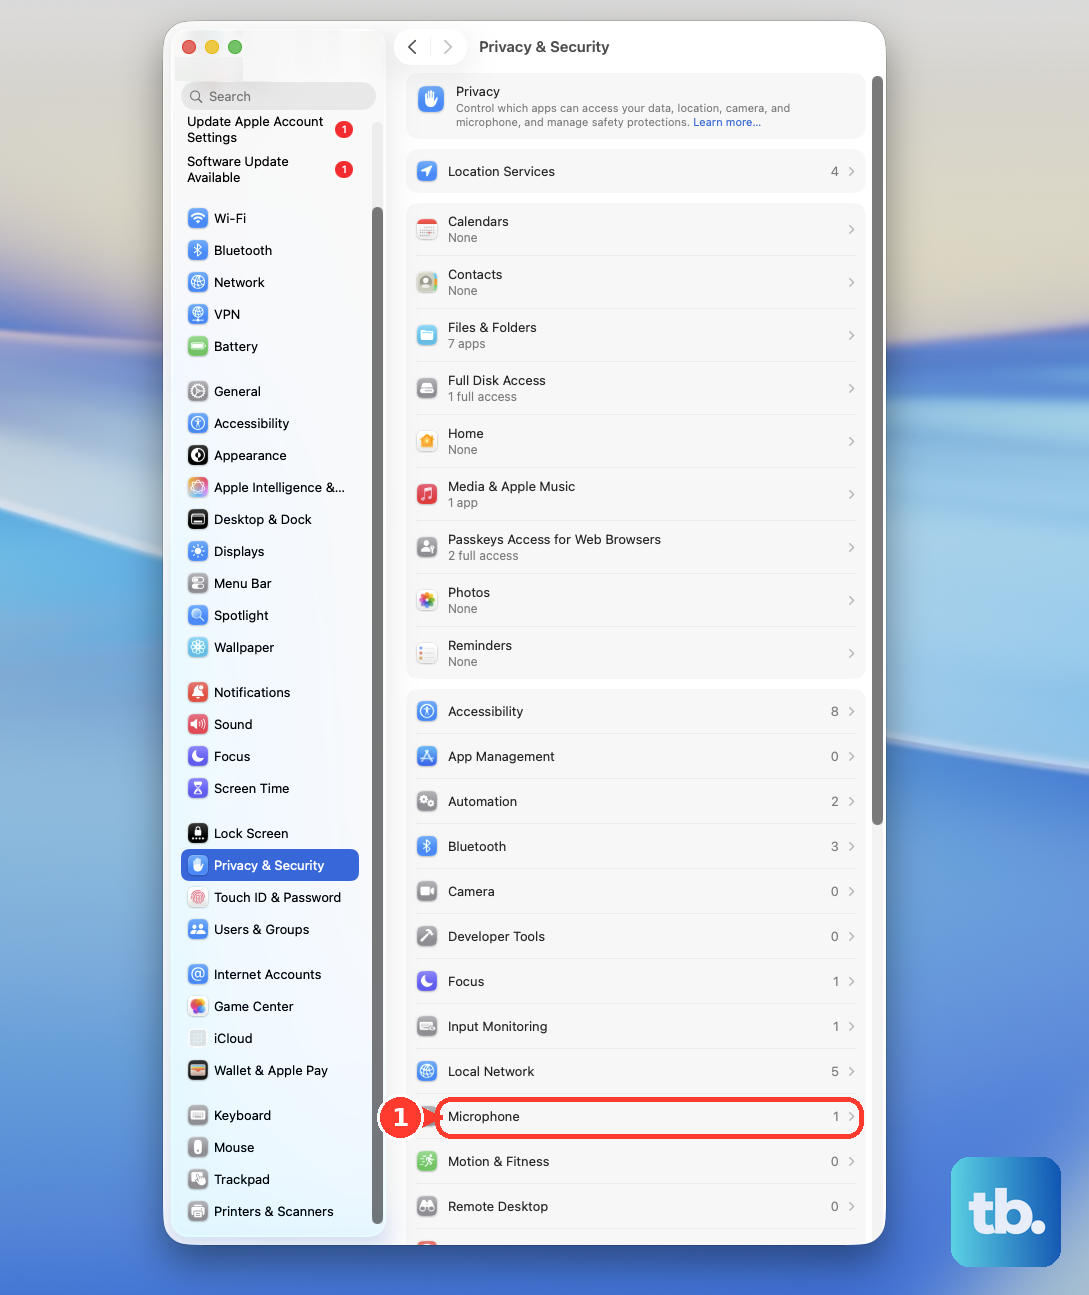
Enable the recording application or browser. For screen access, open Apple menu > System Settings > Privacy & Security > Screen & System Audio Recording. Enable the recorder or browser. Permission grants access; it doesn't start a recording.
For a recording website in Chrome, open Settings > Privacy and security > Site Settings. Select the recording site. Set Camera to Allow, then set Microphone to Allow.
In Edge, open Settings > Privacy, search, and services > Site permissions > All sites. Select the recording site. Allow Camera access, then allow Microphone access.
Restart the browser if the macOS permission change requires it. If the camera still won't work, open Apple menu > System Settings > Screen Time. Select the relevant family member if applicable. Open Content & Privacy > App & Feature Restrictions.
Allow Camera. Open Screen Time > App Limits. Adjust any limit affecting the camera app. If access remains blocked on a managed Mac or browser, ask your administrator to review camera, microphone, or screen-capture restrictions.
Frequently Asked Questions
Do I need QuickTime Pro to record myself?
No. Use the QuickTime Player included with macOS. QuickTime Player 7 is unsupported and incompatible with macOS versions after Mojave. Skip tutorials requiring QuickTime 7 or a QuickTime Pro registration code.
Can I record myself directly into iMovie?
Yes. Click Media first if the import button is hidden. Click Import. Select the built-in camera under Cameras. Choose an event, New Event, or Project Media under Import to. Click Record below the preview to start. Click Record again to stop. Click Close.
Can I add a countdown before a screen recording?
Yes. Press Shift-Command-5 to open Screenshot. Open Options > Timer and select a delay before starting your recording.
How do I reconnect my iPhone after tapping Disconnect?
Connect the iPhone to your Mac by USB to add it back to the available camera list. For a temporary break instead, use Pause and Resume on the iPhone. These controls manage the camera feed; save the video in your recording app.