In this article, we will be teaching you how to record your meetings in Microsoft Teams. But before that, we shall be talking about the Microsoft Teams platform in general, what it is, how it works, and some of the best features that the Microsoft Teams platform has.
So, if you are impatient and want to get straight to the point, go to the second paragraph of this article right away to learn the steps for recording your meetings in Microsoft Teams.
What is Microsoft Teams?
Microsoft Teams is a platform used mainly by schools and companies that want to organize their classes, meetings, and projects. People can communicate with each other in Microsoft Teams, make plans, develop new projects, and handle assignments. This platform is great for you if you are a teacher who cannot hold and attend classes in real life but want to be in touch with your students all the time. Microsoft Teams allows you to hold online meetings and video conferences.
You can even share your screen with other meeting participants and even present your PowerPoint presentation that way. This platform has one amazing feature where you can record your meetings. This feature is great because you can have a backup copy of some vital information that you did not memorize or that you did not write on a piece of paper.
And by recording a meeting, you will be safe knowing that you have all that information in one place and that you can re-watch the meeting anytime you want to. Therefore, without further ado, we will present the steps to recording a meeting you are attending on the Microsoft Teams platform.
Steps to recording a meeting that you are attending on Microsoft Teams
If you are attending a meeting on your desktop:
- To be able to record a meeting, you must first attend a meeting. There is no way to set up an option to start recording the meeting as soon as you enter; you have to do it manually when you are in the actual meeting.
- When you are in the meeting, move your cursor to the meeting window so that you expand some more options.
- Find the three-dotted button in the bottom toolbar of your screen and click on it to expand even more options.
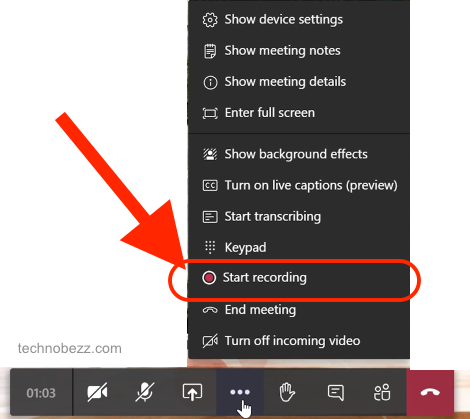
- A new drop-down menu should show up on your screen. You will need to find the Start recording button in that menu and click on it. By clicking on it, the recording process is going to start immediately. And everyone that is attending that meeting is going to get a notification that you are recording it. Also, people will get a notification in the chat saying that the meeting is being recorded. Also, remember that if one person starts to record a meeting after they stop, everyone who has participated will get a copy of that recording saved to their Cloud storage.
- If you want to stop your meeting, move your cursor to the meeting window to expand those options again.
- Click on that three-dotted button and wait until the drop-down menu shows up.
- When it does show up, find the Stop recording option and click on it. The recording will be saved to everyone’s cloud storage after the recording has been stopped.
Also Read


Recent
Ottocast Car TV Mate Max Review – A Versatile In-Car Entertainment Adapter
iPhone Battery Dying In Minutes? 23 Real Fixes That Work
Ottocast Play2Video Pro Ups the Game in Affordable Car Entertainment
Ottocast OttoAibox P3 Powers a Smarter Driving Experience
How to Disable WebRTC in Your Browser Settings
Guides

Lenovo Debuts Solar-Charging Laptop That Turns 20 Minutes of Sunlight Into Hour of Video

Why Do Smartphones Get Slower Over Time?

Decoding Tech Jargon: The A to Z Cheat Sheet (Free Downloadable PDF)

How to Clear an App's Cache on Your Samsung Device

Why Are My iPhone Messages Green Instead of Blue?

Everything Google Knows About You (And How to Stop It)
