


If you’re a Mac user, we know you have tried at least once to post on Instagram using your Mac computer, and we also know that you faced difficulties in how to make it. This is why this article is written.
Here, we’ll show you how to publish content, either photos or videos, on your Instagram account via your Mac. Two methods allow you to publish a media file on Instagram from a Mac PC. The first method is using the Apple browser (Safari), and the second method – using the Chrome browser.
Posting on Instagram using Safari:
It’s a clever trick that will let you upload photos on Instagram with your Mac, and you need to open the Instagram website like you are using an iPhone. Follow these simple steps:
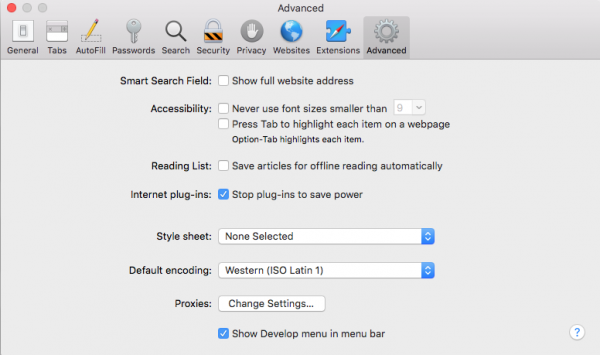
- First, launch Safari navigator, click on “Preferences,” and choose “Advanced.” Verify from the menu bar that “Show Develop Menu” is switched on.
- In the next step, go to Instagram and log in to access your account.
- Then, you have to go to the “Develop” drop-down menu you can find on the top menu bar, then select “User-Agent” and finally select “Safari – iOS 12 – iPhone,” or it could be the latest version, other than 12.
After this, Instagram will consider you an iPhone owner using Safari mobile version. You need to reload the website page to get an iPhone-like display, and you will get all the functionalities of a mobile user. One of these functionalities is the ability to upload images and videos. - Then you can see the upload feature or button on the browser’s middle bottom. Once you click the upload button, it will lead you to your computer files. Choose any photo or video you want to share, select a filter, and click “next.”
- Finally, by clicking “share” on the top right of the screen, your image will be posted on your Instagram profile.
Posting on Instagram using Chrome:
There is no big difference between Safari and Chrome, and basically, it’s the same principle to follow.
- On the menu bar, select “View,” then select “Developer.” A list of options will expand from which you have to choose “Developer Tools.” The console opens, and you must find the menu bar icon left from the “Elements” option. This will allow you to switch to the user agent and display the Instagram mobile version.
- Now you have to select your device. In fact, by clicking “Responsive” on the menu bar, a list of Apple devices will expand, and all you have to do is to choose yours. Once you select your option, the display will look like the display of the chosen device. Refresh the website if this does not happen, and the display remains unchanged.
- After everything is set as described above, the upload button will appear on your virtual mobile screen. Go ahead and click the upload button at the bottom middle of the screen. This will systematically open the folder with your files on your Mac computer.
Then, it’s time to choose a photo or image, or even a video, and once selected, you get two options; either you want to rotate the photo or zoom in or make both of them if you like.
After this, Instagram offers multiple filters to choose from. Make your appropriate choice and click “Next,” after which you can write a short description of the photo.
In the end, click “Share,” and the photo will appear instantly on your Instagram profile.
