Websites can use trackers to collect data about the content that you browse. These can include information such as subjects you enjoy reading about, videos you are more likely to share, and items you will likely shop online for. Some of these trackers can track your activity across multiple websites.
Thus, you will sometimes find the same advertisement following you over multiple websites. Microsoft Edge has functions that help prevent trackers from collecting your data. This article will cover how to manage settings within Microsoft Edge that will enhance your browsing experience.
Enabling Tracking Prevention
For PC users:
- Launch Microsoft Edge on your device. If you are having trouble locating the application, its logo has a mixture of blues and greens, forming the letter "e."
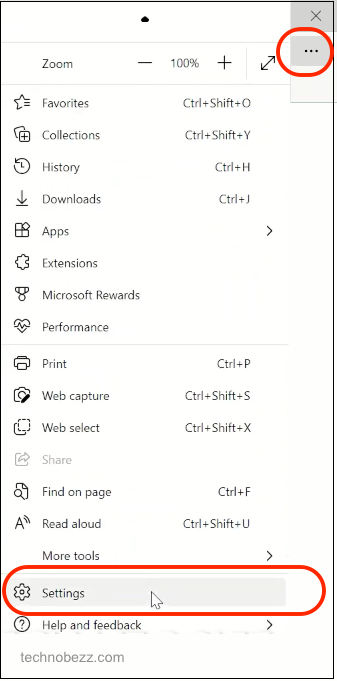
- Click on the Options button in the Microsoft Edge window. It is located on the top right of your screen and represented by three dots in a horizontal line. From the drop-down menu that appears, select Settings. Alternatively, you may type "edge://settings/privacy" into the website address bar.
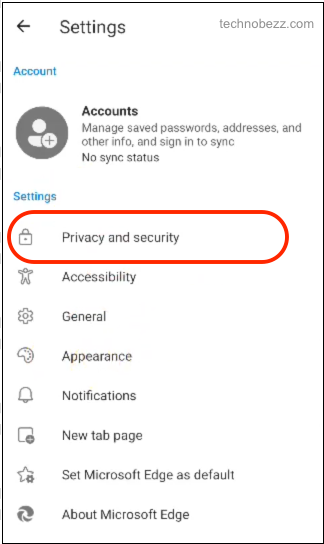
- Select the Privacy, search, and services from the panel on the left of the new page that pops up as a new tab.
- Scroll down and look for the Tracking Prevention feature. You can select the default settings to enable the function. There are three default plans available: Basic, Balanced, and Strict. Using Basic will allow most trackers across all websites, while Balanced and Strict will increasingly block more trackers. All three plans will block known harmful trackers.
- Select the plan that best suits your needs.

For mobile device users:
- Launch Microsoft Edge.
- From the app, click on the Options button at the bottom of the screen. It should be located next to the arrow keys.

- From the window that pops up at the bottom of the screen, click on Settings. It has a gray icon with a gear.
- From the Settings menu, click on Privacy and Security. This will direct you to a page with all the settings for your personal information stored within the Microsoft Edge browser.
- Scroll down and click on the Tracking Prevention option.
- Toggle the switch next to enable the Tracking Prevention feature. As with the PC version, there are three default plans that you may choose from.
- Click on a plan that suits you, and make sure a tick appears on the right side of your chosen plan.
- Tap on Done once you have enabled Tracking Prevention, and choose a plan you wish to use.
![]()
Settings available within Tracking Prevention
For the PC versions, there are a few more features that you can use to customize your Tracking Prevention feature.
- Follow steps 1 to 3 from Enabling Tracking Prevention for PC users.
- Below the Tracking Prevention plans, you can select Blocked Trackers. These will show you all the sites that Microsoft Edge has blocked from tracking you. You can also view the number of times the site has been blocked. This can give you a rough idea of the websites that wish to collect your data.
- Go back to the previous page by clicking on the arrow pointing to the left. Select Exceptions. This option allows you to add web addresses that you want to enable tracking. You can add a website by clicking the Add Site button on the top right. You may remove or edit the website address added by clicking on the three dots that appear beside the web address.
You can also add exceptions to the Microsoft Edge mobile app tracking feature under the Privacy and Security settings page.
Also Read


Recent
Ottocast Car TV Mate Max Review – A Versatile In-Car Entertainment Adapter
iPhone Battery Dying In Minutes? 23 Real Fixes That Work
Ottocast Play2Video Pro Ups the Game in Affordable Car Entertainment
Ottocast OttoAibox P3 Powers a Smarter Driving Experience
How to Disable WebRTC in Your Browser Settings
Guides

Lenovo Debuts Solar-Charging Laptop That Turns 20 Minutes of Sunlight Into Hour of Video

Why Do Smartphones Get Slower Over Time?

Decoding Tech Jargon: The A to Z Cheat Sheet (Free Downloadable PDF)

How to Clear an App's Cache on Your Samsung Device

Why Are My iPhone Messages Green Instead of Blue?

Everything Google Knows About You (And How to Stop It)
