Microsoft Word is among the most popular word processors used by millions of people all around the globe. Many people use it daily to write all kinds of things, from notes and diaries to articles and books. No matter what you are using it for, it is pretty simple, and the best part is that it comes with many options that you can adjust to make your text look great. It also has the option to allow you to make your Word file read-only. So you are working on the file, and you completed it. You can make it final if it does not need more editing or adjustments. When you're ready to do that, you should make your file read-only. Here, we are going to show you the steps for that. Let’s see how to make a Word file read-only.
How to make a Word file read-only
To make a Word file read-only, follow several simple steps listed below:
- Make sure your file is completed
- Click on File in the top-left corner of the screen
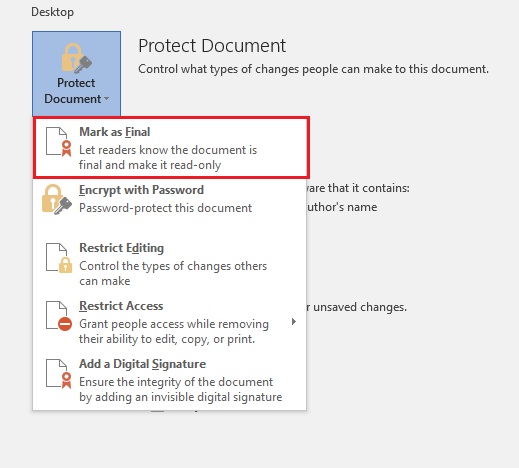
- Next, click on Protect Document
- Now click on Mark as final
- You will see a message saying, “This document will be marked as final and then saved”

- Click OK.
That’s it. Your Word file/document is now marked as saved and is read-only. It can be simpler than this, right?
Also Read


Recent
Ottocast Car TV Mate Max Review – A Versatile In-Car Entertainment Adapter
iPhone Battery Dying In Minutes? 23 Real Fixes That Work
Ottocast Play2Video Pro Ups the Game in Affordable Car Entertainment
Ottocast OttoAibox P3 Powers a Smarter Driving Experience
How to Disable WebRTC in Your Browser Settings
Guides

Lenovo Debuts Solar-Charging Laptop That Turns 20 Minutes of Sunlight Into Hour of Video

Why Do Smartphones Get Slower Over Time?

Decoding Tech Jargon: The A to Z Cheat Sheet (Free Downloadable PDF)

How to Clear an App's Cache on Your Samsung Device

Why Are My iPhone Messages Green Instead of Blue?

Everything Google Knows About You (And How to Stop It)
