A Comcast DNS problem makes websites stall, throw DNS errors, or fail on one device while the Wi-Fi icon still looks normal. Start with Xfinity service and gateway checks first, then use the right device, browser, or router DNS fix for the setup in front of you. The steps below stick to current Xfinity, Windows, macOS, iPhone, Android, Chrome, Edge, and Firefox controls.
Check for an Xfinity outage first
Open the Xfinity app and sign in with your Xfinity ID. If your location is affected, the app shows outage information automatically.
Open xfinity.com/support/status when the app is unavailable. Use the Xfinity Outage Map from there to check service trouble near your address.
Text Out to 266278 from a phone tied to a supported Comcast or Xfinity account.
If Xfinity shows an outage, wait for service restoration before changing DNS settings.
Restart your Xfinity Gateway
Use the official app restart before changing network settings.
- 1.Open the Xfinity app and sign in with the Primary Manager or Member Xfinity ID.
- 2.Select WiFi.
- 3.Choose Troubleshoot.
- 4.Select Restart your Gateway.
- 5.Follow the prompts and allow up to 12 minutes for the restart to finish.
Tighten loose cables
The most common non-DNS cause is a loose coax, wall, or splitter connection creating signal drops that surface as browser DNS errors.
Check the cable connection at the wall outlet and at every Xfinity device.
Check every splitter between the wall and your modem or gateway.
Make each connector finger-tight without tools, then load the same website again.
Change DNS on one device
Use this when the connection works but DNS lookups fail on one phone, tablet, or computer. A single-device DNS change tests the fix without changing the whole home network.
On Windows 11, open Settings, go to Network & internet, choose Wi-Fi, then Manage known networks, and select your network. For Ethernet, open Network & internet, choose Ethernet, and select the connected network.
Next to IP assignment, select Edit, choose Manual, turn on IPv4 or IPv6, enter the Preferred DNS and Alternate DNS values, choose a DNS over HTTPS setting when Windows offers it, then select Save.
On Mac, open the Apple menu, choose System Settings, then Network. Select Wi-Fi or Ethernet, open Details, choose DNS, use the Add button under DNS Servers, enter the DNS address, and select OK.
On iPhone or iPad, open Settings, tap Wi-Fi, tap the i icon next to your network, choose Configure DNS, then Manual. Add the DNS server addresses, remove the default DNS servers if you want only the new resolvers, and tap Save; switch back to Automatic to restore network-provided DNS.
On Android 9 or later, open Settings, go to Network & internet, then Private DNS. Choose Private DNS provider hostname, enter dns.google or one.one.one.one, and tap Save; choose Automatic or Off to undo it.
For IPv4 DNS addresses, Google Public DNS uses 8.8.8.8 and 8.8.4.4. Cloudflare uses 1.1.1.1 and 1.0.0.1.
Flush DNS on your computer
On Windows, search for Command Prompt and choose Run as administrator.
Run ipconfig /release.
Run ipconfig /renew.
Run ipconfig /flushdns.
For a deeper Windows reset, run netsh winsock reset, then netsh int ip reset, then repeat ipconfig /release, ipconfig /renew, and ipconfig /flushdns. Restart the PC if Windows prompts you.
On Mac, open Finder, then Applications, then Utilities, then Terminal. Run sudo dscacheutil -flushcache; sudo killall -HUP mDNSResponder and enter your administrator password when prompted.
Flush DNS after changing servers so your computer stops using stale lookup results.
Test Xfinity security blocking
Use this when most sites load, but one safe website is blocked or acts like DNS is failing. Xfinity CyberSecure or Advanced Security blocks traffic at the network level on supported gateways.
Open the Xfinity app, go to the Home tab, then open CyberSecure or Advanced Security.
Under Settings, choose CyberSecure or Advanced Security, then select Turn Off to test.
Turn protection back on after the test unless you are dealing with a confirmed false positive. For a site that should not be blocked, go to spa.xfinity.com, select Report an issue, choose I can't reach a website that I want to go to, enter the requested details, and select Submit.
Avoid the rented gateway DNS dead end
The most common dead end is trying to edit DNS directly inside a rented Xfinity xFi Gateway.
Older guides tell you to browse to 10.0.0.1 and change WAN or LAN DNS inside the gateway admin tool. Do not use that as the current fix for rented xFi gateways.
Use device DNS, browser Secure DNS, Bridge Mode with your own router, or approved customer-owned equipment instead.
Set browser Secure DNS
Browser Secure DNS applies when one browser has DNS trouble while other apps or browsers work. It also helps when you want Chrome, Edge, or Firefox to use its own encrypted DNS path instead of relying only on the network default.
In Chrome on desktop, open More, then Settings, then Privacy and security, then Security. Under Advanced, turn Use secure DNS on or off, then choose your current service provider or a custom provider.
In Chrome for Android, open More, then Settings, then Privacy and security, then Use secure DNS. Turn Use secure DNS on or off and choose the current provider or another provider.
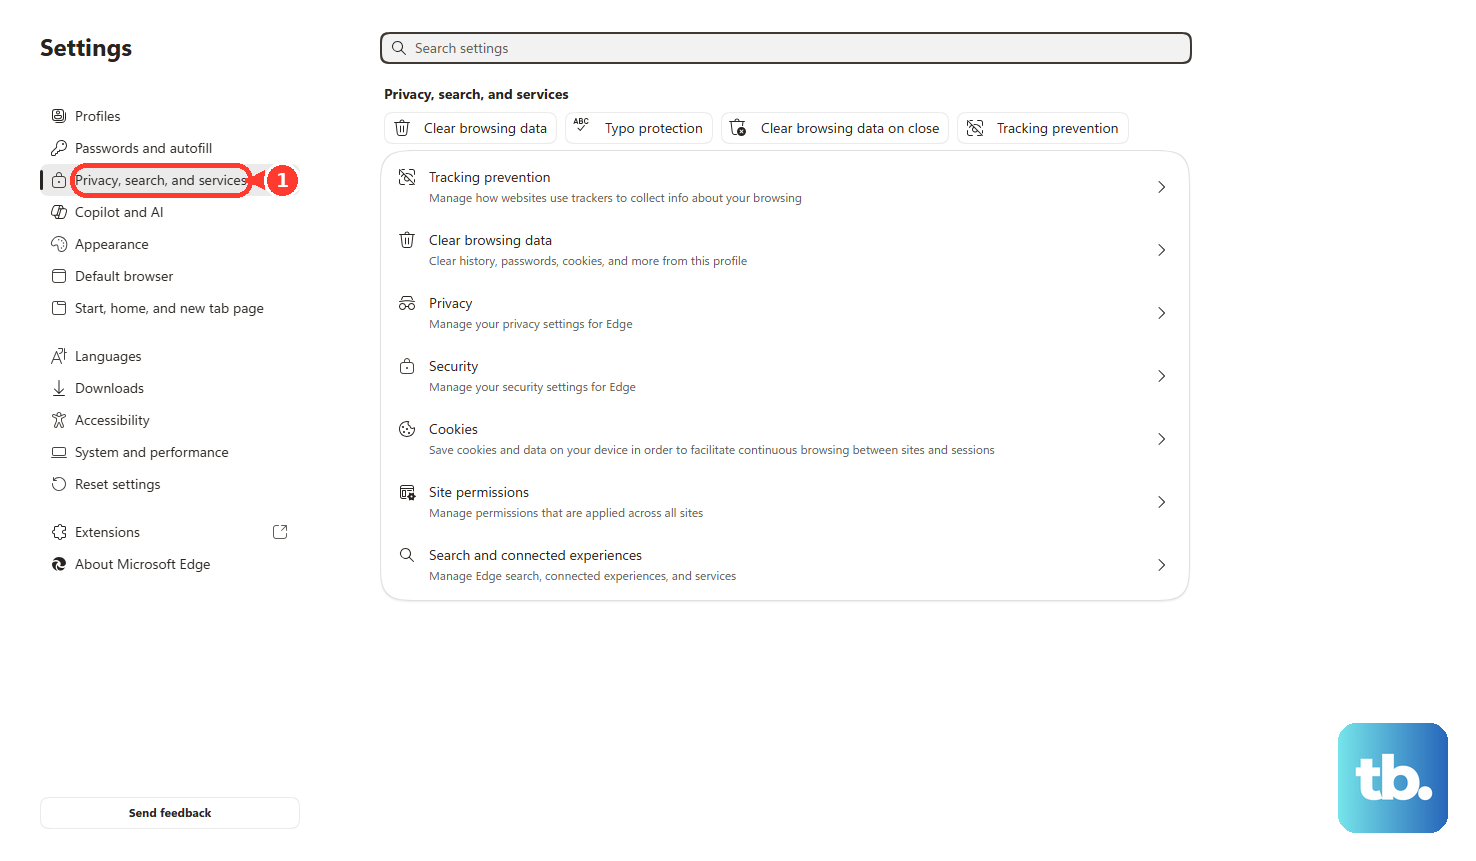
In Microsoft Edge, open Settings and more, then Privacy, search, and services, then Security. Turn on Use secure DNS to specify how to lookup the network address for websites.
In Firefox, open Settings, then Privacy & Security, then DNS over HTTPS, then Advanced settings. Choose Default protection, Increased Protection, Max Protection, Custom protection, or Off; use Manage Exceptions for site-specific fallback.
Use your own router for whole home DNS
Use this when every device at home needs custom DNS from the router. It is the clean replacement when a rented xFi Gateway does not expose direct DNS editing.
On newer Xfinity Gateways, browser access to the Admin Tool is turned off until you allow it. In the Xfinity app, open WiFi, select View WiFi equipment, open Advanced settings, choose Admin Tool online access, slide the toggle to Allow Admin Tool access, and select Save. Create the Admin Tool password if the app prompts you.
Connect to the Xfinity Gateway network and open http://10.0.0.1 in a browser.
Sign in to the Admin Tool as admin, open Gateway, then At a Glance, set Bridge Mode to Enable, and confirm.
Bridge Mode turns off routing and the private Wi-Fi network on the gateway; on supported models the Xfinity WiFi Home Hotspot keeps broadcasting and is managed separately in your account settings. After enabling it, configure DNS on your own router using that router's DNS settings screen.
For a customer-owned setup, check compatibility with My Device Info or Xfinity Compatible Modems, choose equipment certified for your address and speed tier, activate it with the Xfinity app, then set DNS in the device maker's DNS settings.
On work, school, or family-managed devices, DNS controls are locked by the organization or account manager. Use the visible browser or device settings, or contact the manager when those controls are unavailable.
Frequently Asked Questions
Why does Comcast internet say DNS server not responding?
It happens when Xfinity service is down, the gateway needs a restart, coax connections are loose, the DNS cache is stale, Xfinity security is blocking a site, or the device or browser is using DNS settings that fail.
Can I change DNS on a rented Xfinity xFi Gateway?
Current Xfinity controls do not provide a supported direct DNS edit path for newer rented xFi Gateways. Use device DNS, browser Secure DNS, Bridge Mode with your own router, or approved customer-owned hardware.
What DNS servers should I try for Comcast DNS problems?
Google Public DNS uses 8.8.8.8 and 8.8.4.4 for IPv4. Cloudflare uses 1.1.1.1 and 1.0.0.1 for IPv4.
Does changing DNS on iPhone affect cellular data?
No. The iPhone and iPad DNS setting applies only to the selected Wi-Fi network. Cellular data keeps using the carrier's DNS path.