Your Epson printer still shows low ink, refuses a cartridge, or prints blank and faded pages after a refill. The right fix depends on whether you have an EcoTank ink-tank printer or a cartridge-based Epson model. Start with the physical ink level, then reset the level, check the nozzles, clean the head, and move to software or support only after the printer-side checks are done.
Check the actual ink level first
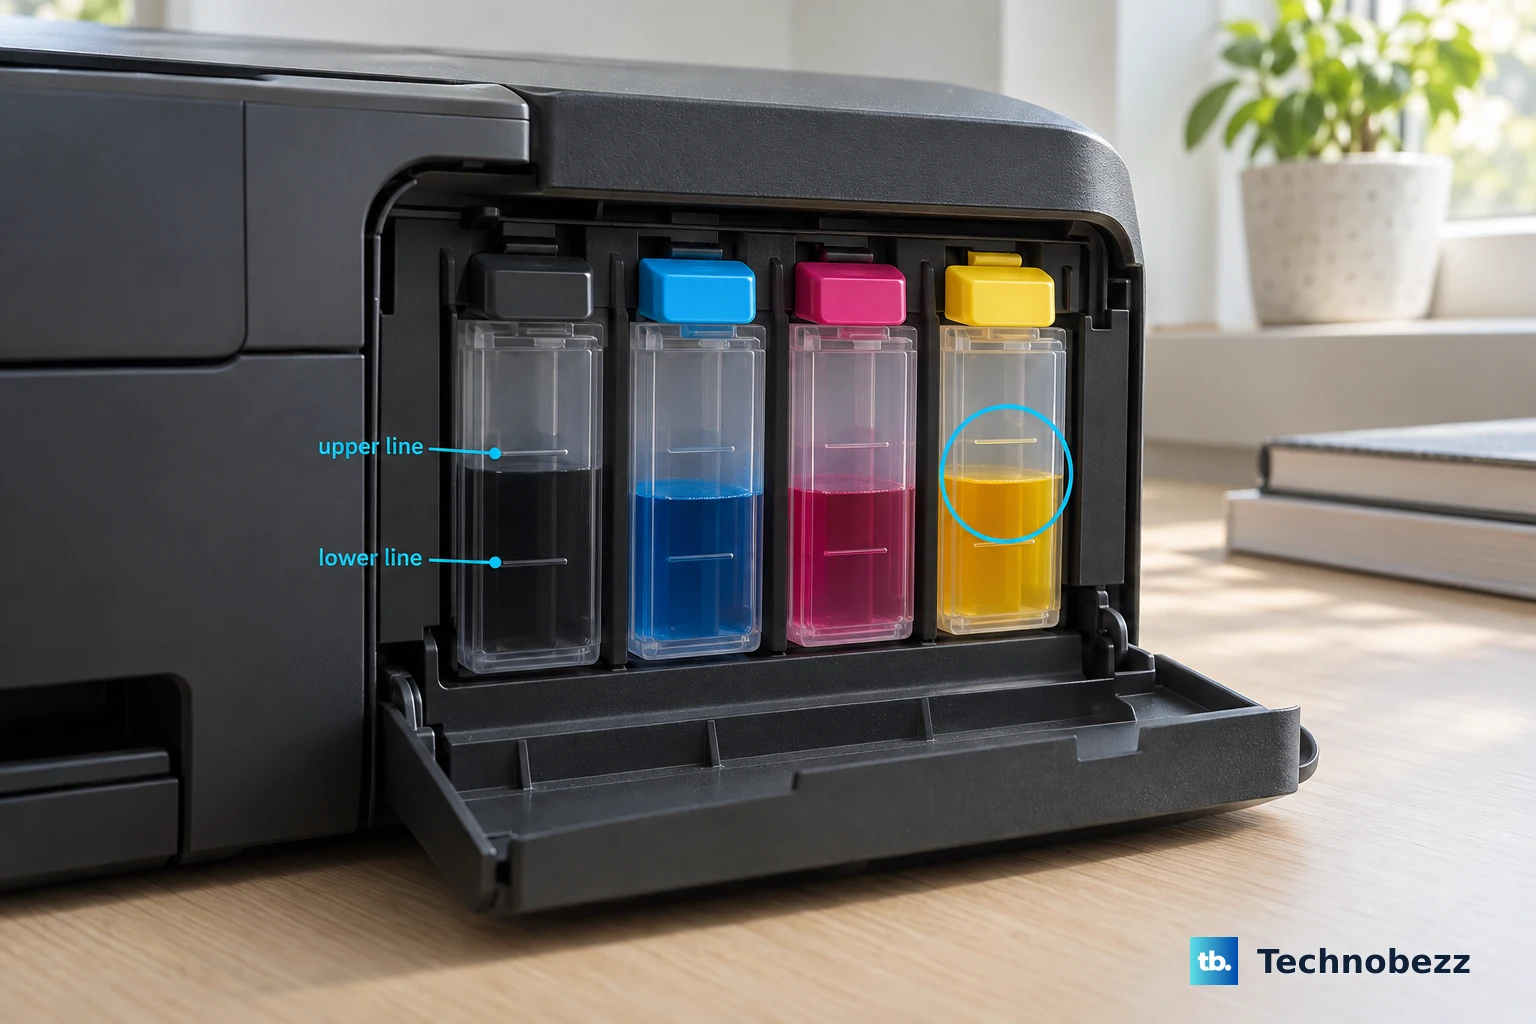
On EcoTank models, do not rely only on the low-ink alert. Epson’s ink warning is estimated, so look directly at the ink tank windows and confirm that each color is above the lower line.
If a tank is below the lower line, refill it with the correct Epson ink bottle for your model. Bring the ink up to the upper line, then reset the ink level from the printer panel.
On Windows, double-click the Epson product icon on the right side of the Windows taskbar, or click the up arrow and double-click the product icon, then review the estimated ink levels. On Mac, open Apple menu or Dock, go to System Settings on current macOS or System Preferences on older macOS, choose Print & Fax, Print & Scan, or Printers & Scanners, select your Epson printer, open Options & Supplies, then Utility, Open Printer Utility, EPSON Status Monitor, and Update.
Refill the EcoTank bottle the supported way
If ink is not flowing into an EcoTank tank, lift the bottle off the filling port and reinsert it straight onto the port. Let the ink flow automatically when the bottle is seated correctly.
Do not squeeze the ink bottle. If the ink has already reached the upper line, leave the bottle off the port and do not reinsert it to force in more ink.
If the refill still does not work, confirm that the tank color matches the bottle color and that the bottle part number matches your exact Epson printer model.
Reset the ink level from the printer menu
The most common cause is that the printer was physically refilled but the EcoTank ink level was not reset from the printer menu.
On many current EcoTank models, turn on the printer, open Maintenance, choose Fill Ink, complete the refill flow, press the start button, and follow the screen prompts to reset the colors you refilled.
Some EcoTank models use Maintenance and Reset Ink Levels. Choose the colors you refilled on the LCD screen and follow the prompts.
Other models use Maintenance and Set Ink Level. Use the exact menu your printer displays, because Epson uses different labels across EcoTank models.
Let the first setup fill finish
During a first-time EcoTank setup, let ink charging finish before judging the refill. The power light stops flashing when charging is complete.
If the print head stops moving or making noise and ink charging has not finished after about 20 minutes, turn the printer off, turn it back on, and check whether charging continues.
If charging is still stuck after that restart, contact Epson support. Once charging is moving again, leave the printer powered on until the power light stops flashing.
Run a nozzle check before blaming the refill
A refill can look failed when the real problem is clogged nozzles. Load plain paper, confirm there are no errors on the LCD screen, extend the output tray, press home if needed, open Maintenance, and choose Nozzle Check.
Press the start button and examine the printed pattern. A complete pattern points away from the ink supply and toward a computer, cable, software, or settings issue.
If the pattern has gaps or looks faint, run Head Cleaning next instead of refilling again. If all or most of the lines are missing, skip regular cleaning and run Power Cleaning instead.
Clean the print head after a bad pattern
From the printer panel, load plain paper, press home if needed, open Maintenance, choose Head Cleaning, and press the start button. Wait for cleaning to finish, then check the nozzle pattern again.
Repeat Head Cleaning up to three times. If the pattern still has gaps after that, turn the printer off and wait at least 12 hours before checking again.
On Windows, right-click the Epson product icon in the taskbar or up-arrow overflow, then open Printer Settings, Maintenance, Print Head Cleaning, and Start. On Mac, open Apple menu or Dock, go to System Settings on current macOS or System Preferences on older macOS, then open Printers & Scanners, Options & Supplies, Utility, Open Printer Utility, Print Head Cleaning, and Start.
Use Power Cleaning for stubborn EcoTank clogs
Visually check the ink tanks and confirm that each tank is at least one-third full.
Press home if needed.
Open Maintenance.
Select Power Cleaning. The label and location vary by model, so use the path your printer shows: the ET-2980 and ET-2988 nest it under Maintenance, Head Cleaning, then Power Cleaning, and models such as the ET-16600 and ET-5800 start it by holding the power button and the help button together until the Power Cleaning screen appears.
Follow the LCD instructions until the process finishes.
Run another Nozzle Check.
Save Power Cleaning for cases where regular Head Cleaning has not fixed the pattern, because it uses a significant amount of ink and can fill the maintenance box sooner.
Fix cartridge recognition errors on non EcoTank printers
This fixes Epson cartridge printers that say a replaced or refilled cartridge is not recognized.
Turn on the printer.
If the printer says an ink cartridge is expended, choose How to.
If it does not show that prompt, press home, open Maintenance, choose Ink Cartridge(s) Replacement, and select Start.
Lift the scanner unit until it clicks.
Remove the ink cartridges.
Confirm the yellow tape is removed, and do not touch the green chip.
Reinsert each cartridge until it clicks.
Lower the scanner unit, select Completed, wait for ink charging, then choose OK.
If the cartridge is still not recognized, replace it with a compatible genuine Epson cartridge. Epson says its cartridge printers are designed for genuine Epson-brand cartridges, and refilled or third-party supplies can fail to function properly or fail completely.
Update Epson software and know when to stop
For genuine Epson ink behavior that still seems wrong, use Epson Software Updater from Epson’s official support page. On Windows, open Start, Epson Software, and Epson Software Updater; on Mac, open Applications, Epson Software, and Epson Software Updater.
Select your model, choose the firmware or software item offered, and follow the prompts while the printer is powered on and connected. Use caution with third-party or refilled cartridges, because Epson says firmware updates can affect third-party ink functionality.
Epson does not publish cartridge refilling, chip resetters, firmware downgrades, or bypass tricks as supported fixes for current cartridge printers. The supported path is to install a compatible genuine Epson cartridge through the printer’s Ink Cartridge(s) Replacement workflow.
If model-specific refill, reset, cleaning, and software steps fail, contact Epson support with the product name, serial number, proof of purchase or purchase date, computer setup, and a clear description of the problem.
Frequently Asked Questions
Why does my Epson EcoTank still say low ink after refilling?
The printer needs an ink-level reset after the physical refill. Use the EcoTank menu path your model shows, such as Maintenance, Fill Ink, Reset Ink Levels, or Set Ink Level.
Can I squeeze an Epson EcoTank ink bottle if ink will not flow?
No. Epson’s refill process is designed for the bottle to drain automatically. Lift the bottle off the port, reseat it straight, and wait for the ink to flow.
Why are pages still faded after I refilled the printer?
Faded or missing colors after a refill point to clogged nozzles. Run a nozzle check, then use Head Cleaning if the printed pattern has gaps.
Are refilled Epson cartridges supported?
For cartridge-based Epson printers, Epson’s supported fix is to use a compatible genuine Epson cartridge. Refilled or third-party cartridges can fail recognition or fail to work properly.