A vertical line on a laptop screen can show up after a stuck display session, a bad graphics driver, the wrong display mode, or a failing built-in panel. Start with the quick software resets first. Then check updates, drivers, external displays, and built-in diagnostics so you know whether this is a settings problem or a repair job.
Start with a display reset
This fixes a temporary Windows graphics glitch.
On a Windows laptop, press Windows + Ctrl + Shift + B.
Listen for a beep or watch for the screen to flicker, then check whether the vertical line is gone.
If the line appeared after using an external monitor, press Windows + P.
Tap P again, then press Enter to cycle through PC screen only, Duplicate, and Extend.
If the laptop still shows the line, hold the Power button for 20 seconds.
Turn the laptop back on and test the screen again.
Update the system before deeper fixes
Outdated system files and graphics components can keep a display problem alive, so install normal operating-system updates before changing drivers.
On Windows 11, open Start > Settings > Windows Update > Check for Windows updates. If updates appear, select Download & install, then restart when prompted.
On a Mac, open Apple menu > System Settings > General > Software Update, or search for Software Update with Spotlight. If new software is available, click Update, Upgrade, or Restart Now.
On a Chromebook, select the time at the bottom right, open Settings > About ChromeOS, and choose Check for updates. If an update downloads, select Restart from the update notification.
If updating does not clear the vertical line, check the display settings next.
Set the screen to supported display settings
On Windows 11, go to Start > Settings > System > Display, select the laptop display, open the Display resolution list, and choose the option marked Recommended.
For refresh rate, open Start > Settings > System > Display > Advanced display. Next to Choose a refresh rate, select a supported rate for your laptop panel.
On Windows 11 laptops that support Dynamic Refresh Rate, stay in Start > Settings > System > Display > Advanced display and use the Dynamic refresh rate toggle to turn it on or off. Test the screen again after changing it.
Fix the graphics driver
The most common software cause after a recent change is a graphics driver that needs updating, rolling back, or reinstalling.
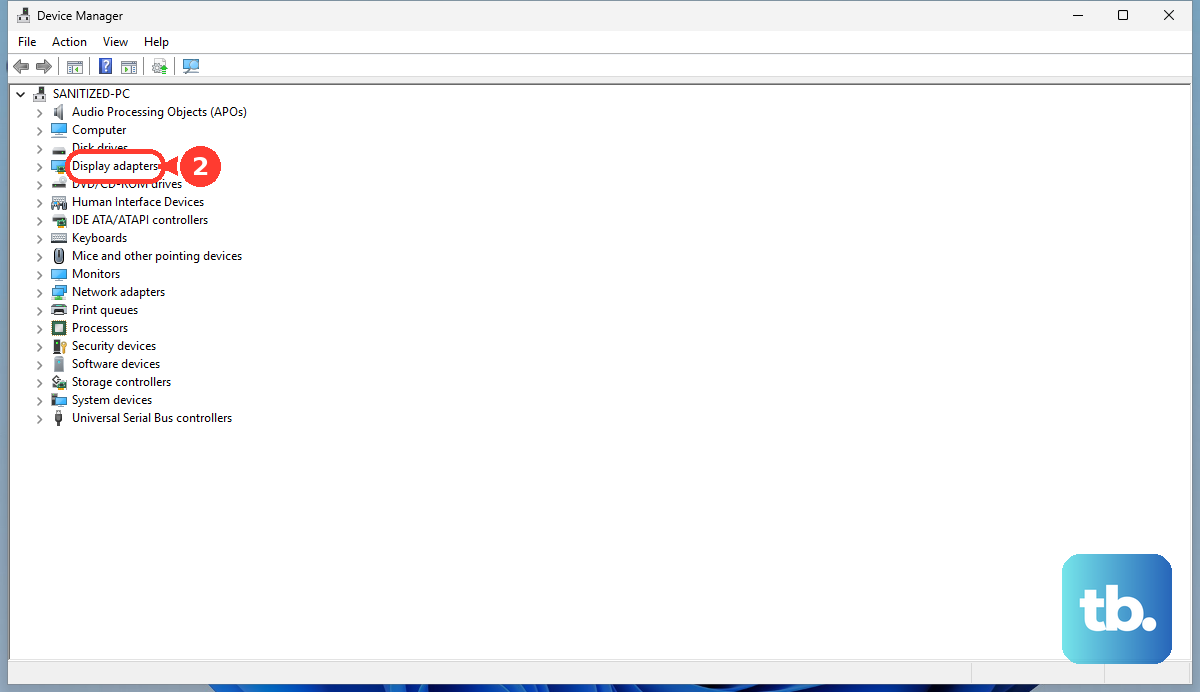
Right-click Start, open Device Manager, expand Display adapters, right-click the display adapter, select Update driver, then choose Search automatically for updated driver software.
If the line started after a driver update, right-click the adapter again, select Properties, open the Driver tab, and choose Roll Back Driver. Pick a reason, select Yes, and restart if Windows asks.
When the driver seems corrupted, right-click the adapter, select Uninstall device, choose Uninstall, and restart from Start > Shut down or sign out > Restart. Windows will try to reinstall the driver after the restart.
For a manual driver update, download the correct graphics driver from your laptop maker or graphics-device maker. In Device Manager, choose Update driver > Browse my computer for drivers, select Browse..., choose the downloaded driver folder, then select OK > Next.
Use Safe Mode when Windows is hard to read
Safe Mode helps when the vertical line comes with flicker, blank-screen behavior, or a problem that began right after an update.
Hold the Power button for 10 seconds to shut the laptop down. Repeat that forced shutdown two or three times until Windows enters Recovery Mode.
Open Troubleshoot > Advanced Options > Startup Settings > Restart, then press F5 to start Safe Mode with Networking.
Once Safe Mode loads, open Device Manager, expand Display adapters, and update or roll back the graphics driver from there.
If the problem began after a broader system change and you have a restore point, use Troubleshoot > Advanced Options > System Restore and choose a restore point from before the line appeared.
If Safe Mode does not help, test whether the built-in screen is the part failing.
Check the laptop screen against an external display
The most common hardware clue is a vertical line that appears on the built-in display but not on an external monitor.
On an HP Windows laptop, attach an external monitor, restart the computer, and compare both screens.
When the external monitor looks normal but the built-in display still has the line, HP points to possible panel damage, graphics failure, or a loose internal video cable.
On a MacBook, connect the external display to power, then connect it to the Mac through Thunderbolt or HDMI.
Use the correct adapter or another cable when needed, then open Apple menu > System Settings > Displays to configure resolution and refresh rate.
If the vertical line shows on both the laptop screen and the external monitor, continue with software, drivers, and diagnostics. If it stays only on the built-in panel, plan on diagnostics or repair.
Run built-in diagnostics from your laptop maker
Dell laptops with LCD Built-in Self-Test can check the panel directly. Shut the laptop down, disconnect external monitors, USB devices, docking stations, and headphones, connect the power adapter, clean the screen, hold D, press Power, and keep holding D until color screens appear.
Inspect the black, white, red, green, and blue screens for vertical or horizontal lines. Press Esc or hold Power for 10 seconds to stop the test.
On HP PCs, turn the computer off, turn it on, repeatedly press Esc, then press F2. In HP PC Hardware Diagnostics UEFI, choose Component Tests or Symptom Tests, run the display-related test, and follow the onscreen instructions.
On ASUS laptops, power off the device, hold F2, press the Power button, and keep holding F2 until the BIOS setup screen appears. If the display problem still appears in BIOS, ASUS treats it as likely screen hardware; if BIOS looks normal, continue software troubleshooting.
Brand support downloads and service
This method applies when Windows updates and Device Manager do not find the right display fix, or when diagnostics point to hardware.
For Dell, use Drivers & Downloads, identify the product by Service Tag, Dell EMC Product ID, or model, then install relevant BIOS, chipset, graphics, or display updates.
For HP, open HP Software and Driver Downloads, identify the laptop model or serial number, and install the HP-recommended BIOS, firmware, chipset, graphics, or diagnostics packages for that exact model.
For ASUS, use MyASUS > System Diagnosis for a one-click or scenario checkup, and use ASUS Download Center for model-specific BIOS, graphics, chipset, or utility packages.
If MyASUS diagnostics are missing, install the ASUS System Control Interface driver from the Software and Utility category.
For Acer, use Acer Drivers and Manuals with the laptop serial number, SNID, or model.
For Lenovo, use Lenovo PC Support, then go to Drivers & Software or Troubleshoot & Diagnose for model-specific updates and diagnostics.
If brand updates and diagnostics do not clear the line, use the laptop maker's repair channel or Apple Service and Repair for Mac laptops.
Chromebook cleanup and reset options
Use these Chromebook steps after updating ChromeOS, especially when the line appears in browser or app content.
- 1.Open Chrome and go to More > More tools > Extensions, then turn off extensions one at a time and test after each change.
- 2.Open Settings > About ChromeOS > Diagnostics, or use the Launcher and type Diagnostics, to check available Chromebook hardware categories.
- 3.Turn off the Chromebook, hold Refresh, tap Power, and release Refresh when it starts up.
- 4.If the problem remains, sign out, press Ctrl + Alt + Shift + r, select Restart, then choose Powerwash > Continue.
- 5.When restart, extension checks, hard reset, and Powerwash all fail, use Google's ChromeOS recovery flow to remove and reinstall ChromeOS.
On work or school laptops, update, driver, rollback, Powerwash, and software-update controls may be managed by an administrator. Contact your IT team instead of trying to bypass those controls.
Frequently Asked Questions
Does a vertical line mean my laptop screen is broken?
Not always. If the line disappears after a graphics reset, update, driver rollback, or Safe Mode troubleshooting, it was likely software-related. If it appears in BIOS, diagnostics, or only on the built-in panel while an external monitor looks normal, hardware service is more likely.
Can I fix a vertical line by pressing on the screen bezel?
No. Use display resets, updates, drivers, external-monitor isolation, built-in diagnostics, and repair when the panel or internal display connection is suspected.
Why does the line show only after connecting a second monitor?
Windows may be using the wrong projection mode. Press Windows + P, cycle through PC screen only, Duplicate, and Extend, then press Enter to apply the mode that matches your setup.
What should I do if the line appears during Dell, HP, ASUS, or Apple diagnostics?
A line visible during hardware diagnostics or BIOS points away from normal Windows or macOS settings. Use your laptop maker's repair channel, or Apple Service and Repair for Mac laptops.