

Windows 10, which was launched last year by Microsoft, can be installed in several ways on your PC or laptop. Microsoft has allowed all users to upgrade from Windows 7/8.1 to Windows 10 automatically. But apart from that, you can also create a boot/installation media (USB flash drive or a DVD-ROM) for a clean install or reinstall Windows 10 on your computer.
Creating a bootable USB flash drive in Windows 10 is easier than on Windows 7 or 8.1. The fact is that Microsoft has released a helpful tool called «MediaCreationTool», which makes downloading Windows 10 ISO files much more convenient and easier. This guide will show you how to create a bootable USB Flash Drive in Windows 10.
How To Create A Bootable USB Flash Drive In Windows 10
Before you create a bootable USB flash drive with Windows 10, make sure that the USB, which is used as a bootable media, is clean and without any critical data. Because this process will format the USB completely, all data will be lost. In addition, the flash drive must have at least 4GB of memory. If everything is OK, you can start creating the bootable media. To do this, follow these steps:
- Step 1: Download “Media Creation Tool” according to your system type from the Microsoft download page. The type of your opening system can be found by opening Start> Settings> System> About.
- Step 2: Once MediaCreationTool is downloaded, run it. Open the initial screen, «Windows Installation Program,” where you can choose what you want to do. Select “Create installation media for another PC” and click next.

- Step 3: On the next screen, select the language, architecture, and version of Windows 10.
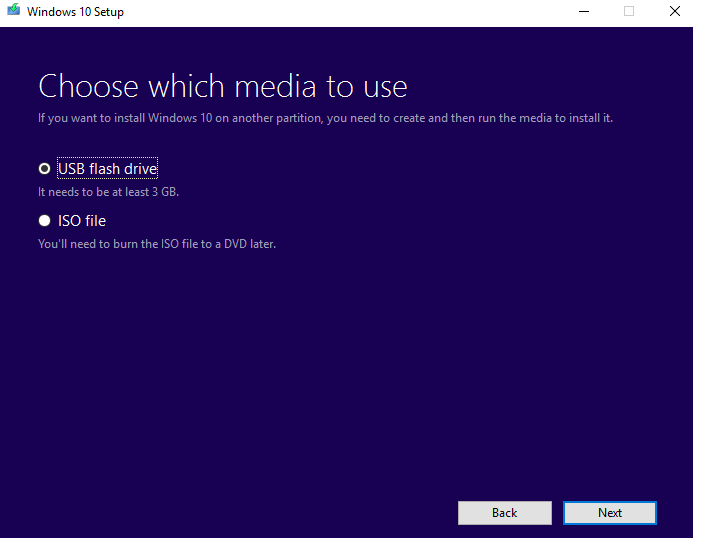
- Step 4: Select the bootable device. Now, you need to choose the type of media that will be used to download and install Windows 10. Select the USB flash drive and click next.
- Step 5: You need to connect the USB flash drive to the computer (if not already connected). If the program doesn’t see your USB drive, try to reconnect it.
- Step 6: If everything is OK, click Next. Then Windows 10 begins to load. The process is quite long, so you need to be patient.
- Step 7: On the next screen, the program will inform you of the readiness of the flash memory and files. Click Finish. And that’s all!
The bootable USB flash drive with Windows 10 is ready for use.
