Your Anki remote is paired with your Mac, but pressing a button does nothing. Bluetooth connects the hardware; the buttons still need to send Anki the right commands. Here's how to connect StudyRemote, 8BitDo Zero 2, or Micro and get its review buttons working.
Get your Mac and remote ready
Check the model before pressing any button combinations. StudyRemote, formerly Anki Remote, sells Anki Remote 2.0 and AR 2 Pro models with preset operation after connection. An 8BitDo Zero 2 or Micro uses a different setup.
If you need Anki, open the official download page and find Download Anki. Choose macOS 13+ (Apple Silicon) or macOS 13+ (Intel) for your Mac. Both downloads require macOS 13 or later.
Open the downloaded disk image. Drag Anki into Applications, then open Anki.
Upgrading an existing installation? Quit Anki before replacing the application in the same location.
Pair a StudyRemote or Anki Remote
This connects your Anki Remote so you can use its preset buttons.
Move the remote's mode switch down to KEY.
Hold START for about three seconds to power it on.
Hold START until the blue light flashes three times, then release it. If the light keeps flashing about once per second, the remote is in pairing mode.
On your Mac, open Apple menu > System Settings > Bluetooth.
Turn on Bluetooth.
Click Connect beside Anki Remote under Nearby Devices.
Test the buttons in an Anki review
Keep Anki focused and test the buttons in an actual review.
- 1.Select a deck and click Study Now.
- 2.Press the remote button assigned to Space or Enter to reveal the answer.
- 3.On the answer side, test buttons assigned to 1, 2, 3, and 4. These select the available answer buttons, which depend on the card's review state.
- 4.Open Anki > Preferences > Review.
- 5.Enable Spacebar (or enter) also answers card to let the reveal button also select Good on the answer side. Disable it if you want separate rating buttons.
Customize StudyRemote buttons
The default StudyRemote setup does not require Karabiner. For different button actions, use the vendor's Anki add-on. Its publisher specifies Anki 2.1.50 or newer but does not specifically list Anki 26.09.3 as a tested version.
Open Tools > Add-ons > Get Add-ons in Anki.
Enter 693153301 to install the add-on.
Restart Anki.
Open the Anki Remote add-on's button settings in Anki.
Choose an action from each button's dropdown. Options include Show Answer, ratings, Undo, Reveal Hint, Reveal Next Cloze, and Send Custom Keystroke. Hint and cloze actions require compatible card templates.
Save your changes.
Keep the hardware switch in KEY mode.
If customization fails, open Tools > Add-ons.
Select Anki Remote.
Click Toggle Enabled to disable the add-on.
Restart Anki.
Try the remote's preset buttons with the add-on disabled if the custom setup fails.
Connect an 8BitDo Zero 2 instead
Keyboard mode connects the Zero 2; remapping assigns its keys to your preferred Anki actions.
With the controller off, press R + START. The LED flashes five times.
Hold SELECT for three seconds to enter pairing mode.
Open System Settings > Bluetooth.
Click Connect beside 8BitDo Zero 2 gamepad.
Select an English keyboard input source, as required by 8BitDo.
To add that input source, open System Settings > Keyboard.
Edit Input Sources under Text Input.
Click +.
Add English/ABC.
Follow the Karabiner steps below to map the controller's keys to Anki actions. The Zero 2's USB port supports charging and firmware updates only, so a USB cable cannot provide wired Anki control.
Set up an 8BitDo Micro
The Micro's Mac keyboard setup uses K mode. Save Anki keys onto the controller with its mobile companion app, or use a Mac keyboard remapper.
Move the mode switch to K.
Press HOME to turn on the Micro.
Hold PAIR for one second.
Open System Settings > Bluetooth.
Click Connect beside 8BitDo Micro gamepad.
To store your button assignments on the remote, install 8BitDo Ultimate Software on an iPhone or Android phone using the official Micro software page.
Connect the Micro in K mode to the mobile app.
Use Button Mapping to assign Space and rating keys 1 through 4 to your chosen buttons.
Synchronize the selected profile to the controller. The Micro stores one active profile; the mobile app can retain other profiles.
Disconnect the phone.
Reconnect the Micro to your Mac to use the saved bindings.
For a wired connection, set the Micro to K mode.
Unlock your Mac before connecting it if you use an Apple silicon Mac laptop.
Connect the Micro with a USB data cable.
Click Allow if macOS requests accessory approval.
Map keyboard-mode buttons with Karabiner
Download a compatible build from the Karabiner-Elements website when your keyboard-mode remote sends different keys from the Anki controls you want.
Open the downloaded disk image.
Run Karabiner-Elements.pkg to complete installation.
Open Karabiner-Elements.
Follow its setup prompts for services, permissions, and the virtual keyboard layout.
Enable its required background services in System Settings > General > Login Items or Login Items & Extensions, following the app's prompt.
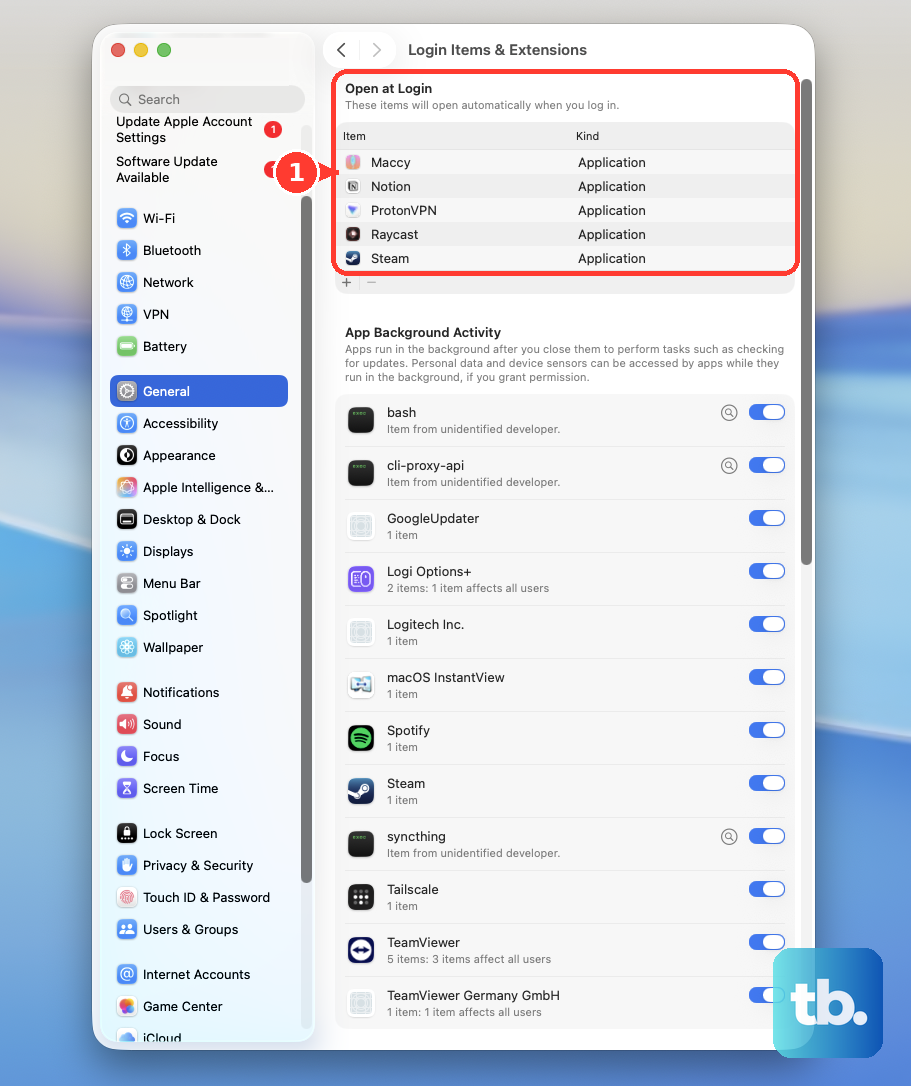
Allow its requested access under System Settings > Privacy & Security > Accessibility.
Approve its virtual HID driver under Login Items & Extensions > Driver Extensions.
Open Devices in Karabiner-Elements.
Enable modification for the remote.
Leave modification disabled for keyboards you do not want affected.
Open Karabiner-EventViewer.
Select Capture Raw Input Events.
Select the remote.
Click Start capture.
Press each remote button to identify its incoming key. Raw capture temporarily bypasses modification.
Open Simple Modifications in Karabiner-Elements.
Select the remote.
Click Add item.
Choose the incoming key in the left dropdown.
Choose the desired output in the right dropdown, such as spacebar or 1 through 4.
Repeat for each button you want to use.
Keep Anki focused while testing, because system-level keyboard mappings send keys to the focused application.
Fix a remote that connects but does not work
These checks address stale pairings, wrong ratings, and duplicate button actions.
Open System Settings > Bluetooth.
Select your remote under My Devices to reconnect it.
If reconnecting fails, click the remote's information button.
Choose Forget This Device.
Repeat the pairing procedure for your exact model.
If the remote reveals answers but selects the wrong rating, open Anki > Preferences > Review > Answer keys.
Enter your desired shortcuts for Again, Hard, Good, and Easy.
Close Preferences to save. These settings change rating shortcuts; they do not remap every remote button or the reveal action.
If one press triggers multiple actions, deactivate extra controller readers or mapping software so only one handles the controller.
To disable a conflicting Anki add-on, open Tools > Add-ons.
Select the conflicting add-on.
Click Toggle Enabled to disable it.
Restart Anki before testing the remaining setup.
For a frozen Zero 2, hold START for eight seconds to force shutdown.
Press START to restart the Zero 2.
On a work or school Mac with locked permissions, ask your administrator to authorize the mapper and its required components.
Frequently Asked Questions
Can I test Anki without loading its add-ons?
Yes. Quit Anki. Hold Shift while starting it until the safe-mode message appears. Test native keyboard input or a system-level mapper. Controller features supplied by add-ons are unavailable during this test. Restart normally to restore add-ons.
Does syncing with AnkiWeb connect the remote or transfer its mappings?
No. AnkiWeb card synchronization does not pair the hardware. StudyRemote's custom mappings are local to the desktop.
Are Scope Remote's pairing steps the same as Anki Remote's?
No. For Scope, move the side slider down to KEY. Hold START for about three seconds to power on. Hold START until the blue light flashes twice, then release it. Connect Scope Remote in System Settings > Bluetooth. StudyRemote uses three flashes.
Can I use my phone as an Anki remote instead?
Yes. Install Shige's Ankimote fork through Tools > Add-ons > Get Add-ons using code 1960305789. Restart Anki. Connect the phone and Mac to the same local network. Open Tools > Ankimote > Connect Ankimote. Scan the QR code or open the displayed URL in your phone browser. The network must allow local communication. The fork's desktop visual answer feedback does not work on Mac, and its publisher does not specifically list Anki 26.09.3 as a tested version.