You plug in a USB drive and restart, but your computer loads its usual operating system again. Getting it to boot from USB takes two things: properly prepared media and the right startup option for your computer. Start with the drive check below, then follow the Windows, Mac, Surface, or Chromebook route that fits your device.
Start with a USB drive your computer can boot
Copying an ISO file onto an ordinary USB drive generally does not make it bootable. Choose media that matches your computer's processor architecture, firmware, and operating system requirements.
For Windows 11 x64, use an empty USB drive with at least 8 GB of space. Creating the installer erases its contents.
On Microsoft's Windows 11 download page, select Download Now under Create Windows 11 Installation Media. Run the downloaded tool. Accept its terms. Choose the installation-media option.
Select USB flash drive. Choose your destination drive.
For an Arm-based Windows PC, follow the media-creation instructions linked from Microsoft's Windows 11 Arm64 download page. The x64 installer is not interchangeable with Arm64 media.
For a Mac, download a compatible full installer using Apple's macOS download instructions. Connect an expendable USB volume named MyVolume. In Terminal, run the matching createinstallmedia command from Apple's bootable installer instructions.
Authenticate when prompted. Confirm erasure by typing Y.
For Ubuntu, download a compatible image from Canonical. In Ubuntu's Startup Disk Creator, check Source disc image. Check that Disk to use identifies your intended USB.
Select Make Startup Disk. This tool is intended for Ubuntu-family images; Canonical also provides a Rufus workflow for preparing media on Windows.
Selecting the finished USB starts its software. Installation or recovery actions afterward can erase data on the computer.
Choose the USB from Windows 11
With your bootable USB connected, open Start > Settings > System > Recovery. Your firmware must recognize the media. Under Advanced startup, select Restart Now.
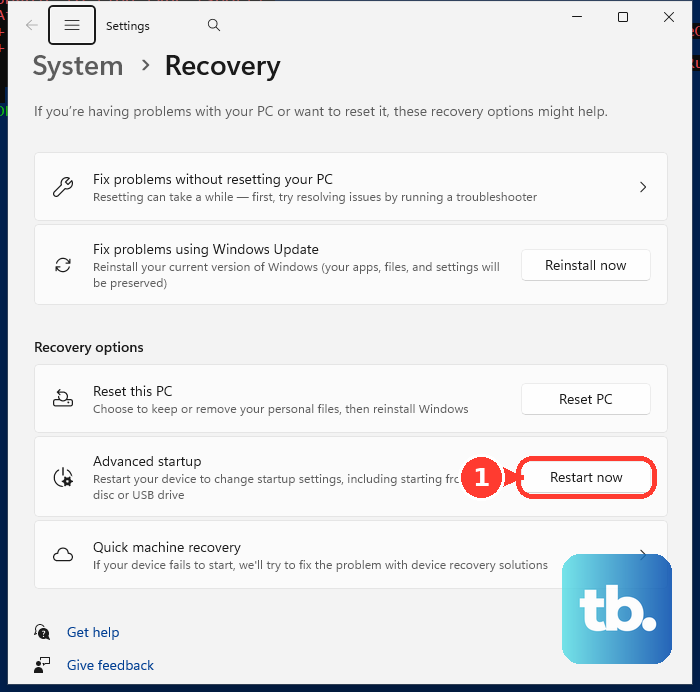
On Choose an option, select Use a device > USB Storage, or the entry identifying your drive. Microsoft provides this route for Surface; on other PCs, availability depends on firmware and recovery configuration.
For a shortcut into recovery on Windows 11 or Windows 10, hold Shift while selecting Power > Restart. The same Use a device route applies there. If that option is absent, the startup boot menu below is your next route.
Use your PC's startup boot menu
The startup boot menu lets you choose USB without opening Windows. It also works on USB-boot-capable Linux PCs and compatible computers starting a ChromeOS Flex installer.
Connect your prepared USB before starting the computer. Follow the matching brand instructions below; keys and drive names depend on the model.
On a compatible Dell, repeatedly press F12 at the Dell logo during startup. Select USB Storage Device or the drive's brand-name entry. Press Enter.
On a supported HP, repeatedly press Esc immediately after powering on. Press F9 for Boot Device Options. HP also supports pressing F9 repeatedly directly after power-on. Select your USB. Press Enter.
On supported Lenovo and IdeaPad models, press F12 or Fn+F12 during startup. Highlight your USB in Boot Menu. Press Enter.
On supported ASUS notebooks, all-in-ones, and gaming handhelds, hold Esc while pressing Power with the computer off. Release Esc when the boot menu opens. Select the USB entry. Press Enter.
For another PC brand, enter BIOS or UEFI using its model-specific startup key. Firmware shortcuts and menu names are not universal.
Find a USB drive missing from the menu
Disabled USB startup in firmware keeps a bootable drive out of the available startup options. Check that your media matches the target computer before changing firmware settings. Moving an incompatible image to the top of the boot order does not make it compatible.
To enter supported UEFI firmware from Windows 11, open Settings > System > Recovery. Select Restart now under Advanced startup. Choose Troubleshoot > Advanced options > UEFI Firmware Settings > Restart.
In firmware, select the USB boot entry or make it the preferred device under Boot or Startup. Labels vary by model. Save your changes. Restart the computer.
On an Acer notebook with the F12 menu feature, press F2 at the Acer logo. Set Main > F12 Boot Menu to Enabled. Press F10.
Press Enter to confirm. Press F12 during the next startup. Select your USB. Some Acer models lack this menu feature.
On Dell models with these controls, press F2 at startup. Open General > Boot Sequence. Select UEFI. Enable USB Storage.
Select Apply or Save Changes. Select Exit. Press F12 during startup. Select the USB entry.
Leave Secure Boot enabled when your media supports it. Disabling it is a conditional troubleshooting measure for incompatible media, not a universal USB startup requirement. Current UEFI-only PCs do not support older Legacy/CSM procedures.
Start a Mac from the external drive
Connect a bootable USB containing an operating system compatible with your Mac model. Shut down the Mac.
On an Apple silicon Mac, hold Power until startup options appear. Select the USB volume. Click Continue.
On an Intel Mac instead, start the computer while holding Option, also labeled Alt. Select the USB volume. Click the upward arrow or press Return.
If an Intel Mac with the T2 Security Chip blocks external startup, enter macOS Recovery. Open Utilities > Startup Security Utility. Select Enter macOS Password. Choose an administrator account and enter its password.
Select Allow booting from external or removable media under the allowed boot media controls. This setting applies to T2 Intel Macs; Apple silicon uses a different security interface.
Restart while holding Option. Select the USB volume. Press Return. Keep internet access available when using a bootable macOS installer, because Apple requires it.
Start your Surface with its hardware buttons
On supported Surface models, these buttons start the computer from a prepared USB.
- 1.Shut down your Surface.
- 2.Connect the bootable USB drive.
- 3.Hold Volume Down.
- 4.Press and release Power while continuing to hold Volume Down.
- 5.Release Volume Down when the spinning dots appear.
Reach recovery when Windows will not start
Automatic Repair opens a route to USB selection or firmware settings when Windows will not load, provided Windows Recovery Environment still works. Connect your bootable USB. Start the PC.
Hold Power until it shuts down when the Windows or manufacturer logo appears. Start the PC again. Hold Power until it shuts down at the logo a second time. Start the computer a third time to enter Automatic Repair.
Select Advanced options to reach Windows Recovery Environment. Select Use a device if available. Select your USB entry.
If device selection is absent, choose Troubleshoot > Advanced options > UEFI Firmware Settings > Restart on a system supporting that interface. Select the USB boot entry in firmware.
Recover a Chromebook from USB
Chromebook USB recovery reinstalls ChromeOS and erases local data; it does not open a live desktop session. Prepare model-specific media using Google's Chromebook Recovery Utility instructions and an expendable USB drive of at least 8 GB. Preparation works on a working Chromebook, Windows PC, or Mac running Chrome.
On the target Chromebook, hold Esc+Refresh while pressing and releasing Power. Some models use Esc+Maximize with Power instead. Release the remaining keys when the recovery message appears.
Select Recover using external disk to begin the USB recovery prompts. ChromeOS Flex installation on a compatible PC or Intel Mac is separate and uses that computer's startup boot menu.
Frequently Asked Questions
How do I make an external drive my Mac's default startup disk?
Open Apple menu > System Settings > General > Startup Disk. Select a compatible external system volume. Click Restart.
Does a Windows Recovery Drive include my personal files?
No. A Windows Recovery Drive excludes personal files and is intended for the PC on which it was created.
Can I run a complete Windows installation from USB with Windows To Go?
Windows To Go has no current supported setup path. Microsoft removed it in Windows 10 version 2004 and later. Windows installation and recovery USBs are separate from that removed portable-workspace feature.
Why can't I enable USB startup on my work computer?
Organizational firmware policy can block external startup and prevent local changes on managed devices. Ask your IT administrator to authorize and configure external startup.