Tech Insights in Your InboxSubscribe to our free newsletter and never miss out on what's happening in the tech world. Learn Tech Today, Lead Tomorrow.
Writing emails can be very tiresome, especially if you do not know how to sign off. Sometimes, we worry that the writing in the email may sound too informal. On the other hand, some people do not wish to rewrite the exact words to close an email each time they send one.
Writing a personal email signature may help you with your worries. An email signature is a block of text unique to you that will be inserted into all emails that you send out. This article will show you how to add an email signature in Outlook.
Steps to follow:

Method 1: Creating an email signature from the Outlook app
- Pull up the Outlook application on your laptop or computer and launch it.
- Open a new email message. You can do so by composing a new email.
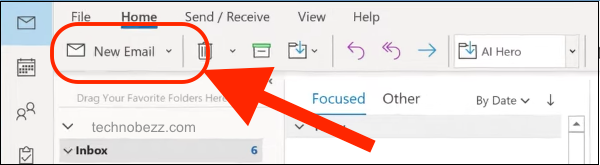
- On the blue headings, select Messages. This is the second option from the left or just before the lightbulb icon.
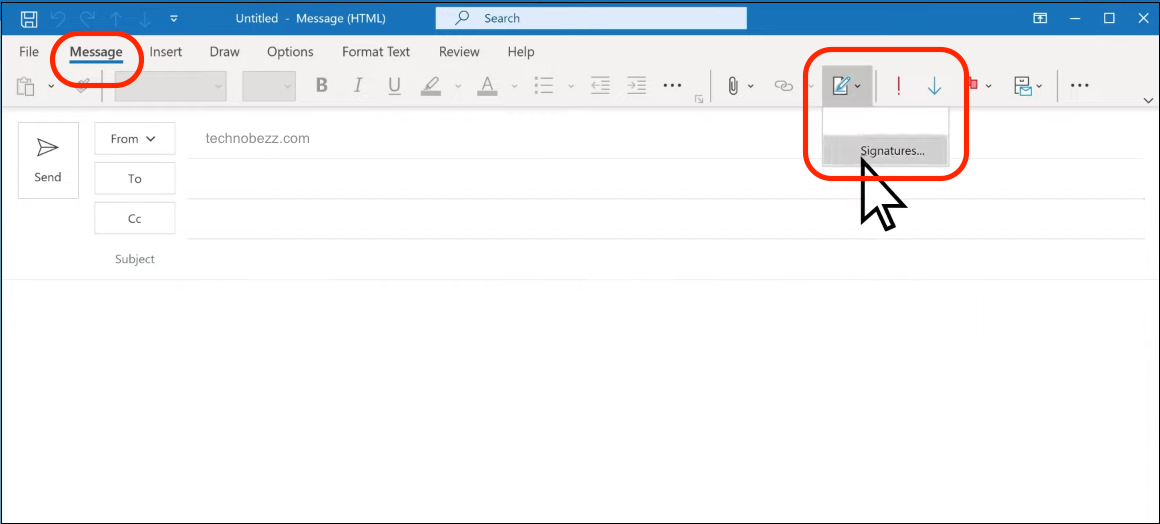
- Select the tool: Signatures. Then select Signatures from the dropdown menu. These can be found in the middle of your outlook window or on the right side of the window, depending on the size of Outlook displayed on your screen.
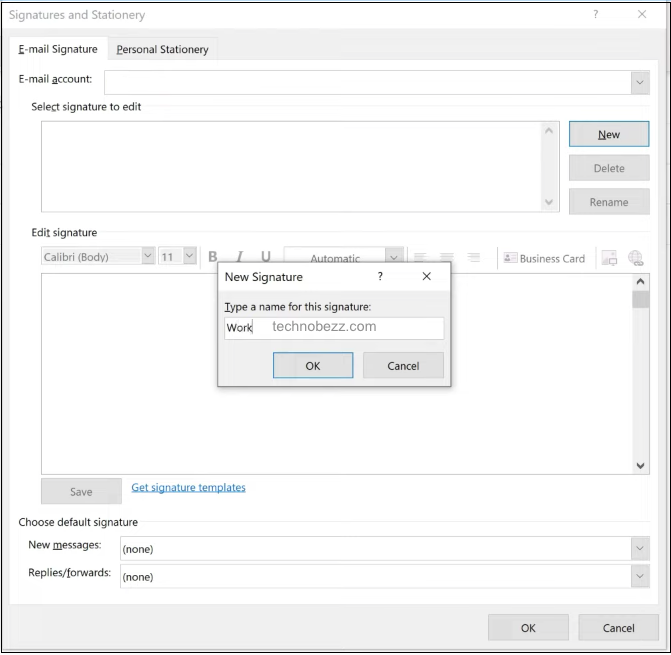
- There should be an option to Select signature to edit. Click on that, then choose New. This will allow you to start setting up your email signature. Choose a name for the signature to identify each signature you have created.
- In the dialog box, pick a name for the signature.
- Choose the option to edit the signature. This will allow you to insert your full email signature. You can customize the email signature to suit your needs using font colors, different fonts, and text arrangements.
- If you wish to add social media icons to the signature, you must first download the image files to your computer. This could be a picture of your actual signature. Try to save them as recognizable file names. Then, click on the image icon to locate your file and insert the image that you have downloaded. You can re-size the image to fit in your text alignment.
- There are default signature settings on the top left of the pop-up window that you are working on. You can fill out the information to match this signature to a singular email.
- If you want the email signature to appear in every email, change the settings under New messages and Replies/forwards.
- If you do not wish for it to be added automatically, ensure the options are left at (none).
- Click OK to save the changes that you have placed. Check if the email signature has been added to your current message.
- If you want to add the signature while writing the email, under the Signature option from step 4, you can insert the signature you created from the dropdown list.
To find the option to add signatures, you may go to the File option in the blue heading. Then, select the Mail tab. Scroll until you find the compose messages component. There, you will find the option to edit Signatures.
Method 2: Adding an email signature from Outlook.com
- Search for the website and log in using your username and password.
- There should be a cog icon representing the Settings. Click on that and then select View All Outlook Settings. Select the Compose and reply option.
- Scroll down and look for the email signature option. Choose that and start composing your new email signature.
- Save the email signature you have created using the Save button.
- To manually insert the signature, click on the three horizontal dots button and select Insert signature.
Also Read


Recent
1
Ottocast Car TV Mate Max Review – A Versatile In-Car Entertainment Adapter
2
iPhone Battery Dying In Minutes? 23 Real Fixes That Work
3
Ottocast Play2Video Pro Ups the Game in Affordable Car Entertainment
4
Ottocast OttoAibox P3 Powers a Smarter Driving Experience
5
How to Disable WebRTC in Your Browser Settings
Guides

Lenovo Debuts Solar-Charging Laptop That Turns 20 Minutes of Sunlight Into Hour of Video

Why Do Smartphones Get Slower Over Time?

Decoding Tech Jargon: The A to Z Cheat Sheet (Free Downloadable PDF)

How to Clear an App's Cache on Your Samsung Device

Why Are My iPhone Messages Green Instead of Blue?

Everything Google Knows About You (And How to Stop It)
