Windows 10 has many new features and the most of them are very useful and necessary. But, some of them can compromise your security. Consider the following scenario. Your friend has visited you and asked to use your Wi-Fi. Of course, you told him your Wi-Fi password. He will enter it in his laptop, which recently have upgraded to Windows 10. Then, he can always use your Wi-Fi. But, Wi-Fi Sense allows your friends contacts from Skype and Outlook to log into your Wi-Fi network, although you didn’t give them the password. In other words, completely unknown people to you can use your Wi-Fi without your permission. This guide will show you how to disable Wi-Fi sense in Windows 10.
You may also read: How To Manually Connect To A Wi-Fi Network In Windows 10
How To Disable Wi-Fi Sense In Windows 10
Wi-Fi Sense is offered to users to facilitate the sharing and connecting on Wi-Fi networks between trusted contacts such as family members and friends with whom you talk on Skype and Facebook. You can choose who can have access to the network, so all your chosen friends can use your Wi-Fi anytime, even if they don’t know the password. All they have to do is to enable the option “connect to networks shared by my contacts” in Windows 10 Wi-Fi settings.
It is up to you to choose between the benefits of Wi-Fi Sense and absolute security. If you are concerned about the second, it is recommended to turn off Wi-Fi Sense.
So, if you want to disable Wi-Fi Sense feature in Windows 10, just follow these instructions:
Click on “Start” button and open “Settings”.
Next, go to “Network & Internet” section.
Then click on “Wi-Fi”.
There you will see of the Wi-Fi networks. Scroll down the page and find “Manage Wi-Fi” option.
On the new window, you need to disable two options:
“Connect to suggested open hotspots” and “Connect to networks shared by my contacts”.
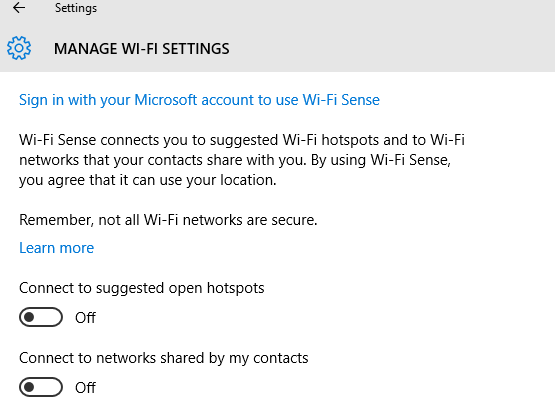
Image Source: www.vladtime.ru
You may also read: 8 Ways To Open The File Explorer In Windows 10
Also Read


Recent
Ottocast Car TV Mate Max Review – A Versatile In-Car Entertainment Adapter
iPhone Battery Dying In Minutes? 23 Real Fixes That Work
Ottocast Play2Video Pro Ups the Game in Affordable Car Entertainment
Ottocast OttoAibox P3 Powers a Smarter Driving Experience
How to Disable WebRTC in Your Browser Settings
Guides

Lenovo Debuts Solar-Charging Laptop That Turns 20 Minutes of Sunlight Into Hour of Video

Why Do Smartphones Get Slower Over Time?

Decoding Tech Jargon: The A to Z Cheat Sheet (Free Downloadable PDF)

How to Clear an App's Cache on Your Samsung Device

Why Are My iPhone Messages Green Instead of Blue?

Everything Google Knows About You (And How to Stop It)
