Gmail is the most popular email service. Every day, you receive tons of new emails. If you want to organize your incoming messages, you need to create a new folder in Gmail. Correct and fast work mostly depends on having Gmail folders. This is a very simple thing to do, and we are going to show you all the steps in the guide below: how to create folder in Gmail.
You may also read: How To Delete Gmail Account
How To Create Folder In Gmail
Initially, you already have two folders (shortcuts) that are created by Gmail. These folders are labeled as starred and important.
Important – there are the important emails that you’ve marked with the yellow icon similar to the yellow rectangle. In order to make the new inbox message important, click on the yellow sign next to the message.
Starred – there are the most important emails that you’ve marked with a yellow icon in the form of the star. To make the new email marked as starred, just put an asterisk next to the email.
To create a new folder (shortcut), follow these instructions:
Click on the gear icon at the top right.
Then click on “Settings” from the drop-down menu.
Click “Labels” tab, scroll down until you see “Create new label”.
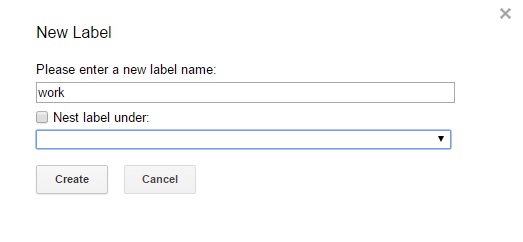
Open the link, and enter a name for the new label (“work”, for example) and click on “Create”.
Then, your label is created and you can see it if you click on the “Circles”.
By the way, you can hide these folders, such as important, circles, etc. so that your mail can look more pleasant. Then you will see only the necessary labels that you created.
To do this, go back to the same label and next to the unnecessary folders, just select “Hide”.
After you created the folder, you have to know how it works.
For example, if you want to receive the emails from a certain domain (“skrill@skrill.com”, for example) to a folder that you created, then you need to open “Settings”, and click on “Filter and Blocked Addresses”.
When you open the tab, click on “Create a new filter”.
In “From” field enter: “skrill@skrill.com” and press “Create filter with this search”.
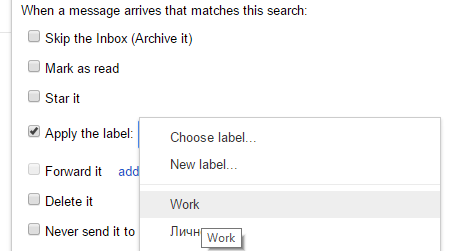
In the next window, choose “work” label, next to “Apply the label”.
At the end, just click on “Create filter” at the bottom of the window.
The mail from, in this example, skrill@skrill.com will be placed in the folder Work.
Image Source: www.wired.com
You may also read: How To Block Emails From Unwanted Senders In Gmail
Also Read

Recent
Ottocast Car TV Mate Max Review – A Versatile In-Car Entertainment Adapter
iPhone Battery Dying In Minutes? 23 Real Fixes That Work
Ottocast Play2Video Pro Ups the Game in Affordable Car Entertainment
Ottocast OttoAibox P3 Powers a Smarter Driving Experience
How to Disable WebRTC in Your Browser Settings
Guides

Why Do Smartphones Get Slower Over Time?

Decoding Tech Jargon: The A to Z Cheat Sheet (Free Downloadable PDF)

How to Clear an App's Cache on Your Samsung Device

Why Are My iPhone Messages Green Instead of Blue?

Everything Google Knows About You (And How to Stop It)

How To Delete Cookies On Your Android Device (And Why You Should)
