Nothing can be more annoying than unwarranted disruptions while you’re busy going about your normal computer activities. The Windows 10 action centre is, unfortunately, a very active notification hub, from bug issues and update notifications to performance updates and so on. While some of these notifications can be quite useful, they’re also very disturbing more often than not. Thankfully, they can be easily switched off. It is also important to distinguish 3rd-party notifications and regular Windows 10 app notifications so that you can switch off the correct ones that are actually bugging you. Here’s a simple guide to having a perfect uninterrupted experience on your device.
See also: How to change startup apps in Windows 10
Total Notifications Shutdown
This is one way to manage notifications on Windows 10. It will completely shut off all notifications and might therefore not be the perfect solution because some of the notifications can actually be helpful.
- Go to the Windows 10 settings which can be found in the start menu at the lower-left corner of the desktop interface. The settings can also be accessed by simply doing a quick search for ‘settings’ in the search bar on the home screen.
- Select the ‘notifications’ or ‘actions’ panel which will appear in a panel on the left side of the monitor.
- This will automatically launch the action centre main panel where notification preferences are configured.
- Click on the option for ‘system’ settings and from the resulting menu, click on the ‘notifications’ tab. This will be in the left side panel as well.
- The notifications in this particular category are mainly based on the quick actions that are available in the action centre. You can switch off the notifications across the whole category for an uninterrupted experience.
Customised Notifications
This is a better approach to eliminating interruptions in order to ensure that only the critical notifications or rather the preferred app notifications will pop up. It will reduce the traffic of notifications from the action centre yet make sure you get the important ones on time.
- Navigate to the settings just as before and go to the notifications tab under the ‘notifications and actions’ category.
- Scroll down until you see the heading ‘get notifications from these senders’. This is where you can conveniently customise each particular Windows 10 application category that wishes to send you notifications.
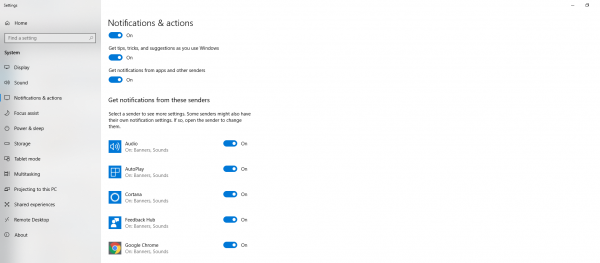
- Click on any category and this will reveal the options to show banners, lock screen behaviour and also sound settings.
- The categories can also be conveniently shut down totally as explained above.
Temporary Focus Assist Customisation
This feature is quite convenient for users who are only concerned about a particular period of uninterrupted usage, for instance, while attending a meeting. This will temporarily limit notifications for the selected time period and then revert back to the regular settings once it’s over. Basically, it’s a temporary ‘mute’ option.
- Launch the action centre with a simple execution of the windows key plus the A key. Alternatively, click the notifications icon which can be found on the right end of the taskbar.
- Select the moon-shaped icon which will appear in the action centre tab of quick actions (not all Windows 10 OS will have this option in the quick actions though)
- By default, this will make sure no interruptions are done from midnight up until six hours later.
- To change this, right-click on the icon and launch its particular settings where you can set the time periods for muted notifications.
- Notifications in the Focus Action customisation can also be limited for particular activities, for instance during a Skype chat or while playing games on the computer.
Once done, you should have a more enjoyable experience with minimum interruptions which you deliberately permitted. These customisations can simply be reversed at any time to reset the default settings which Windows 10 developers deem to be most appropriate.