
The "No Service" error message on your Android phone can be a frustrating experience, especially when you need a reliable network connection. This issue can arise due to problems with your MMS or APN settings, weak signal reception, network provider issues, or SIM card problems.
We have covered a series of articles surrounding this topic. Learn more with :
- Why does my Android phone say 'No Service'?
- What to do if your Android Phone is not receiving or sending texts?
- Is the mobile network available in your area?
- Is your Android phone properly registered on a network?
Why does my Android phone say no service?
Multiple reasons may cause the Android "no service" issue. Sometimes it appears due to radio signal, Airplane mode, poor reception or issues with your wireless carrier, SIM card issues, software bugs, etc.
Before we get started
Ensure:
- You have an active mobile data plan with your wireless carrier and your reception is good.
- The airplane mode is OFF. Navigate Settings > Connections > Airplane mode. Toggle the switch button.
Quick Tips
- Remove your SIM card and put it back in. If you have another phone around, place your SIM card on it and try to make a phone call.
- Toggle Mobile Data
- Restart your phone.
- Activate the correct SIM Card.
- Update your APN Settings
How to Fix the No Service error on Samsung Galaxy
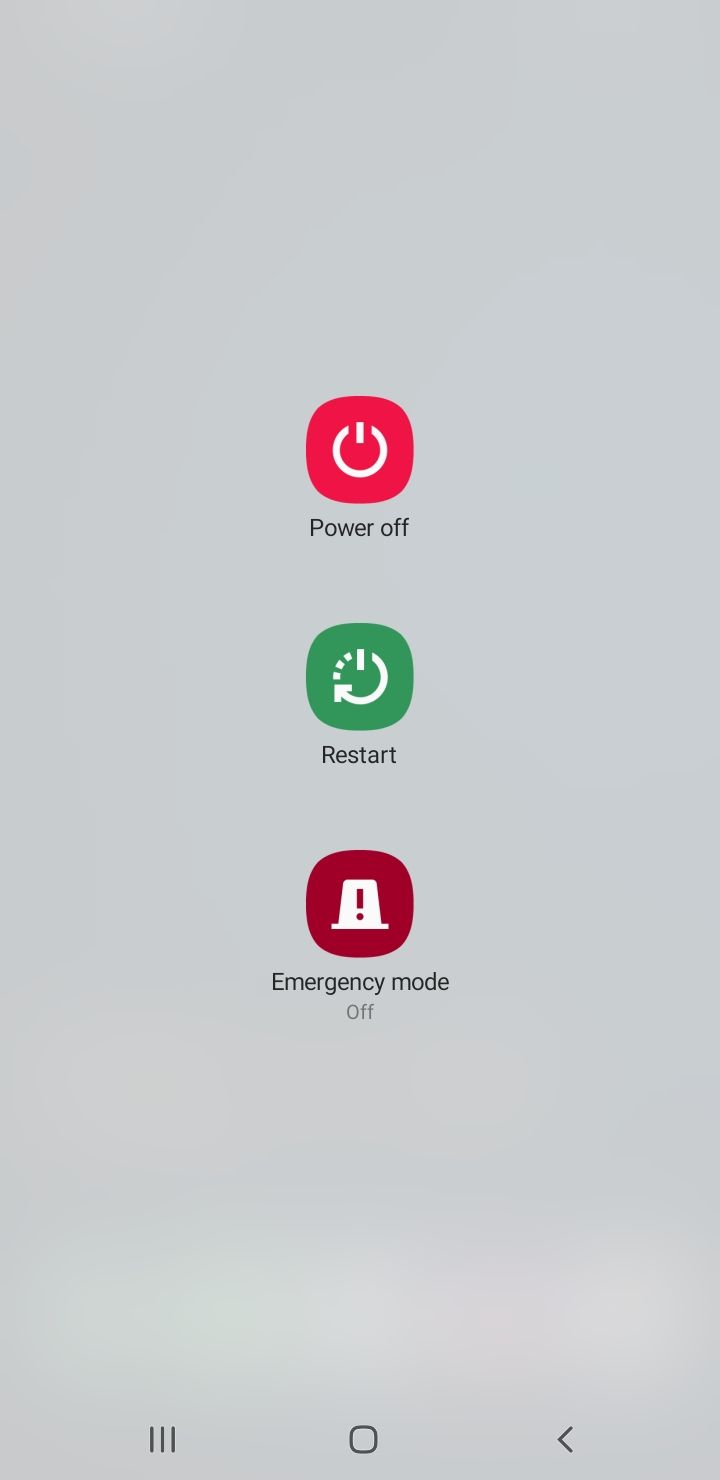
Method 1: Restart Your Phone
Start by restarting the device. This should be the first step if you face any issues on your Android device.
- Press and hold the Power button
- Once the menu opens, tap Restart.
Method 2: Toggle Airplane Mode
Pull down the notification area where you can quickly locate the flight or airplane modes. Please turn it off, then back on.

Method 3: Select Preferred Mobile Network
The "No Service" error can sometimes be fixed by manually selecting a preferred network. To do so:
- Navigate to Settings
- Tap Connection.
- Find Mobile networks and tap on it.
- Now tap on Network operators and it will start searching for all the available networks in that area.
- If you see your network provider, select it manually.
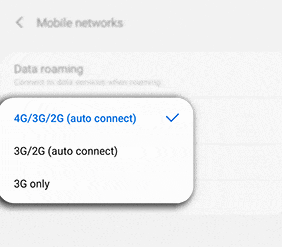
Method 4: Set Network Mode to Auto
Follow these steps:
- Go to Wireless & Networks Or Connections.
- Select Mobile Networks
- Select Network Mode
- You will get a pop-up menu with the different options you can choose from. Ensure that you select the first option that says 4G/3G/2G (auto connect).
Selecting this will ensure that your device is connected to the correct network.
See also - How To The "No Signal To Monitor" Error - Monitor Not Detecting PC
Method 5: Activate the Correct SIM Card
To enable your SIM card, Navigate to:
- Settings
- Tap Connection.
- SIM card manager > Tap one or both switches for the SIM or USIM cards to activate them.
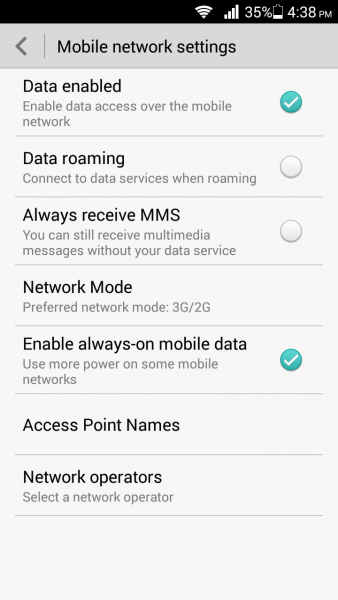
Method 6: Update Your APN Settings
Consider updating your APN Settings
- Navigate to Settings
- Tap Connections.
- Tap Mobile Networks
- Select Access Point Names
- Tap More (3 dots)
- Tap Reset to Default.
- Then enter the new APN Settings
Read this guide: Updated APN Settings For AT&T, Verizon, T-Mobile, Sprint ( +4 More)
Method 7: Re-Insert SIM Card
The SIM card can also be the culprit. Make sure that the SIM card is placed correctly. Use a tool to eject the SIM card safely. Make sure it's not damaged. If the card is damaged, contact the carrier for a replacement.
Method 8: Enter Service Mode
This method requires you to open the dialer first, after which the below steps are to be followed.
- Enter this code *#*#4636#*#* in the dialer
- Enter Service mode
- Click on the top option – Device information or Phone information.
- Next, tap on the Run Ping test.
- The radio option will be visible at the bottom of this screen.
- Check if it is off or on. Please press the button next to it to turn on the radio.
- You will be prompted to reboot the device.
- Click reboot and your phone will start rebooting. Once completed, check if the problem is gone.
See also - We have a collection of the full MMI and USSD Code lists for both iPhone and Android (Samsung Included)
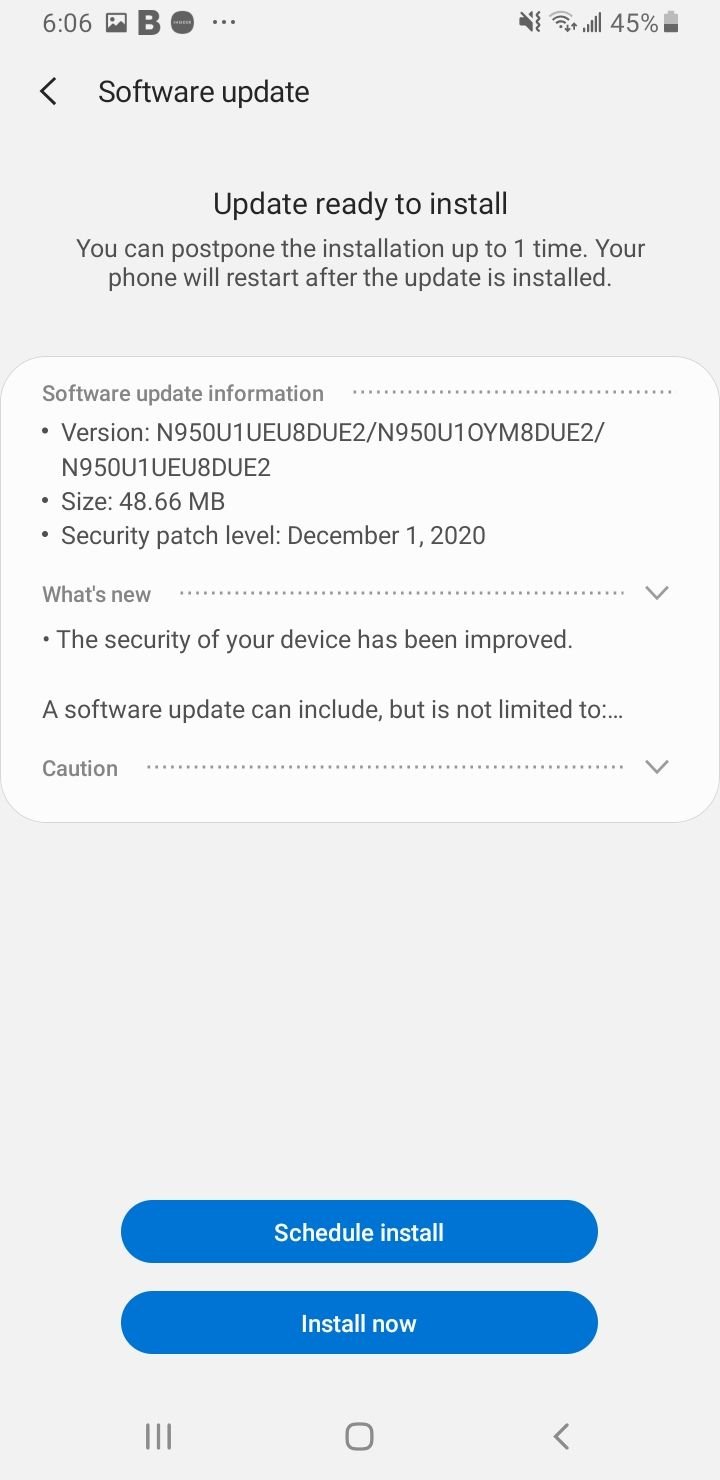
Solution 9: Software Update
Update the software version on your phone. Navigate to:
- Settings
- Scroll down to the extreme bottom
- Select Software Update
- Please wait for it to reboot and complete the update
Method 10: Custom ROM
Sometimes, you might get a "No Service" error on an Android device if you have installed a custom ROM. So what you need to do is get back to the original ROM. You can install it using the recovery mode.
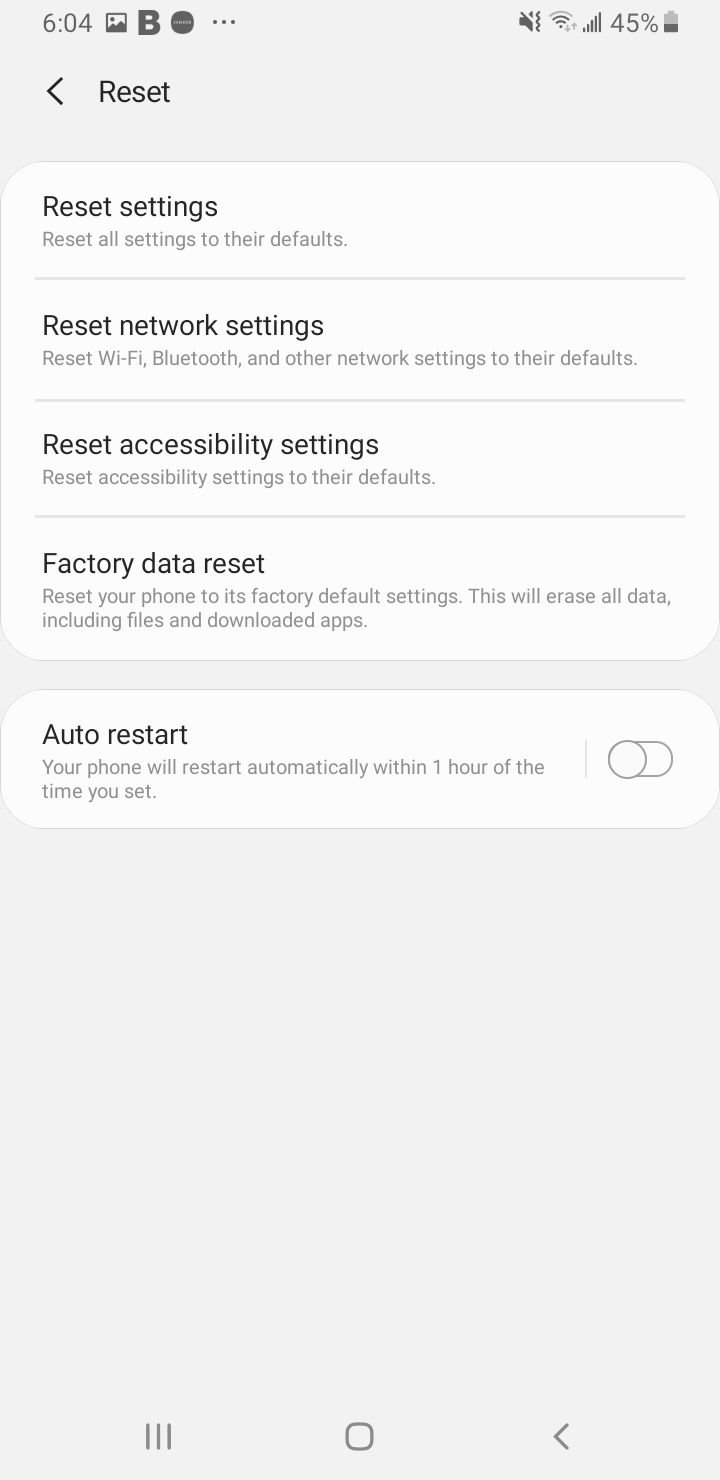
Method 11: Resetting the network settings
The next method to try is resetting the network settings. It's simple and very effective.
The only "trouble" is that you will have to make some adjustments repeatedly, such as connecting to Wi-Fi networks, adding passwords, pairing the phone with other Bluetooth devices, etc.
- Navigate to Settings
- Tap General Management.
- Tap Reset.
- Tap Reset Network Settings.
- Tap Reset Settings.
- Note: If prompted, enter your PIN, password, or pattern
- Tap Reset Settings one more time to confirm
Method 12: Call your carrier
Consider calling your wireless carrier. Ask them if there is an issue with the carrier network. Otherwise, ask them for a SIM card replacement.
- Ensure you have an active mobile data plan with your wireless carrier.
- Ensure you are in a good reception area
Method 13: Corrupt ESN
"No Service" error sometimes occurs because of a nulled or unknown IMEI number. It is essential to check if your IMEI number is null or corrupt and then restore it. Here's how to do that:
- Turn your device on and go to the dialer to enter the code (*#06#), which shows up the IMEI number of the device. If it shows 'Null,' the IMEI number is corrupt.
- Dial (*#197328640#) or (*#*#197328640#*#*) from the phone dialer. Users are required to select the option 'Common.'
- Next, select option #1, Field Test Mode (FTM). It should be OFF.' This process will restore the IMEI number.
- Return to the key input and select option 2, which will turn off FTM.
- Now, remove the SIM card from the device and wait for 2 minutes to re-insert the SIM card.
- Turn on the device and type (*#197328640#) again from the phone dial.
- Next, go to and select Debug screen > phone control > Nas control > RRC > RRC revision .
- Select Option 5
- Restart your phone.
You may also read: Restore Galaxy Null IMEI # and Fix Not Registered on Network
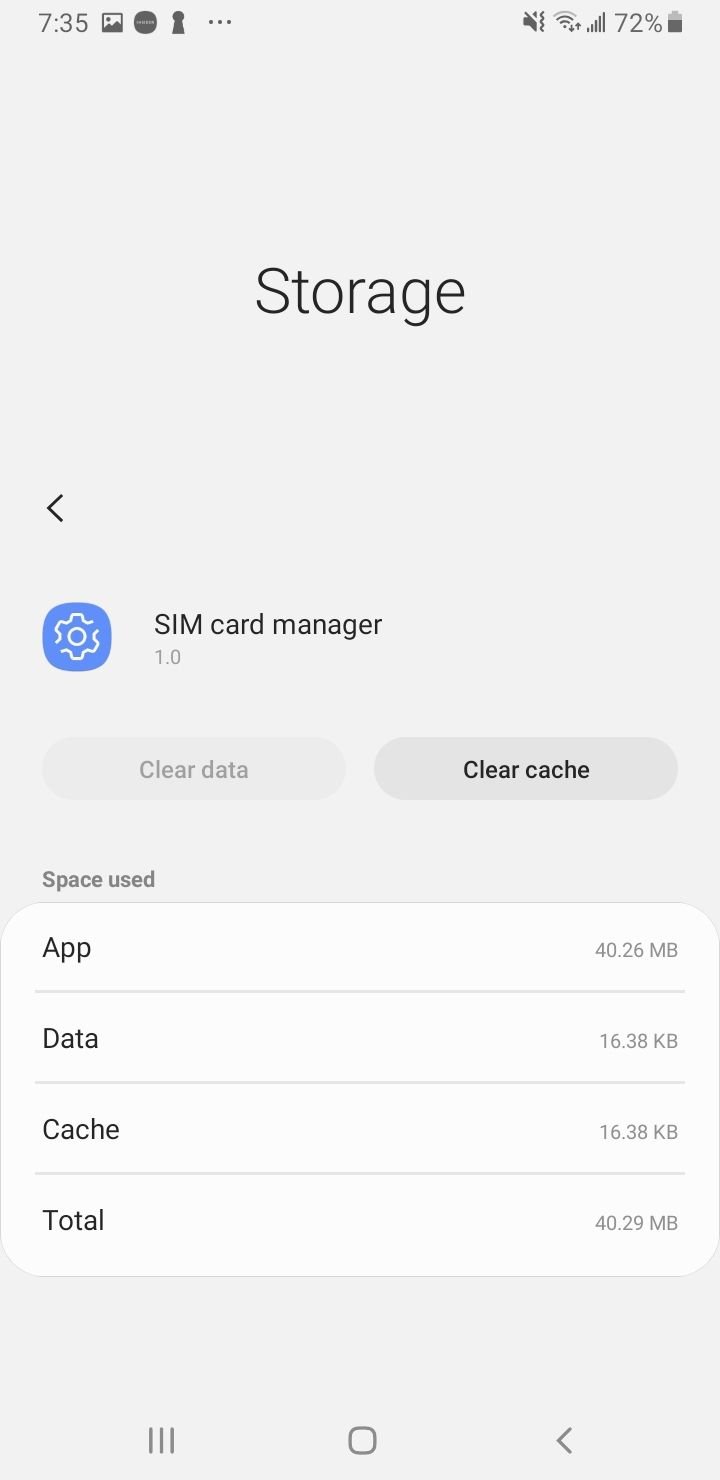
Bonus: Clear SIM Card Manager Cache
Clearing SIM Card manager :
- Navigate to Settings
- Tap Apps
- Tap the Menu Icon (3 dots)
- Tap Show System Apps
- Search for SIM Card manager
- Tap Storage > Clear Cache
Method 14: Factory Reset
The final option is to reset the phone to factory settings. Create a backup first. Once done, follow the steps below:
- Go to Settings
- Tap Reset.
- Select Factory Data Reset
